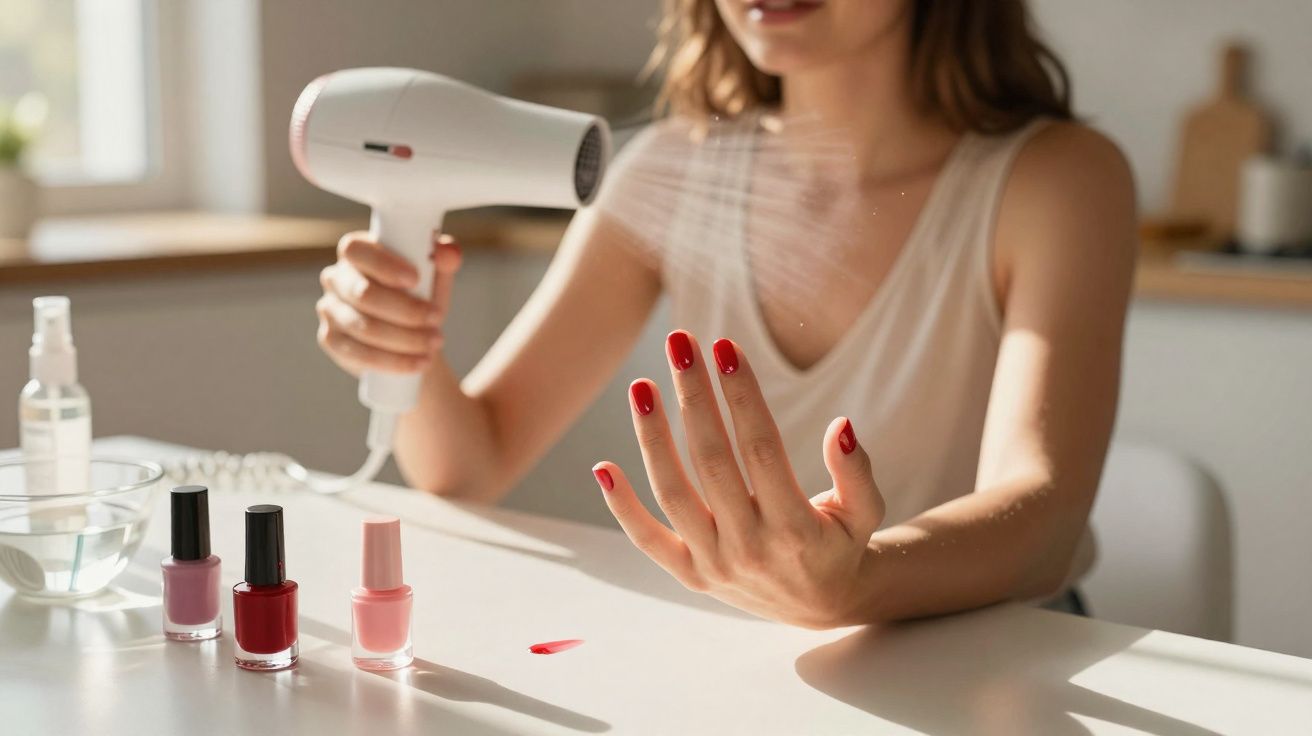
You’ve finally done your nails for a change. Two neat coats, a top coat because you vowed to “do it properly this time”, and now you’re frozen in that awkward T-Rex position with your fingers spread, trying not to touch a thing. The kettle starts up. Your phone lights up. The temptation to hurry the process along feels almost unbearable.
Your gaze drifts to the hairdryer. Sorted, surely? A burst of warm air, nails dry in seconds, and you can get on with the rest of your day. So you plug it in, aim it at your hands, and let that rush of heat wash over your freshly painted nails.
Ten minutes later, you catch one nail on your jeans and the colour shifts like softened butter. The surface looked dry, yet underneath it was still pliable, still unsettled. That is where the real problem begins.
Why warm air quietly ruins your manicure
At first glance, the hairdryer trick seems sensible. You use heat to dry your hair, so why not your nail varnish? The warmth feels pleasant on your hands, the shine appears to “set”, and for a few minutes you may even think you’ve cracked the code. You might lightly tap a nail and tell yourself, “That’s done.”
Then ordinary life gets in the way. You pick up your keys, tug on your coat, or send a quick text. Suddenly there are dents, odd streaks, and smears that look as though you dragged a fork through soft icing. You’re not being careless. The varnish simply wasn’t properly dry yet. It only looked that way.
What is actually happening is this: classic nail varnish does not merely dry in the simple sense. It hardens as solvents evaporate and the pigments and resins merge into a firm film. Hot air speeds up drying at the surface, so the top layer skins over quickly. Beneath that, the deeper layers remain warm and soft. When you press or knock the nail, that semi-liquid layer shifts and the whole manicure ripples. The heat you thought was helping is, in effect, trapping softness inside.
What hot air really does to nail varnish
Picture baking a cake at twice the proper temperature. The outside browns in minutes, looks finished, and may even smell ready. Cut into it too soon and the middle is still raw and sticky. That is what a manicure on a hairdryer can be like. The outer layer forms a skin, but the centre has not had the time to set. Every tiny touch becomes an opportunity for the varnish to slide, wrinkle, or bubble.
A nail technician in Paris once told me about a client who always arrived with smudged nails and insisted she had “cursed hands”. One day, the technician finally asked about her routine. Proudly, the client explained that she blasted her nails with hot air between coats “the same way they do in salons”. Except salons do not do that. They usually rely on controlled airflow, often cool, or specialist lamps for gels. Once she stopped using hot air at home, the mysterious smudges almost vanished.
There is also a chemical reason for it. Heat can thin the top layer just enough for it to sink into the nail’s tiny ridges, leaving an uneven finish. It can also create bubbles as the solvents try to escape too quickly, rather like air pockets in a shaken bottle of fizzy drink. Those bubbles weaken the film, so even when the nails finally feel dry, the polish chips more quickly. So it is not just smudging you end up with, but manicures that fail in half the time they should.
Another point worth noting is room temperature. A manicure dries best in a calm, moderate environment rather than in a hot bathroom or beside a radiator. Steam, warm air, and damp conditions all slow the process in different ways. If you want the smoothest result, choose a well-ventilated room and keep your hands away from heat sources until the varnish has properly settled.
Smarter ways to dry nail varnish without wrecking it
The good news is that you do not need expensive gadgets to get a cleaner, faster-drying manicure. What helps most is thinner application, cooler air, and a little planning. The most effective change is simple: apply very thin coats. One light pass, not a thick blob. Allow each layer to rest for a couple of minutes before adding the next. Thin coats dry far more evenly from the inside out, with much less chance of that hidden soft centre.
If you are impatient, choose cool air rather than hot. Most hairdryers have a cold-shot button or a cool setting. Keep the dryer well back so what you feel is a gentle breeze, not a blast. You are not trying to “cook” the varnish; you are simply encouraging fresh air to move around it so the solvents can leave the film. You can also dip freshly painted nails into a bowl of cold water after a minute or two to help the surface set more quickly. It will not magically harden a thick application, but it can reduce the damage from light knocks.
Quick-dry products can make a real difference as well. A good quick-dry top coat or fast-drying drops can protect the surface while the deeper layers continue to harden. If you paint your nails regularly, keeping these products nearby is often a better investment than relying on heat that works against the varnish.
Choosing patience now or fixes later
To be honest, hardly anyone waits the full 30 to 60 minutes brands suggest for complete hardness. There are clothes to sort, messages to answer, children to manage, and food to cook. A nail specialist I spoke to put it nicely:
“Heat feels comforting, but polish prefers patience. Cool, thin and still beats hot, thick and rushed every single time.”
There is also an emotional side to this that people rarely mention. A ruined manicure is seldom only about the nails. It is about rushing before work, trying to squeeze in a tiny self-care moment when you barely had time for one, and then watching the effort collapse into sticky fingerprints and chipped edges. We have all had that moment when you stare at your dented varnish and think, “Why did I bother?”
Giving up the hairdryer habit is a small act of resistance against that rush. You are choosing a method that respects the product, your hands, and your time. You are accepting that a few extra minutes now can save you the irritation of repainting half your nails tomorrow. That is not pointless; it is sensible. It means less mental clutter and fewer tiny annoyances in a day that probably already has enough of them.
You may also notice that the whole ritual changes. Once you stop blasting your nails with hot air and start treating drying time as a brief pause, those 15 quiet minutes become something else entirely: a podcast, a cup of tea, a slow breath on the sofa, rather than another task to optimise. Your varnish will last longer. Your smudges will shrink. And you may discover that the least high-tech routine is the one that leaves you feeling the most polished.
A simple routine for better results
If you want a smoother finish at home, keep this routine in mind:
- Apply thin coats and leave a couple of minutes between each layer.
- Use a quick-dry top coat made to speed up hardening.
- Pick cool air or a fan instead of hot air from a hairdryer.
- Avoid going to bed or putting on tight clothing straight after painting.
- Plan your manicure for a time when you can keep your hands fairly still for at least 20–30 minutes.
A small bit of preparation helps too. If your polish bottle has thickened, roll it gently between your palms rather than shaking it, which can create bubbles before you even start. And if you are doing your nails for a special occasion, paint them earlier in the day so you are not trying to finish just before you need to leave the house.
Nail varnish drying times: what matters most
| Key point | Detail | Value for the reader |
|---|---|---|
| Hot air keeps varnish soft | The surface dries quickly while the deeper layers stay warm and pliable | Explains why manicures smudge even when they appear dry |
| Cool, thin, still wins | Thin coats, cool airflow or a fan, and a quick-dry top coat | Provides a straightforward routine for faster, longer-lasting results |
| Plan your drying window | Leave 20–30 minutes with as little hand use as possible | Cuts down on frustration and the need to redo smudged nails |
FAQ
Can I use the cool setting on my hairdryer to dry nail varnish?
Yes. A cool or cold setting used from a distance is much safer than heat. You want gentle airflow, not warmth, so the solvents can evaporate without softening the layers underneath.How long does ordinary nail varnish really take to dry fully?
It may feel touch-dry in 10–20 minutes, but full hardness often takes 1–2 hours. Thin coats and quick-dry products can shorten that period, but proper curing still needs time.Are quick-dry drops or sprays better than a hairdryer?
Usually, yes. They are designed to help solvents evaporate and protect the surface. They will not rescue a very thick coat, but they will not bake the varnish soft the way hot air can.Why do salons use lamps if heat is bad for varnish?
Most lamps are for gel or semi-permanent formulas that cure with UV or LED light, not basic heat. Standard nail varnish is usually left to dry in the air or with gentle fans, not hot blowers.What is the fastest safe home manicure routine?
Lightly buff the nails, apply a base coat, then two very thin colour coats and a quick-dry top coat. Leave a couple of minutes between each layer, use cool air or a fan, and give yourself at least 20 minutes with minimal hand use.


Comments
No comments yet. Be the first to comment!
Leave a Comment