In the video, the woman stops mid‑clean, leans in towards the camera and drops her voice as if she’s about to reveal something classified: “You don’t need to rip out your grout.”
On screen, a bathroom floor shifts from grubby grey to a clean cream tone in a few deliberate passes. No power tools. No dust everywhere. No contractor invoice with an extra zero (or two).
If you’ve ever stared at the lines between your tiles and felt that familiar blend of embarrassment and surrender, you’ll recognise the moment. The rest of the room can look perfectly fine, yet the grout makes everything feel dated and faintly grimy. You give it a quick scrub, your back complains, and… it still looks the same.
Then a small online trick pops up, and suddenly ripping everything out starts to feel a bit theatrical. Maybe the grout isn’t finished at all. Maybe it’s simply masked by years of build‑up. And the thing that helps “wake it up” is probably already sitting in your cupboard under the sink.
The real reason your grout looks ruined (and why it usually isn’t)
Grout has an unfortunate talent: it exposes your everyday life.
Every spill, muddy shoe print and stray splash of shampoo that misses the drain ends up settling into those narrow channels between tiles. Your tiles keep their glossy, “I’m fine” look; the grout quietly drinks in the mess and shifts towards a tired grey‑brown, dragging the whole floor down with it.
On a bright morning, the light hits your bathroom or kitchen at just the wrong angle and there it is: a neat map of daily chaos drawn in soap scum and dust. You wipe the tiles and they gleam. The grout looks unchanged. That contrast is what convinces many people the problem is permanent - that it’s “beyond cleaning” and must be replaced.
In most homes, though, grout isn’t actually failing. It hasn’t vanished or lost all integrity; it’s simply saturated with grime that normal mopping never reaches. Mop water glides over the top. The dirt lives in the pores. That’s why so many homeowners jump straight to re‑grout or re‑tile as the only answer - even though the truly “ruined” stage often comes far later than it appears.
A UK cleaning brand once asked homeowners about their kitchens and bathrooms, and more than a third said dirty grout made their home feel “never truly clean”, even immediately after tidying. That reaction matters. You can polish the taps, fold the towels and light a posh candle - and still feel as if the room is letting you down.
One homeowner I spoke to had even arranged a quote to re‑tile her small bathroom. The tiles themselves were absolutely fine, but the grout had turned the colour of weak tea. The estimate came back at more than the price of a long weekend in Spain. She shut the email, grabbed a brush and a bottle of cleaner “just to check”, and within an hour she cancelled the job. The grout wasn’t broken; it was just wearing two decades of showers like a film.
There’s a social element too. People rarely apologise for a dusty shelf, but they’ll whisper about “mortifying grout”. Those thin lines can feel like a judgement on how you live. That’s why the idea of tearing it all out feels oddly satisfying: remove the grime, remove the guilt. The twist is that grout is supposed to take the hit. It fills gaps, absorbs splashes and protects the edges of your tiles. The real skill is knowing how to reset it without demolition bags or specialist bits.
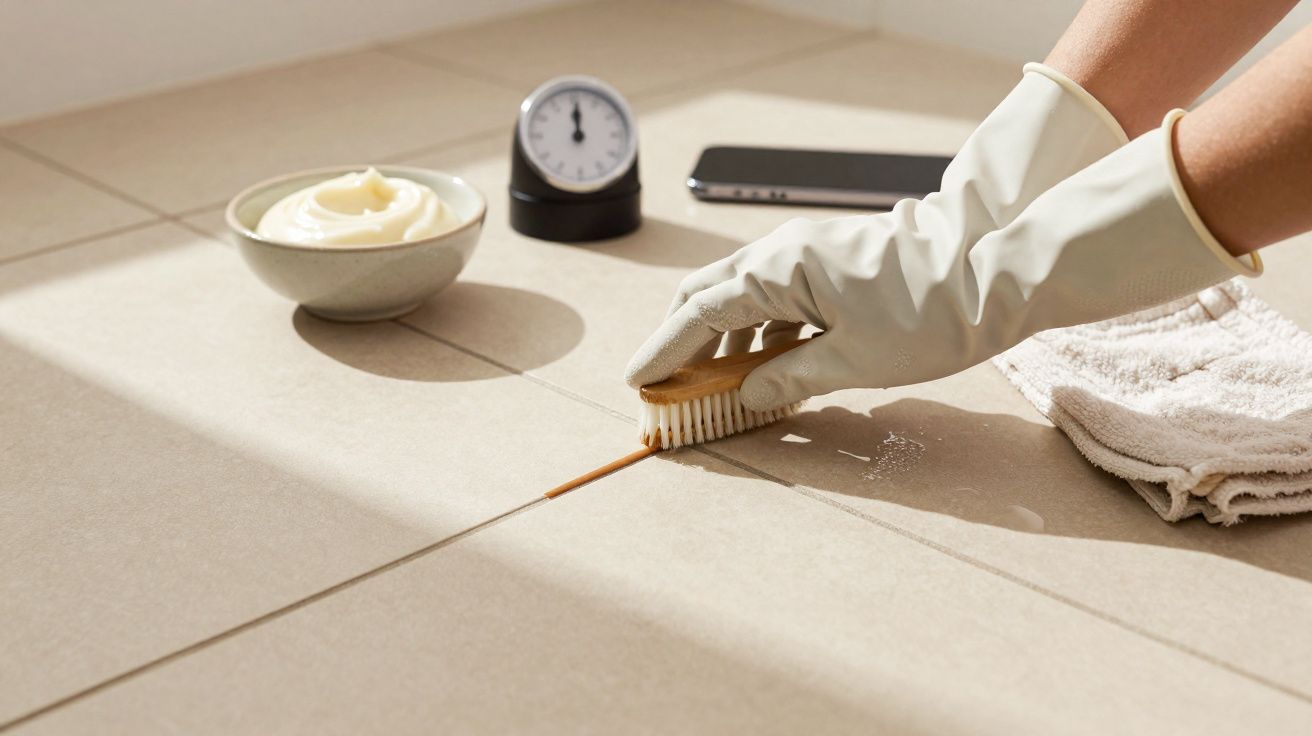
Tile grout cleaning: the quick trick with a paste, a brush and a 10‑minute test patch
The most surprising at‑home method is also one of the simplest: a basic paste, a small brush and a short dwell time.
No steam machine, no fancy gadget - just targeted cleaning exactly where the dirt is lodged.
Start with a small test patch, ideally somewhere less obvious than the area right by the door. In a small bowl, combine roughly two parts baking soda (bicarbonate of soda) with one part hydrogen peroxide, mixing until you’ve got a spreadable paste. If you don’t have peroxide, use warm water plus a drop of washing‑up liquid instead.
Work the paste directly into the grout lines using an old toothbrush or a narrow grout brush, pressing lightly so it gets into the pores rather than sitting on top.
Leave it for 5–10 minutes - long enough to soften the build‑up, not so long that it dries rock‑hard. Then scrub with short back‑and‑forth strokes. Wipe away the residue with a damp cloth, and rinse with clean water. Step back and look at the difference. Often, that tiny section appears dramatically lighter, as if someone has turned on a hidden light beneath the tiles.
This is where optimism tends to collide with reality. You’ll see the result and immediately think, “Right - I’m doing the whole room today.” Then life turns up: knees, time, children, work, washing, dinner. Make it manageable. Clean one small zone at a time - the strip beside the bath, the line in front of the sink, the section you notice first when you walk in.
Let’s be honest: nobody truly does this every day. Most people don’t even do it monthly, and that’s perfectly normal. The point of the trick isn’t perfection; it’s proof. Once you’ve cleaned 1 m² and watched “ruined” grout come back to life, the urge to rip everything out tends to evaporate.
The most common mistakes are: - using strong bleach on coloured grout - going at it with metal tools - forgetting to rinse properly, then wondering why everything looks chalky or streaky
Bleach can help on some white grout, but it may weaken it or turn it yellow over time - and it’s a gamble on coloured grout. Scraping with knife tips or screwdrivers can chip grout edges and create new entry points for water. Grout doesn’t respond well to aggression; it responds to patience and repetition.
“I was convinced our kitchen floor was permanently stained,” says Mark, a dad of two who tried the paste‑and‑brush trick on a Sunday afternoon. “I cleaned one line as a test, and my daughter walked in and asked if we’d bought new tiles. That’s when it clicked - I’d been blaming the grout instead of the dirt.”
To keep it practical, here’s a simple way to make it a habit without letting it take over your week: - Choose one “grout day” each month and only tackle the most visible lines. - Keep a small grout brush and bicarbonate of soda in a labelled tub under the sink. - Set a 15‑minute timer - when it goes off, stop, even if the room isn’t “finished”.
Two extra steps that help your grout stay cleaner for longer
Once the grout is clean and fully dry, consider applying a grout sealer (often sold in DIY shops in small bottles). Sealing doesn’t make grout stain‑proof, but it helps slow down how quickly spills and grime soak in, which means future cleaning is easier and less frequent.
Also, in bathrooms especially, ventilation matters. Running an extractor fan during and after showers (or cracking a window) reduces lingering moisture that encourages discolouration and mould. Cleaning is the reset; airflow is what helps you keep the reset.
When cleaning isn’t enough - and why that can still be good news
Sometimes you do everything properly - paste, scrubbing, even a steam cleaner - and the grout still refuses to brighten. It stays patchy, crumbles, or turns dark in odd patterns that won’t shift. That’s the grout telling a different story.
If powder comes away on your brush, or you can see hairline cracks that widen when you press, that’s not ordinary dirt - that’s wear. In spots that get drenched repeatedly (shower edges, around sinks, entryway floors), grout can eventually break down and leave tiny channels for moisture. Dirt is unpleasant; gaps are a risk. This is when “rip it all out” starts to sound less like drama and more like prevention.
Even then, the fix isn’t always full‑scale demolition. Often you can scrape out only the worst areas and re‑grout those lines. Many DIY shops sell small grout saws and tubs of ready‑mixed grout designed for exactly this kind of spot repair. It’s messier than cleaning, but much cheaper - and far less extreme - than re‑tile jobs. For plenty of households, the sweet spot is a combination of deep cleaning plus selective re‑grouting: better looks without blowing the budget.
You can also use grout pens or grout colour sealers once the surface is clean and completely dry. These products let you refresh the lines in white, grey, or a darker shade so future stains are less obvious. Some people dislike the idea on principle. Others admit it bought them another five years before a bathroom redo. That tension - “do it flawlessly” versus “make it livable” - runs through most home maintenance decisions. You don’t have to pick a side forever; choose what lets you walk barefoot across your tiles without that little surge of irritation.
One final thought: grout is meant to change over time. Like wood and fabric, it records how a room is used. Cleaning it well isn’t about pretending you never lived there - it’s about deciding which marks you’re happy to keep, and which ones you’re ready to rewrite.
That’s probably why before‑and‑after grout photos are so popular online. It isn’t only about a whiter floor; it’s a small, visible win in a life that rarely offers clear progress bars. Ten minutes, one paste, a bit of elbow grease - and a “builder problem” turns out to be almost embarrassingly fixable.
Once you’ve seen what a tiny test patch can do, you may never think of “ruined” grout in quite the same way again. You might still choose to re‑tile one day to change the mood of a room - but you’ll be doing it because you want to, not because you feel defeated. That’s a much nicer story to walk across each morning.
Key points at a glance
| Key point | Detail | Why it matters to you |
|---|---|---|
| The real issue with grout | It’s often dirty and saturated, not actually “dead” | Helps you avoid unnecessary, expensive work |
| Paste + brush method | Simple mix, small test area, short dwell time | Delivers visible results without professional equipment |
| Plan B if cleaning won’t do it | Targeted repair, partial re‑grouting, grout pen | Gives realistic options depending on the floor’s condition |
FAQ
Can I use bleach to clean my tile grout?
On some white grout, diluted bleach can lift stains, but it may weaken or yellow the grout over time and it’s risky on coloured grout. Try the bicarbonate of soda (baking soda) and hydrogen peroxide (or washing‑up liquid) paste on a small test patch first.How often should I deep‑clean my grout?
In most homes, a focused scrub every 1–3 months in high‑traffic areas is enough. Between deep cleans, regular mopping and quick wipe‑downs help stop new dirt sinking in.What kind of brush works best?
A firm nylon toothbrush, narrow grout brush or small scrubbing brush works well. Avoid metal bristles, which can scratch tiles and damage grout edges.When do I need to actually replace the grout?
If the grout is crumbling, missing in places or cracked right through, cleaning won’t fix it. That’s when to scrape out the damaged sections and re‑grout - or call a professional if the area is extensive.Will a grout pen really last, or is it just cosmetic?
Grout pens are mostly cosmetic, but colour sealers (and some pens) add a light protective layer. On well‑cleaned, intact grout, they can refresh the look for a couple of years, especially in lower‑traffic areas.


Comments
No comments yet. Be the first to comment!
Leave a Comment