Spring often triggers the urge to freshen up the house, and the paint roller comes out quickly. A bathroom, in particular, can look noticeably brighter and more contemporary after a coat of paint. The catch is that many DIYers only discover the real problem a year later: the wrong wall paint in a damp room can quite literally detach-showing up as bubbles, peeling and crumbling flakes.
From post-paint pride to a bathroom nightmare
The first few months: everything looks flawless
Straight after painting, it all seems fine. The finish looks smooth, coverage appears even, light bounces around better and the room can feel larger-especially in a bathroom, where the before-and-after effect is dramatic.
Often, though, people reach for a bargain tub from the DIY store: a standard emulsion (dispersion) paint designed for dry living spaces. At first, nothing seems wrong. The paint appears to hold up, showers and baths continue as normal, and there are no obvious warning signs.
The real damage starts out of sight-deep within the paint film, long before the first bubbles appear.
After several months, the consequences begin to show: small areas look slightly rippled, and tiny raised spots develop. Ignore those early hints and the unpleasant surprise tends to follow.
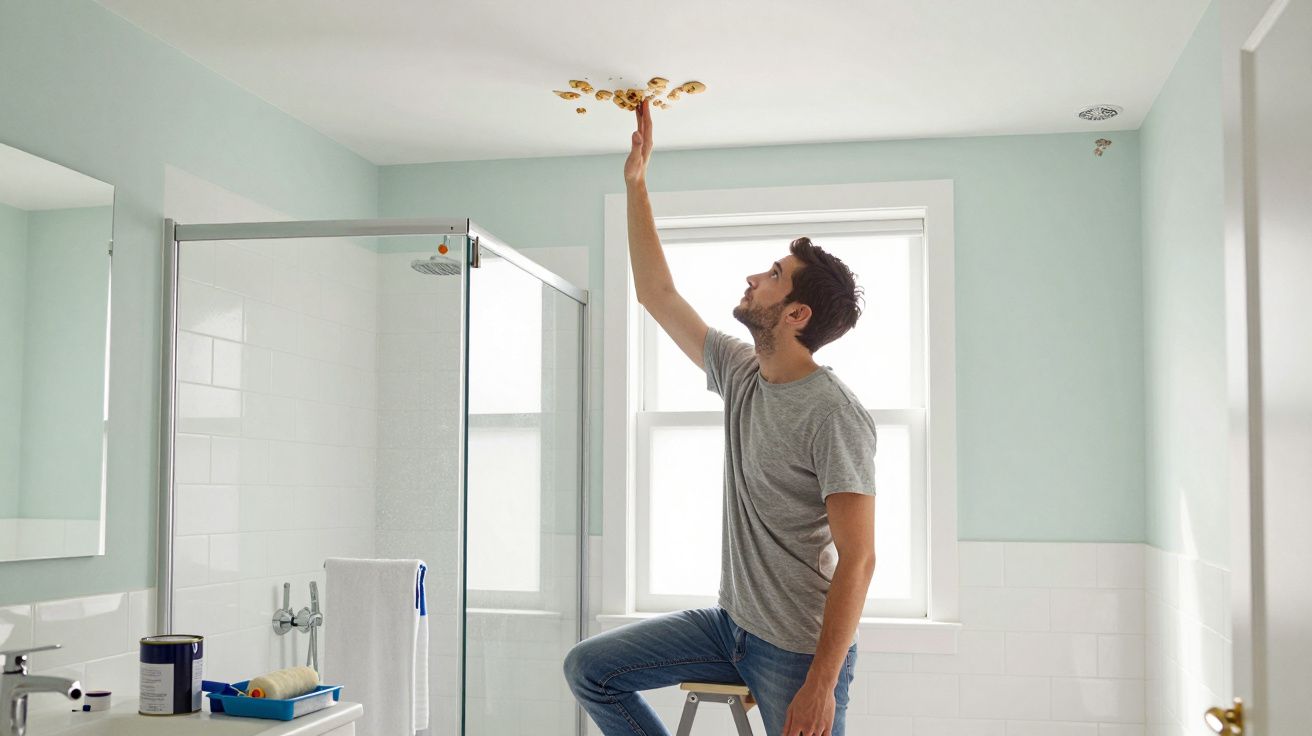
After 6–18 months: blisters, bulges and flaking patches
The most common failure window is roughly 6 to 18 months of typical use. Defects become clearly visible, such as:
- blistered bubbles on the ceiling
- bulges and small hollow spots on the wall opposite the shower
- flakes of paint dropping onto the floor
- patchy areas on walls and ceiling where the finish turns dull and uneven
Two zones are usually hit hardest: the bathroom ceiling and wall areas in the direct splash-and-steam zone around the shower. In these spots, humidity can regularly climb to 80% relative humidity or higher-well beyond what ordinary wall paint can withstand long-term.
Why paint really peels in a bathroom
Moisture works its way underneath the paint film
This is rarely about “bad technique” or the “wrong roller”. The deciding factor is the combination of moisture, heat and an unsuitable paint system.
Every shower generates dense water vapour that spreads through the entire room. That moisture-laden air forces its way into the smallest pores and weak points. Once it gets behind the paint layer, the chain reaction starts:
- Vapour condenses on colder surfaces such as ceilings and external walls.
- Moisture seeps into hairline cracks and unprotected edges.
- The paint film absorbs moisture from behind, swells and loses adhesion.
- Blisters form and can burst under pressure or further moisture exposure.
In the end, paint can detach in larger sheets, the substrate shows through, and the whole job starts to look like a temporary fix rather than a finished surface.
What NF EN 13300 has to do with your bathroom paint
Interior paints are classified by performance, and in damp rooms the critical factor is resistance to water and water vapour. This is where NF EN 13300 (often printed on the tin) becomes relevant, as it helps indicate how a coating stands up to washing and moisture-related stress.
In a bathroom, only use paint that is explicitly approved for damp rooms and has a strong resistance rating against water.
A common mistake is choosing by colour and price alone, then using standard wall paint instead of bathroom paint or damp room paint. Safer options include:
- Solvent-based bathroom paint / alkyd-type (glycol resin) coatings (often tougher, but with a stronger odour), or
- Specialist acrylic paint for damp rooms, clearly labelled as suitable for bathrooms.
What matters is the formulation: specialist binders help repel water vapour and reduce the chance of moisture migrating behind the paint film. That is what dramatically increases the lifespan of the finish.
How to protect your bathroom long-term from bubbling paint and mould
In a damp room, primer is rarely optional
Rolling paint straight onto an old surface is a false economy. On plasterboard, filled areas, or tired and weakened existing coatings, the right primer makes a major difference.
A damp-room primer or adhesion primer typically:
- seals and stabilises the surface so it doesn’t drink moisture like a sponge
- closes pores and microcracks that later become entry points for humidity
- improves coverage so the finish looks even
- increases adhesion so the coating is less likely to peel again
On ceilings and inside the shower’s steam zone, an additional moisture-resistant priming coat is time well spent. You won’t “see” that extra step later-but you’ll notice the finish stays calm and intact for years.
Treat existing mould before you repaint (added)
If you can see dark spotting or you regularly get black marks around corners and the ceiling line, deal with it before any primer or bathroom paint goes on. Clean the area using a suitable fungicidal wash (follow the manufacturer’s instructions), allow it to dry fully, and only then repair, prime and paint. Painting over contamination often leads to stains bleeding back through and encourages repeat growth, even with a better paint system.
Even the best bathroom paint needs proper ventilation
Paint systems can compensate for a lot, but they cannot overcome a bathroom that stays wet for hours. If the room turns into a dripping cave after every shower and rarely dries out, the environment will eventually overwhelm the coating.
A practical solution is extraction that moves enough air consistently. A useful rule of thumb is around 30 m³/hour extracted from a typical bathroom. In day-to-day terms, this means steam clears quickly instead of soaking into the ceiling and walls.
If the mirror clears again within a few minutes after showering, humidity control is usually heading in the right direction.
A working extractor fan, sufficient air inlets (so replacement air can enter) and regular purge ventilation help keep moisture below a critical level of roughly 65% relative humidity. Below that point, paint films and plaster generally last far longer.
Two coats, crossed over-and patience with drying
Applying paint feels straightforward, yet many failures come down to one detail: drying and curing time. Bathroom paint needs time to harden properly.
A proven approach:
- apply the first coat evenly, without overworking the paint
- allow at least 24 hours to dry fully (avoid using the bathroom if possible)
- apply the second coat at 90 degrees to the first (cross-rolling)
- let it dry for another full day before taking hot showers
Cross-rolling helps tighten the surface, covers minor missed spots and creates a tougher barrier against vapour and condensation.
Finish choice and day-to-day care (added)
For bathrooms, a slightly more durable sheen-often satin or eggshell-tends to cope better with wiping and occasional splashes than a flat matt finish. Whatever sheen you choose, keep the coating performing by wiping down persistent condensation, using a squeegee on shower screens, and letting the room dry out after use. Small habits reduce how long moisture sits on painted surfaces.
What to check before your next bathroom project
Spot problems early rather than repainting everything later
If you can already see bubbles, cracks, or chalky dull areas, investigate sooner rather than later. Typical warning signs include:
- blisters that feel soft when pressed
- areas that sound slightly hollow when tapped
- dark shadows or stains even without obvious direct water contact
- mirrors and windows that fog heavily despite a short shower
The earlier you act, the less you’ll need to sand back or rebuild. In many cases, it’s enough to remove damaged sections cleanly, fill, prime, and then repaint with proper bathroom paint.
Practical planning tips for your next renovation
If you’re renovating in spring or summer, a few simple checks can prevent months of frustration:
- Ask specifically for “bathroom paint” or “damp room paint”-don’t choose solely by colour.
- Check the performance details for water resistance and scrub resistance, not just “high coverage”.
- Inspect the extractor fan: does it work, does it run on long enough, and is the duct route clear?
- While painting, keep a window on the latch (or create airflow safely) so moisture can escape.
- Avoid showering between coats so curing isn’t disrupted by steam.
Approached this way, you avoid the demoralising experience of returning a year later with filler, sandpaper and a roller. The combination of the right bathroom paint, correct primer, careful preparation and consistent ventilation turns a quick cosmetic update into a finish that holds up for years-without bubbles, cracks or peeling.


Comments
No comments yet. Be the first to comment!
Leave a Comment