Every year it’s the same routine: tulips shoot up, unfurl their spectacular cups for a few brief days - and after the first thunderstorm they’re already shredded across the border. In 2024, you can feel the mood shifting in many gardens. More and more plant lovers are swapping to a different bulb-like treasure that flowers for longer, looks fuller, and feels unmistakably more romantic: the ranunculus - specifically the Persian buttercup (Ranunculus asiaticus).
Why so many gardeners are ditching tulips
Tulips still signal spring as surely as Easter eggs and the first barbecue of the year. The problem is how fleeting their display can be. Often they look their best for only one to two weeks, and then a burst of heat or a spell of heavy rain hits - and the bed suddenly feels bare.
There’s a second frustration, too: plenty of tulip varieties bloom reliably only in the first few years. After that, flowers may come smaller, or the bulbs seem to vanish altogether. If you want a lush tulip bed, you often end up buying replacements year after year - and it adds up quickly.
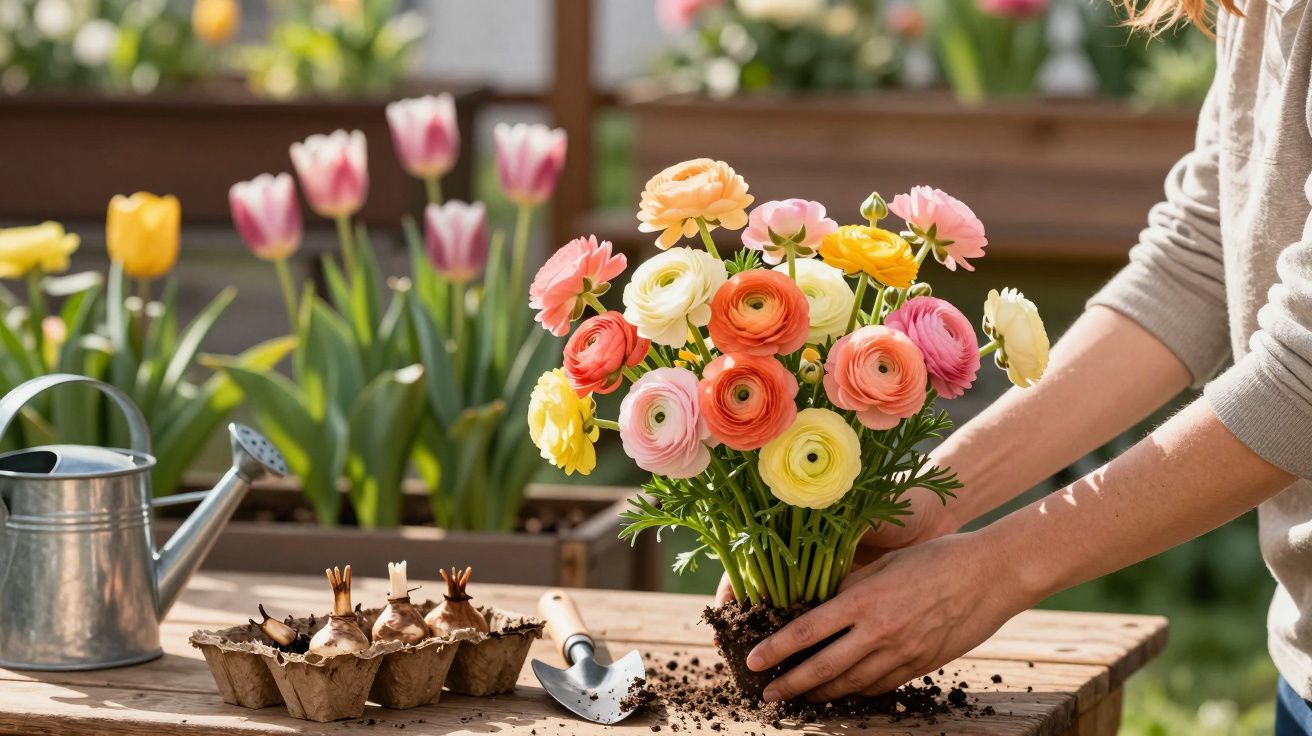
The Persian buttercup (Ranunculus asiaticus) offers a way out: a longer flowering season, densely packed blooms, and the freedom to grow it in borders, pots, or even on a balcony.
Its showy, fully double flowers look like miniature peonies. Planted in groups, they create a thick carpet of pom‑pom blooms that holds on far longer than a classic tulip bed - especially from late May into June.
What makes the Persian buttercup (Ranunculus asiaticus) so special
Ranunculus asiaticus can look like a peony, a rose and a dahlia all rolled into a compact form. The blooms are richly layered, neatly rounded, and carried on sturdy stems that are ideal for cutting.
Colours to suit every style of garden
The range of shades is huge:
- soft creamy white for romantic cottage borders
- pastel apricot, blush pink and salmon for a modern, natural look
- vivid yellow, orange and red for balcony planters with a real “wow” factor
- bicoloured varieties that can look almost like artificial flowers in a vase
With that spread, they fit almost anywhere - from a country garden to the narrowest city balcony. If you like, plant several tones in close drifts to create what florists might call a “luxury bouquet in the border”.
More eco-friendly gardening without a chemical cocktail
These plants cope brilliantly with good compost as their main feed. Pricey specialist fertilisers aren’t necessary. A loose, humus-rich soil is enough, ideally topped with a layer of mature compost that you lightly work in.
Many environmentally minded gardeners warm to ranunculus because it sits neatly within a more sustainable approach: fewer “throwaway” bulbs, less reliance on synthetic feeds, and more lasting structure in beds and pots. In terraced house gardens and on big-city balconies alike, that’s a persuasive reason to make the switch.
How to plant ranunculus from March to mid‑April
In shops they’re usually sold as “claws” - knobbly, spider-like tubers. That odd shape puts off many beginners. The reassuring news is that planting is straightforward if you follow a few simple steps.
Step-by-step planting guide
- Soak the claws in lukewarm water for 10–12 hours.
- Prepare a section of border or a pot with loose, free-draining soil.
- Make planting holes about 5 cm deep.
- Place the claws in with the “little feet” facing down, then cover with soil.
- Space them at around 15 cm in the ground; in pots, closer to 10 cm is fine.
- Water in so the soil settles snugly around the claws.
In a north-west European climate, the usual planting window runs from March to roughly mid‑April, once the soil is no longer icy cold but still holds decent moisture. In very mild areas you can also plant in autumn - as long as drainage is excellent and the tubers won’t sit for weeks in cold, wet clay.
Waterlogging is the ranunculus’s biggest enemy - it’s better to plant on the dry side than keep them too wet, especially in containers.
The best position in a border or on a balcony
Ranunculus likes bright light but not scorching midday sun. A sunny spot with a touch of shade at the hottest part of the day works well. In very exposed, sun-baked locations, it helps to tuck them among taller perennials that cast light shade around noon.
Choosing the right compost and getting drainage right
In borders, improve heavy soil by mixing in sand or fine grit. Even one bucket of coarse sand per square metre can noticeably increase drainage.
For pots, a reliable mix is:
- 2 parts high-quality multi-purpose compost
- 1 part coarse sand or crushed expanded clay
- a little mature compost as a slow, gentle nutrient source
At the bottom of the pot, add a drainage layer of gravel or expanded clay pellets. This stops water pooling at the base and prevents the claws from rotting.
Care: keeping the flower “pom‑poms” looking perfect for longer
While they’re growing, ranunculus needs consistent but moderate moisture. Let the surface dry slightly between waterings, while the compost beneath stays fresh rather than dusty.
A light mulch of shredded prunings or dried grass clippings helps hold moisture and supports soil life. On windy balconies, this can make watering far less of a daily chore.
Ranunculus as a cut flower – luxury from your own garden
One major advantage: the blooms last impressively well in a vase. If you cut when the outer petals have just started to open, you can usually expect around a week of vase life - sometimes longer.
Cutting also encourages further growth. Each bloom you remove signals the plant to push on with more buds. That means even a small patch can keep supplying fresh flowers for your home for several weeks.
What happens after flowering
Once flowering finishes, the leaves gradually turn yellow and die back - a natural process as the plant moves its reserves back into the claw. In mild areas with free-draining soil, many gardeners simply leave the tubers in the ground to sit through the cooler months and reappear the following year.
In colder places with wet winters, a different approach is safer: once the foliage has fully died back, lift the claws carefully, clean them, and store them somewhere dry and airy. The next March, you can plant them again in borders or containers.
Pairing ranunculus cleverly: ideas for borders and pots
If you don’t want to banish tulips completely, you can stagger the two for a longer season. Tulips provide the early colour burst in April, then ranunculus takes over seamlessly through to June - keeping beds looking lively for much longer.
Lovely spring combinations include:
- ranunculus above a low blue carpet of forget-me-nots
- ranunculus with violas in a pot for small balconies
- ranunculus woven between early perennials such as hardy geraniums or lady’s mantle
- white ranunculus against dark-leaved heucheras
Monochrome planting can look especially elegant - for example, a border limited to cream, apricot and blush pink. The tightly packed petals create a soft, cloud-like effect that wouldn’t look out of place in wedding flowers.
What beginners should know
Two details often catch first-time growers out. First: ranunculus shoots dislike hard frost. Late cold snaps can damage new growth once it’s visible. In frost-prone spots, a simple fleece cover for a few nights can make all the difference.
Second: the claws look dead at first glance - dry, hard and brown. That’s normal. The pre-soak before planting is the starting gun: it rehydrates the storage organs and wakes the buds. Skip that step and you may end up with frustrating gaps.
When space is limited, large pots or balcony troughs are often the best option. Three to five strong claws in a 30 cm pot are enough to produce a striking mound of blooms. If you also cut regularly, you’ll have fresh flowers indoors from late spring into early summer - and you’ll quickly see why so many gardeners have scaled back their tulips and given ranunculus the starring role in the spring garden.
Two extra tips for stronger plants and fewer problems
When buying claws, size matters: plump, firm tubers typically perform better than tiny, shrivelled ones. If you want a more controlled start, you can also pre-sprout them after soaking by placing them in barely damp compost somewhere cool and bright for a week or two, then planting out once growth is underway.
Pests and diseases are usually manageable without harsh treatments. Watch for aphids on young shoots and remove them by hand or with a gentle soap spray; good spacing and free airflow helps prevent powdery mildew. Above all, avoid soggy soil - most setbacks with Ranunculus asiaticus trace back to overwatering rather than underfeeding.


Comments
No comments yet. Be the first to comment!
Leave a Comment