Many people instinctively reach for a pan of boiling water and hope for a quick fix. It looks dramatic at first, but a few weeks later the green film is back. A seasoned gardener showed me a different approach that’s surprisingly gentle: no heat, no harsh chemicals and no hours of scrubbing - and it keeps patio slabs looking cleaner for noticeably longer.
Why boiling water is the wrong long-term answer for moss on patio slabs
Pouring boiling water over moss feels effective: it hisses, steams and the green seems to vanish in moments. The problem is that the “result” is often only skin-deep. The tiny textures where spores and residue lodge - pores, pits and especially the joints - are rarely dealt with properly.
Moss thrives when the same conditions keep returning:
- constantly damp joints and edges
- shaded spots with little air movement
- rough or porous paving that holds on to moisture
That’s why the growth comes back quickly, even if the surface looks spotless straight after treatment. If you only tackle what you can see, you end up cleaning the same areas again and again.
There’s also a second issue: boiling water doesn’t distinguish between moss, paving and jointing. On older patios, or slabs that are already a bit weathered, repeated heat can do real harm - jointing can loosen, natural stone can discolour and concrete flags may develop fine cracks. Over time the surface can become more uneven and, in the worst cases, more slippery.
After years of heat treatments, many patios don’t look “well cared for” - they look worn out, both visually and structurally.
If you try to “power clean” every spring, you can unintentionally make the surface more vulnerable, which makes it easier for moss to take hold again.
The gardener’s trick for a cleaner patio: bicarbonate of soda on damp slabs
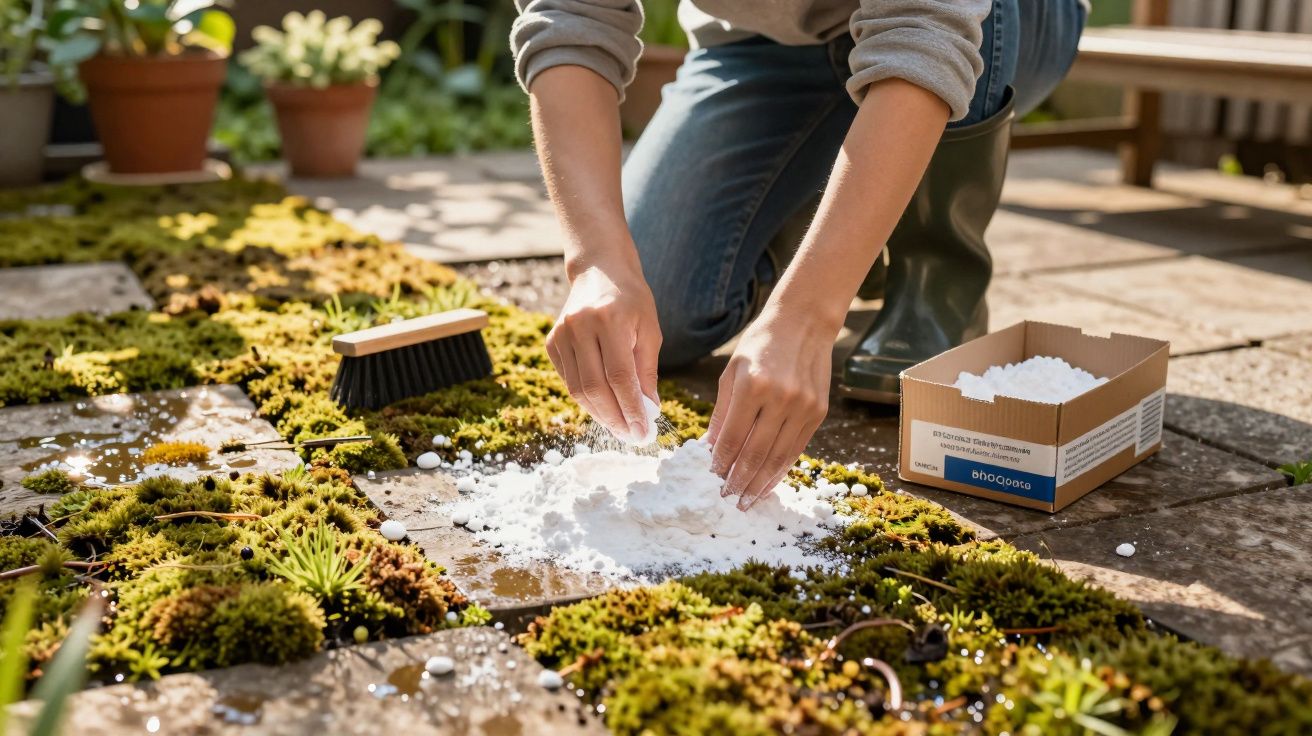
The gardener who taught me this method works in the opposite way: no boiling water, no pressure-washer frenzy, no aggressive cleaners. Instead, he uses a simple pairing - slightly damp paving and everyday bicarbonate of soda.
How it works
The key is moisture first. That can come from rainfall, morning dew, or a quick pass with a garden sprayer. The slabs shouldn’t be soaked or sitting in puddles - they just need to be visibly damp.
He then sprinkles bicarbonate of soda onto the damp surface - not across the whole patio, but specifically where moss and green staining are already visible or usually start: joints, edges, shaded corners and damp patches.
Damp slab plus bicarbonate of soda: the powder clings exactly where the moss is - and stays in contact for hours.
This isn’t a minutes-long reaction. Over roughly 48 hours, the moss loses its grip, dries out, dulls in colour and becomes easy to remove with a brush.
Step by step: removing moss without heat or harsh chemicals
- Check the area: Sweep away leaves, soil and loose debris with a stiff broom (or use a leaf blower).
- Dampen the paving: Lightly wet the slabs until they look evenly darkened, without leaving standing water.
- Apply bicarbonate of soda: Sprinkle it onto moss patches, joints, borders and shaded areas.
- Wait 48 hours: Leave the patio alone as much as possible - don’t scrub and don’t rinse hard.
- Brush off the loosened growth: Use a stiff brush or deck scrubber to lift the dried residue.
- Rinse gently: Finish with a watering can or a soft hose spray to clear away remaining particles.
The hands-on time is minimal. The “work” is done by the waiting, not by brute force.
Use the right amount: targeted treatment, not a white coating everywhere
The most common beginner mistake is dusting the entire terrace until it looks frosted. You don’t need to. The point is to treat the locations where moss is established or most likely to settle next.
These areas are usually the first to turn green:
- narrow joints where water lingers
- slab edges alongside borders, hedges or lawns
- shaded zones near walls or the back of the house
- porous natural stone with a rough texture
If your paving is very pale or delicate, test a small, discreet section first. You’ll quickly see whether brushing leaves the finish you want, without unwanted marks.
The method stays gentle when it’s used precisely: dose carefully rather than overdoing it across the whole patio.
Weather and timing: when the method works best
Choose a dry spell where heavy rain isn’t forecast for a day or two. A light shower usually won’t ruin the process, but a proper downpour can wash the bicarbonate of soda away before it has time to work.
Ideal conditions include:
- light cloud or mild sunshine
- temperatures above freezing (spring-like weather is perfect)
- no persistent rain for the next 48 hours
If you’re unsure, start with a small test patch. It removes the pressure of treating the whole patio at once and shows how your particular paving reacts.
Common mistakes that sabotage the results
A few predictable slip-ups can make the method seem disappointing:
- “More must be better”: thick layers don’t improve performance - they just waste product.
- Scrubbing too soon: brushing after a few hours stops the process before it’s done.
- Using a harsh water jet: blasting with a pressure washer straight afterwards can strip joints and roughen stone, making future moss growth more likely.
Success here is about patience, not strength. If you genuinely give it the full 48 hours, the brushing stage is usually quick and easy.
Slowing the return of moss on your patio
Once the patio is clean, the part people often forget begins: changing the conditions so the green doesn’t immediately come back. Moss never disappears entirely from a garden, but you can make the patio a less welcoming place for it.
Practical levers include:
- Reduce shade: prune overhanging branches and thin low growth to increase light and airflow.
- Move water away: check for puddling; clear drainage routes and, if needed, correct minor low spots so water doesn’t sit.
- Look after the joints: repair loose jointing so water and soil can’t collect and feed new growth.
- Act early: treat the first faint green haze or small cushions of moss rather than waiting for a big seasonal clean.
If you remove moss but leave its favourite habitat untouched, you’re effectively inviting it back.
An extra UK-specific tip: once joints are clean and dry, consider topping them up with an appropriate jointing material (for many patios this may be kiln-dried sand or a polymeric jointing compound, depending on your paving). Well-filled joints reduce moisture retention and make it harder for spores to settle.
Why bicarbonate of soda works (and why it’s kinder to paving)
Bicarbonate of soda changes the surface conditions locally. Many mosses and algae don’t cope well with that shift and, combined with natural drying periods, they lose their grip. At the same time, the crystals are typically far less aggressive on stone than specialist acidic cleaners or other harsh treatments.
Even so, every patio behaves differently: old clay pavers won’t respond exactly like dense concrete slabs or polished granite. That’s why a small trial on a few flags is especially worthwhile on sensitive surfaces - it helps you find the right amount for your material.
Once you’ve seen how, after two calm days, the growth lifts away with just a few strokes of a brush, the boiling-water routine starts to feel unnecessary. It’s not a flashy method, but it suits a garden routine where you don’t want to restart the battle every season - you want paving that stays presentable year after year.


Comments
No comments yet. Be the first to comment!
Leave a Comment