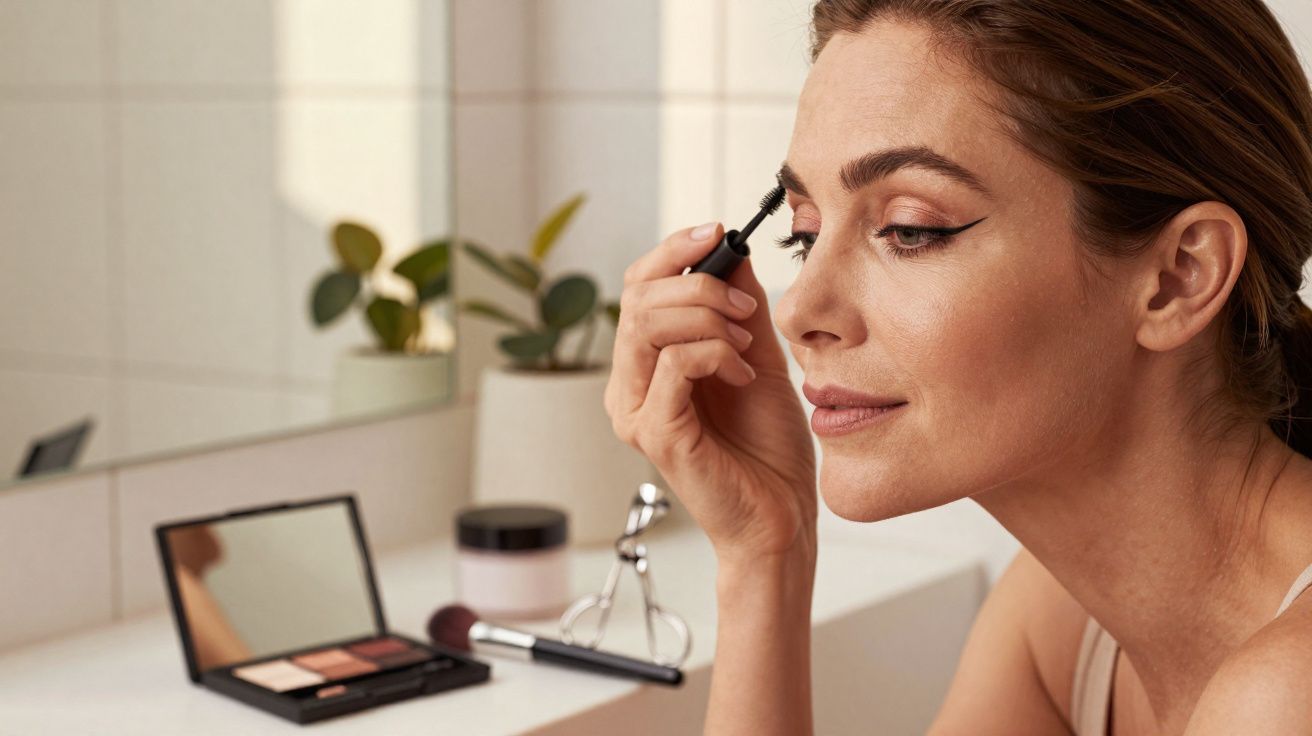
Droopy lids can feel unsettling at first, particularly when your go-to eyeliner or mascara suddenly smears, creases or simply looks “wrong”. With a handful of specific adjustments, however, droopy lids can appear brighter, more lifted and noticeably less tired-without immediately turning to surgery or heavy filters.
Why eyelids start to droop after 50
From about midlife onwards, the skin on the upper eyelid typically becomes finer and less resilient. Collagen and elastin naturally decline, and the small fat pads around the eye can shift slightly downwards.
The familiar outcome is that the fixed lid starts to spill over the mobile lid, sometimes covering it almost entirely.
With droopy lids, classic makeup techniques often stop working, but adapted methods can visually “lift” the eye.
Several frustrations come up again and again:
- eyeliner that bends, breaks up or vanishes into the folds
- mascara transferring onto the upper lid by midday
- eyeshadow collecting in creases rather than blending cleanly
- a heavier-looking upper face that can make features appear older
The aim isn’t to “erase” age. It’s to reposition light and shadow so the eye reads as open, alert and balanced.
Tip 1: prep and powder – the step many people skip
Before you think about colours or trends, the base needs attention. Droopy eyelids are often a touch oilier and more folded, which makes product slide and transfer more easily.
How to prepare the eyelid
Begin with a light, non-greasy eye cream, then leave it to absorb properly. If the area is too emollient under makeup, pencils and liners are more likely to stamp onto the upper lid.
Next, smooth on a very thin layer of eye primer or a long-wear concealer across the entire lid, continuing right up to the brow bone.
Finish by setting with a small amount of translucent powder. Tap off excess first so you don’t end up with a dry, chalky finish.
A light veil of powder over primer reduces creasing and creates a smoother canvas for eyeliner.
This one “unexciting” step can noticeably improve longevity and makes every technique that follows work better.
Tip 2: eyeliner for hooded and droopy lids (without the broken flick)
A traditional cat-eye, especially one drawn while stretching the lid, is often the first thing that fails once lids begin to droop. When the eye relaxes, the wing can look jagged, uneven or even angle downwards-undoing any lifting effect.
The no-stretch rule
It’s tempting to tug the outer corner to get a crisp line. On droopy lids, that creates a false map: as soon as you release the skin, the liner can kink in unpredictable places.
Instead, draw with the eye relaxed while looking straight into the mirror. That way, your liner follows the lid’s true shape, including its folds.
The “floating” flick trick
Rather than placing the wing directly into the fold, position it just underneath the main crease so it remains visible and intact when your eyes are open.
A straightforward approach:
- lightly powder the upper lid, especially the outer third
- using a pencil or fine brush, place a tiny dot where you want the wing to finish, under the fold
- draw a short line from that dot towards the lash line to form a small triangle
- fill in the triangle, then connect it to a slim line along the lashes
Placing the wing below the main fold stops it from breaking and pulls the eye slightly upward.
For many over-50 eyes, softer definition is more flattering than a stark black stripe. Consider deep brown, plum or charcoal instead of jet black, and keep the inner third of the upper lash line as thin as possible.
Tip 3: use your brows as a natural lift for droopy lids
Eyelids get the attention, but brows often decide whether the whole upper face looks raised or weighed down. As brow hair thins with age, brows can appear flatter and sparser-visually pulling the eye area down.
Shaping for more space and lift
The goal isn’t a dramatic, ultra-arched look. It’s a tidy structure that restores vertical space.
Many makeup artists suggest this two-stage method:
- brush brows down first so the top edge is clearly visible
- with a fine pencil, sketch in missing hairs along the top line, keeping it light
- brush hairs back up and slightly outwards
- define only the gaps along the lower edge, leaving the front softer
Creating as much light, empty space as possible under the brow subtly lifts droopy lids without touching the eyelid itself.
A clear gel or a softly tinted gel can then hold hairs upwards for a gentle “brow lift” effect. Overfilling, by contrast, can crowd the eye area and reduce the open space many mature faces benefit from.
Tip 4: eyeshadow placement that creates a higher-looking crease
Many classic eyeshadow “maps” assume a clearly visible, high crease. On hooded and droopy lids, that crease often disappears once the eye is open.
The solution is to place shading slightly higher than your natural fold so, from the front, it reads as your crease.
The soft contour halo
Choose a matte or satin shade that’s just a little deeper than your skin tone. With your eyes open, look straight into the mirror and apply colour just above where the lid naturally folds-focusing most of it on the outer third.
Blend in small upward motions so you build a soft diagonal shadow that lifts towards the tail of the brow. On the mobile lid, keep tones lighter and a bit more reflective, especially in the centre.
Lighter on the lid and darker slightly above the fold gives the illusion of deeper, lifted eyes.
A quick guide for mature lids:
| Area | Texture | Best effect |
|---|---|---|
| Mobile lid | Satiny, light shades | Adds brightness and openness |
| Above the fold | Matte, medium depth | Creates a new “fake” crease |
| Outer corner | Slightly deeper matte | Adds structure and lift |
| Brow bone | Subtle highlight (not frosty) | Raises the area without glare |
Mascara, tools and small adjustments that make a difference
Mascara can either help droopy lids or highlight the very issues you’re trying to avoid. Lengthening, flexible formulas often brush against the upper lid, leaving dots and smudges.
Two simple changes usually help:
- concentrate mascara at the roots and on the outer half, rather than heavily coating every tip
- choose a waterproof or tubing formula, which is less likely to transfer as the day goes on
Curling lashes can also create an immediate, if subtle, lift. Use the curler before mascara; press gently at the base for a few seconds, and avoid pumping the curler, which can weaken lashes over time.
Two extra considerations: skincare texture and everyday habits
If your eyelid makeup slides despite primer and powder, consider what sits underneath. Very rich creams and facial oils can migrate into the lid area, particularly overnight or after moisturising in the morning. Keeping eye products lightweight (and allowing a few minutes before makeup) often reduces mascara transfer and eyeliner smudging.
It’s also worth checking the small, daily habits that change how products wear: rubbing eyes due to hay fever, using very creamy sunscreen too close to the lash line, or applying concealer that remains tacky. Tiny changes here can do as much for creasing as changing an eyeshadow palette.
When makeup tricks meet medical reality
For some people, droopy lids aren’t only cosmetic. Excess skin can start to press on the lashes and reduce the field of vision.
In these situations, an ophthalmologist may discuss:
- ptosis (a droop of the upper lid itself)
- dermatochalasis (excess eyelid skin)
Both can sometimes warrant medical or surgical treatment, including blepharoplasty.
Makeup can change perception, but it cannot correct conditions like true ptosis or excess skin that obstructs vision.
An assessment from an eye specialist can help you tell the difference between an aesthetic frustration and an issue that could affect eye health or safety-especially for driving.
Trying it at home: a realistic morning routine
Picture a typical weekday morning for someone in their late fifties rushing to get out of the door. The old routine might be a thick black line along the lashes plus a sparkly highlight under the brow.
By late morning, the liner has stamped onto the upper lid, and the shimmer has made every fine line more obvious.
Using the techniques above, the routine shifts to:
- a thin layer of primer and powder over the lid
- a soft brown line drawn with the eye relaxed, with the wing placed under the main fold
- matte, mid-toned eyeshadow placed just above the crease rather than inside it
- brows brushed up and lightly filled, leaving clean space underneath
The mirror doesn’t show a different person-just the same face looking more awake and less weighed down.
Ageing, expectations and combining strategies
Makeup techniques can postpone the sense that surgery is the only option, and for many people they’re all that’s needed. For others, they fit into a wider plan that may include non-invasive approaches such as laser tightening, radiofrequency, or more targeted skincare.
The crucial point is expectations: makeup lifts by millimetres, not centimetres-but those millimetres can change how your expression is read. When you pair these optical tweaks with good lighting, flattering glasses frames and even the right hairstyle, the combined effect around the eyes can look distinctly fresher.


Comments
No comments yet. Be the first to comment!
Leave a Comment