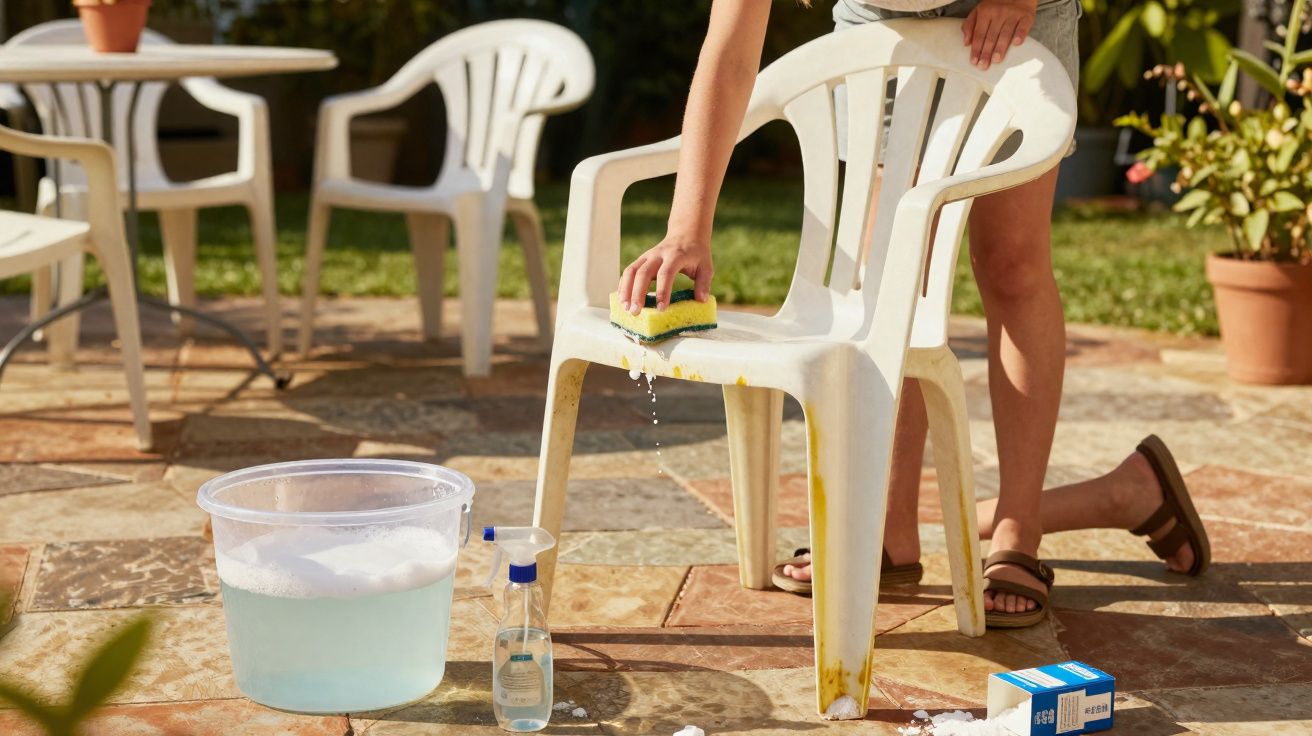
Every spring it’s the same scene: the table has gone dull, the white chairs look grey and blotchy, and the whole plastic set appears tired. Many people immediately assume it’s time to buy new. In reality, a large part of that decline can be reversed surprisingly well with a bit of time, a bucket of water and a clever home remedy.
Why plastic garden furniture turns dull and yellow so quickly
Plastic is considered easy to look after. When it’s new, it often looks brilliant white or pleasingly colourful - then, within a few years, it slips into a drab grey. There are several reasons for this:
- Sunlight: UV radiation attacks the surface, making it brittle and more porous.
- Rain and damp: these create a grey film that dirt readily clings to.
- Dust and pollen: they settle into tiny pores and make the surface look grimy.
- Low-quality plastic: if the material isn’t coloured all the way through and lacks UV protection, it fades especially quickly.
White chairs made from PVC (or similar) often drift towards a yellowish tone. Coloured pieces tend to look washed out and patchy. The good news is that, as long as the plastic is still sound and isn’t showing cracks, a thorough clean can rescue a great deal.
It’s also worth remembering that other outdoor materials have their own drawbacks: metal will happily rust without a decent coating, wood turns grey and rough and demands oil plus sanding, and natural rattan won’t thank you for constant rain. By comparison, plastic can be the most pragmatic choice - provided you give it a little attention now and then.
The two-step plan for plastic garden furniture: deep clean first, then refresh
The “secret trick” isn’t a miracle product from the DIY shop. It’s a simple combination of a proper base clean followed by a straightforward home remedy mix. If you only give everything a quick blast with the garden hose, you’ll barely see a change. The right approach is: remove the grime first, then tackle the discolouration directly.
Step 1: Remove surface dirt with warm soapy water
Before any home remedy can do its job, the visible dirt has to go. Only then can the mix reach the yellowed, dulled surface.
- Brush off cobwebs, leaves and dust using a soft brush or hand brush.
- Fill a bucket with warm water and add a small amount of washing-up liquid.
- Wipe down all surfaces thoroughly with a soft cloth or sponge, including underneath the seats.
- Rinse briefly with clean water so no soapy residue is left behind.
The base clean is crucial: only on a reasonably clean surface can the home remedy work against grey haze and yellowing later on.
Step 2: A home remedy mix for grey haze and yellowing
Now for the actual trick: a mixture of warm water, clear household vinegar and bicarbonate of soda (or baking powder). This combination helps loosen build-up and makes yellowed plastic look visibly brighter.
For a standard spray bottle, the following works well:
- 500 millilitres warm water
- 1 tablespoon clear household vinegar
- 2 tablespoons bicarbonate of soda (or baking powder)
- a small squirt of washing-up liquid
Shake well until the powder has mostly dissolved. If your bottle is smaller, simply halve the amounts or split the batch across two bottles.
How to use it:
- Spray the mix generously over chairs and table.
- Work it in with a soft sponge or microfibre cloth - don’t scrub aggressively.
- Leave it to sit for a few minutes so the film can loosen.
- Rinse off with plenty of water, ideally with a garden hose or watering can.
- Let everything air-dry; don’t cover it straight away with cushions.
After just one round, many pieces look noticeably fresher: the grey haze lifts, whites look cleaner again, and colours appear clearer. For stubborn marks (such as rings left by plant pots or residue from sun cream), a second treatment is often worthwhile.
If the home remedy mix isn’t enough: specialist cleaners and small tricks
Sometimes stains are so ingrained that the home remedy mix on its own won’t shift them. White surfaces, in particular, give you a bit more freedom to be bold.
Gentle abrasion for white plastic garden furniture
For heavily yellowed white chairs, a “cleaning paste” made from mineral powder, soap and glycerine (often sold as stone paste or cleaning paste) can work well. Think of it as an extra-mild cream cleaner.
- Dab a damp sponge into the paste.
- Rub the affected area in circular motions.
- Leave it to sit briefly.
- Rinse very thoroughly with plenty of water so no residue remains.
Important: use the paste sparingly. If you rub too hard, you can create fine scratches that collect dirt more quickly later.
Take care with coloured chairs and tables
With coloured pieces, test first in an inconspicuous spot. Some products don’t just lighten dirt - they can also lighten the colour. If the test area looks fine, you can continue cautiously. If a dull patch appears, stop immediately and switch to water only.
Extra note: avoid “overpowering” tools
It can be tempting to reach for a pressure washer, but on older plastic it may roughen the surface and actually make future dirt build-up worse. If you do use one, keep the pressure low, use a wide fan setting and maintain a sensible distance so you’re rinsing rather than cutting into the plastic.
When it’s time to say goodbye
No amount of cleaning helps if the material is no longer safe. Before you commit to a big scrub, do a quick safety check:
- Are there clear cracks in the seat or backrest?
- Does the chair creak when you sit down?
- Are small pieces crumbling away in places?
A chair that could break under an adult’s weight has no place on the patio. At that point, even the best home remedy mix won’t help - the risk of a fall is simply too high.
If the wear is purely cosmetic, it’s a different story. Light scratches or blotchy colour can sometimes be disguised with fine sandpaper and a specialist plastic spray paint. The method is: lightly sand first (for example, 120 grit), remove dust, then spray according to the manufacturer’s instructions. This creates a more even finish.
How to keep plastic garden furniture looking good for longer
After a successful rescue, nobody wants the chairs to look the same again next spring. A few habits make a real difference.
If you protect your plastic furniture, you’ll need a “full-on” spring clean far less often.
Protection at purchase and during storage
- When buying, ask specifically for versions with UV protection.
- Store furniture in winter somewhere dry and out of direct sun where possible.
- If you don’t have a cellar or shed, use robust protective covers.
- Avoid tight plastic sheets laid directly on top for long periods - condensation can build up underneath.
Regular care instead of a major overhaul
Rather than a cleaning marathon every couple of years, a simple routine is often enough:
- During the season, wipe down every few weeks with warm soapy water.
- Remove compost, bird droppings and greasy splashes from the barbecue promptly.
- Don’t use oily products or furniture polishes on plastic - they often soften the surface and make it more vulnerable.
What “yellowing” actually is
Many people assume the colour itself is changing. In most cases, it’s a combination of material breakdown, layers of dirt, and tiny micro-cracks. Light, oxygen and moisture attack certain components in the plastic. The surface changes chemically, looks more matte, and can appear slightly yellow or grey.
The home remedy mix can’t reverse those deeper processes, but it can remove deposits and brighten the surface visually. That’s why some items look almost new after treatment, while others remain slightly patchy - it depends on how much the sun has already degraded the structure.
Practical add-ons for everyday garden life
If you’re already reorganising the patio, you can pair a few simple changes with your cleaning routine. Light-coloured seat cushions protect the seating surface from direct sun and instantly improve comfort. Place saucers under plant pots so standing moisture doesn’t leave a ring on the table. And if you position a parasol over the dining set, you’ll protect not only your skin but the material as well.
One more point many people overlook: sun cream, fake tan and insect repellent often leave greasy smears on plastic. A quick wipe-down after a long day in the sun helps stop those residues soaking in and becoming difficult to remove later.
If you do replace items: dispose of them responsibly
If a chair has become unsafe, replacement is sensible - but it’s also a good moment to think about disposal. Many councils accept rigid plastics at local recycling centres, and some retailers run take-back schemes for garden furniture. Keeping the old pieces out of general waste where possible is the simplest way to reduce unnecessary landfill and make an upgrade a little more responsible.


Comments
No comments yet. Be the first to comment!
Leave a Comment