This speedy routine restores crisp lines and a gentle sheen.
Most kitchens end up with a light, tacky film on cabinet doors, handles and trim. Warmth, steam and airborne cooking oils rise, then settle on cooler surfaces. Before long, cupboards look flat and slightly sticky, and the residue attracts dust. With a sensible mixture and the right cloth, you can shift build-up quickly without damaging wood, lacquer or laminate.
Why grease clings to kitchen cabinets
When you cook, microscopic droplets of fat hitch a ride on warm air. As they reach cooler cabinet fronts, they set and form a thin layer. Dust then grips onto that layer, and over time the coating thickens, darkens and hardens. Harsh solvents will cut through it, but they can dull finishes and leave strong smells lingering indoors. A safer approach relies on mild acidity, light oils and surfactants that lift grime without scratching.
Grease breaks down best when a gentle solvent is paired with surfactants, given a brief dwell time, then wiped away with tight-weave microfibre.
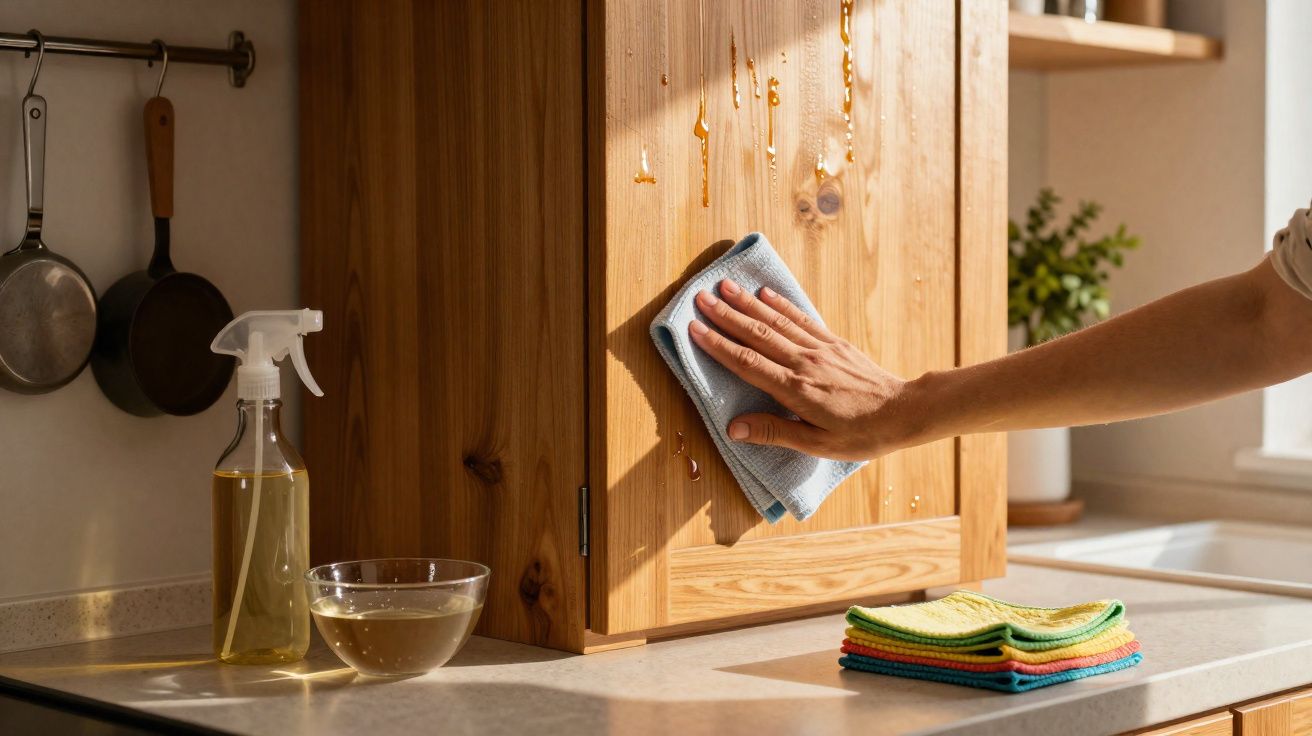
The fast formula for wood kitchen cabinets
Sealed or oiled wood benefits from a cleaner that removes grease while also supporting the finish. A simple cupboard-staple blend of olive oil and lemon juice does both jobs. The lemon helps loosen oily residue, while the olive oil revives the surface and reduces how much water touches the wood.
What you’ll need
- Microfibre cloths (two colours: one for cleaning, one for drying)
- Olive oil
- Lemon juice (fresh or bottled)
- A soft brush for grooves, corners and decorative profiles
Combine 1 part lemon juice with 2 parts olive oil. Shake or whisk until the mixture looks cloudy and evenly blended.
Start by removing loose dust with a dry cloth. Lightly moisten the cleaning cloth with the blend (it should not be dripping). Work door by door. Wipe in the direction of the grain. Use the soft brush to loosen residue around handles and along mouldings. Dry-buff immediately with a clean cloth. The finish should feel clean rather than slippery. If it feels oily, wipe once with a slightly damp cloth and buff again.
Test first on an inside edge or hidden corner. If the surface turns dull, switch to a mild washing-up liquid solution with water, then dry promptly.
Gentle care for lacquered kitchen cabinet finishes
Lacquered cabinets have a glossy, glass-like look, but they can show marks easily. Treat them with a mild soap solution and a light touch. Avoid abrasive powders, scouring pads and ammonia-based products, which can scratch or leave a cloudy haze.
Quick method for lacquered kitchen cabinets that protects the shine
- Mix warm water with a small squeeze of mild washing-up liquid.
- Wring the cloth very well so it’s only barely damp.
- Wipe in straight strokes rather than scrubbing in circles.
- Rinse the cloth in clean water and wipe again to remove any soap.
- Dry immediately to prevent water marks.
For lacquer: mild soap, minimal water, immediate drying. Anything abrasive can leave permanent haze.
No-fuss cleaning for laminate kitchen cabinets
Laminate stands up well to staining, but it doesn’t like standing water or prolonged steam at the edges. A simple washing-up liquid mix plus fast drying keeps surfaces sharp and prevents swelling along seams.
Step-by-step
- Dust door fronts, edges and hardware first.
- Use a barely damp microfibre cloth with roughly a drop of washing-up liquid per litre of water.
- Wipe from top to bottom first, then across, to catch any drips.
- Rinse the cloth, wipe once more, then dry with a towel.
For stubborn grime in corners, mix a gentle paste: 1 part bicarbonate of soda to 3 parts water. Dab it onto the spot, leave for 1 minute, then wipe away. Don’t scrub hard near joins or edges.
Stainless steel, glass inserts and cabinet hardware
Grease often builds up on handles and around hinges. Touching pulls transfers residue to hands and straight back onto doors, so include these areas every time you clean.
- Stainless steel: wipe with mild soapy water following the grain, then buff with a tiny drop of mineral oil to reduce fingerprints.
- Glass inserts: mist a vinegar-and-water spray onto the glass only (keep it off timber frames), then dry with a lint-free cloth.
- Brass or bronze pulls: use mild soapy water only, then dry thoroughly to prevent spotting.
The five-minute weekly kitchen cabinet routine
Consistent, light maintenance beats occasional, heavy scrubbing. Pick a time straight after your hottest cooking night, set a timer and keep movements simple.
- Run the extractor hood on high for an extra 2 minutes after cooking.
- Dry-dust doors and rails.
- Spot-clean handles and the splash zones near the hob.
- Wipe the line where steam hits first (often the area just above the splashback).
- Finish with a quick dry buff.
When build-up fights back
Thick, sticky layers respond better to dwell time than brute force. Place a warm, damp cloth with mild soapy water over the area for 2–3 minutes. The warmth softens the film. Lift it off and wipe with a fresh cloth. Repeat once if necessary. On wood, finish with the lemon–olive oil blend to restore an even sheen. On lacquer and laminate, end with a dry buff only.
| Surface | Go-to mix | Contact time | Avoid |
|---|---|---|---|
| Sealed wood | 1 lemon : 2 olive oil | Wipe on, don’t soak | Bleach, strong alkalis, soaking with water |
| Lacquer | Mild washing-up liquid in warm water | Brief; wipe then dry | Powders, ammonia, rough pads |
| Laminate | Mild soap; barely damp cloth | Brief; keep seams dry | Steam, flooded edges |
| Stainless steel | Soapy water; tiny mineral oil buff | None | Chlorine-based cleaners |
| Glass inserts | Vinegar-water on glass only | Brief | Acid on stone frames |
Air quality and finish safety in the kitchen
Aggressive degreasers can release strong fumes and may dull cabinet finishes over time. A gentler routine keeps indoor air more comfortable and helps cabinets stay looking newer for longer. Keep the extractor running while you clean and open a window if the room feels stuffy. Change cloths regularly-once a cloth is loaded with residue, it tends to smear the film rather than remove it.
Smart prevention that saves time on cabinet cleaning
Use lids when simmering or frying to cut down airborne grease. Replace extractor filters as recommended; if you cook frequently, metal mesh filters benefit from a monthly soak in hot, soapy water. Wipe splashes the same day where possible. Fresh marks lift in seconds, while week-old grease needs more time and more chemistry.
A quick note on microfibre and technique
Microfibre works best when it’s clean and only slightly damp-too much liquid encourages drips into seams and around hinges. Fold the cloth into quarters so you can flip to a fresh side frequently, and use a separate cloth for drying. This simple habit prevents you from redepositing grease onto the next door.
Choosing the right routine for your cabinet finish
If your kitchen includes mixed materials (for example, wood doors with glass panels and stainless handles), treat each section with the method best suited to it rather than trying to use one product for everything. Matching the cleaner to the finish reduces the risk of dull patches, swelling at edges and uneven shine.
Clean quickly, dry even faster, and match the method to the material. That combination beats grease every time.
Extra tips that pay off
Natural stone such as granite and marble needs extra caution: avoid lemon juice or vinegar near stone surfaces. If cabinet doors sit above stone worktops, spray the cleaner onto the cloth rather than onto the cabinet to prevent run-off. For painted matt cabinets, reduce the oil content and rely more on mild soap and water, then dry carefully to avoid glossy patches.
When you’re unsure what finish you have, check with the cabinet maker or test in a hidden spot. If you opt for a shop-bought degreaser for a one-off deep clean, choose a pH-neutral product, wear gloves and rinse thoroughly. Then go back to the gentler routine-less effort, fewer harsh chemicals and a kitchen that feels fresher day to day.


Comments
No comments yet. Be the first to comment!
Leave a Comment