Many homes have a slightly neglected spider plant sitting in the living room or hallway. It’s tough, low-maintenance, safe around pets-and often a bit forgettable to look at. With one simple, almost playful tweak, though, this everyday houseplant can become a genuine focal point: a living green artwork rather than just “something in a pot”.
The spider plant (Chlorophytum comosum) as raw material for green design
The spider plant (Chlorophytum comosum) is one of the classic houseplants for good reason. It copes well with occasional dry spells, tolerates lower light levels and keeps growing steadily. Those reliable qualities make it ideal for shaping into decorative forms without constant worry.
What makes it especially useful is its growth habit: long, slender stems that carry small leaf rosettes at the tips-often called plantlets or “babies”. These little offshoots hang like miniature plants in mid-air, and the stems themselves can be guided and styled.
If you train your spider plant’s stems instead of letting them dangle at random, you can create hearts, wreaths or even entire leaf columns.
In other words, the plant becomes a living building material. Rather than letting the greenery spill over the pot rim, you steer the growth and give it a clear structure. The result: a once “old-fashioned” plant reads as a modern décor object.
Step one: think of your spider plant as a living sculpture
Before you start shaping anything, study the plant for a minute. Which stems are the longest and healthiest? Where are there plenty of plantlets? Which side looks full, and where are there gaps?
- Choose long, healthy stems
- Prioritise stems carrying lots of plantlets
- Remove weak or dried stems
- Rotate the pot so the best stems face forwards
Spider plant stems are surprisingly flexible. If you bend them slowly and gently-without forcing them-they usually won’t kink. That bendability is exactly what makes them suitable for clean, graphic shapes.
Why a wire frame works so well
For many designs, a simple armature made from aluminium wire is enough. It’s lightweight, rarely rusts and can be shaped by hand. A slightly thicker craft wire (for example, modelling wire or florist wire) tends to be the easiest to work with.
You can, for instance:
- Bend a circle for a green wreath
- Join two arcs into a heart
- Shape oval or teardrop frames
Push the wire into the compost or span it in a half-arch over the plant. It acts like a guardrail, giving you a path to guide the stems along.
Hearts, wreaths and more: shaping your spider plant step by step
Once you’ve picked a design, the “modelling” begins. Work with one stem at a time and take it slowly. Spider plants adapt best when they’re moved into position gradually rather than being forced all at once.
Option 1: a green wreath as a table centrepiece
For a wreath, make a circular wire ring slightly wider than the pot’s diameter. Insert it into the compost at a slight angle, or attach it to the rim of the pot.
Then guide the long stems around the circle one by one:
- Lay the stem around the wire gently-don’t pull it tight.
- Secure it loosely with soft plant clips or raffia.
- Arrange plantlets so they face outwards.
- Remove excess plantlets and keep them for potting up later.
Over the following weeks, the plantlets keep growing, gaps fill in and the wreath becomes fuller. On a dining table, it creates a green frame you can see through comfortably-decorative without blocking anyone’s view.
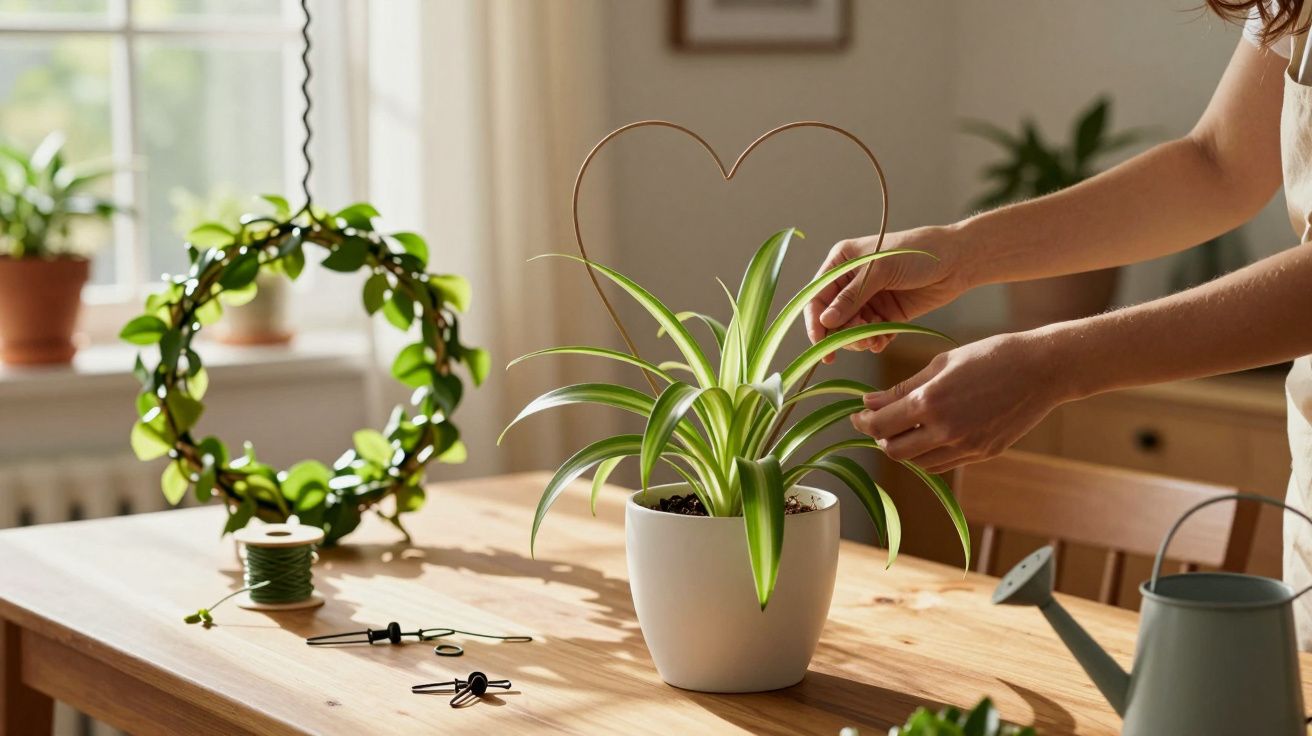
Option 2: a heart shape for special occasions
For a heart, bend the wire into two arches and form a point at the bottom. Anchor the frame by pushing the lower point into the compost, then lay the stems along the curved sides.
Placed in the hallway or on a console table, this plant-heart quickly becomes a talking point. Pair it with candles or a small string of lights and it takes on a more personal, occasion-ready feel.
The braided column spider plant: from drape to green totem
If you want height rather than a flat outline, go for braiding. Here, several stems work together to create a slim, upright “column” of foliage.
You’ll need:
- At least three long stems
- A sturdy wooden cane as support
- Soft ties (coated garden tie wire or raffia)
Insert the cane into the centre of the pot. Then position the stems around it and braid them-much like plaiting hair:
- Place three stems against the cane and fix them lightly at the base.
- Braid evenly and loosely so nothing is strained.
- Add a gentle tie every few centimetres to keep the shape.
- Let the ends taper off at the top, or wrap them loosely around the cane.
A sprawling spider plant can be turned into a slim, vertical plant column that fits neatly into narrow corners.
This braided column looks particularly good beside an armchair, at the end of a low sideboard, or next to a bookcase. In smaller bedrooms, a scaled-down version on a bedside table can add a calm, green accent without taking up much space.
Where a spider plant sculpture looks best at home
Placement determines whether your newly shaped plant looks merely “nice” or truly becomes a highlight. Spider plants prefer bright, indirect light. Strong, direct sun-especially from a south-facing window-can scorch the leaves.
Good spots include:
- The centre of the dining table (as a low wreath form)
- A hallway console (as a heart or oval)
- A narrow corner near a TV unit (as a slender column)
- A bedside table in compact rooms (as a mini-column or small arch)
One more key point: give the plant breathing room. Avoid cold window glass in winter and keep it away from radiators. Warm, dry air is a common cause of brown leaf tips.
Care after shaping: keeping the sculpture healthy
After bending, braiding and tying, your spider plant may need a short recovery period. A few small adjustments help it settle into its new form.
Getting water and nutrients right
A liquid feed with two key nutrients-nitrogen and potassium-is more than sufficient at the start. During the growing season, a light dose every 2–3 weeks supports fresh plantlets and stronger, greener leaves.
When watering, it’s better to water thoroughly and then let the compost dry slightly than to keep giving small sips. The compost can dry a little between waterings, but it shouldn’t become bone-dry. Waterlogging quickly leads to root rot, particularly in crowded pots with lots of plantlets.
Indoors vs outdoors: knowing the limit
In very mild areas, a spider plant can spend the warmer months outdoors-on a sheltered balcony, for example. Temperatures should stay reliably above about 13 °C. If they drop below that, bring the plant back inside.
Outside, growth is often sturdier and more compact, and the leaf colouring can look more pronounced. Wire frames and braided columns can simply move outdoors with the pot, as long as everything stands securely and won’t topple in wind.
Extra creative ideas and practical tips
Many indoor gardeners see spider plant plantlets only as propagation material. They’re also excellent for strengthening the base of your sculpture. If you tuck a few plantlets into the compost near the centre of the pot, the plant gradually develops a denser, bushier core. That contrast-compact middle with airy shapes above-can look especially striking.
If you want to build a fuller “display pot”, you can combine the spider plant with other houseplants. Small succulents or a mossy ground layer around the rim can create a calming carpet effect while the spider plant rises into sculptural forms. The important rule is compatibility: choose companions with similar light and watering needs.
Fixings should always remain soft and flexible. Hard wire or sharp edges can cut into stems as they thicken over time. Garden centres sell suitable clips and ties, but a strip of fabric or raffia works just as well. Check every few weeks for any tight spots and loosen ties if needed.
Two additions that make shaping easier long-term
A heavier pot can make a big difference, especially for hearts and columns that shift the plant’s balance. Choosing a stable container (and refreshing the top few centimetres of compost if it’s tired) helps prevent wobbling and keeps the frame firmly anchored.
Also, keep the leaves clean so the final “sculpture” looks intentional rather than dusty. A quick wipe with a damp cloth now and then-plus an occasional check for common houseplant pests-keeps the greenery looking crisp and the overall design more polished.
Once you get into plant shaping, you’ll notice how much range a single, resilient spider plant can offer-from a simple table wreath to a detailed heart, or an impressive living column in the living room.


Comments
No comments yet. Be the first to comment!
Leave a Comment