Paving joints treated early in the year with vinegar, a stiff brush or hot water often lead to the same demoralising outcome: you straighten your back, and fresh green shoots are already pushing up between the stones again. In most cases the problem is not your tool and not your home remedy - it is the timing. Ignore the calendar, and you more or less schedule the next round of weed clearing for yourself.
The real reason weeds return so quickly in paving joints
Between patio slabs and block paving, typical joint weeds such as dandelion, chickweed and thistles thrive. What you see above the surface can look minor, but the plant’s real strength is underground. The most persistent types are those with a taproot.
A dandelion’s taproot commonly reaches around 15 cm down into the ground. If you simply snap the stem off just above the joint, you may remove only about 10% of the plant’s total mass. Everything that matters is still hidden below.
When the top is torn away, the plant often responds by producing new growth even more vigorously - so the weed comes back thicker and stronger than before.
That is why gardening groups and horticultural organisations consistently advise removing as much root as possible. Even with the right kit, though, this only works reliably when the timing is right and the ground conditions cooperate.
Why early spring is the wrong time (at least until mid‑May)
It is tempting to reach for a joint scraper in March or April as soon as the first green tips appear. Unfortunately, this is exactly what creates the cycle of disappointment. In these months, bright sunshine, showers and cold snaps often arrive in quick succession. Biological contact treatments - such as vinegar solutions, plant brews and similar surface-acting products - are particularly vulnerable to rain.
These remedies work only on what they touch. They need several undisturbed hours on the leaves to do any damage. If rain falls within the next couple of days, it can wash the treatment away entirely. The result is lots of effort with very little impact.
Start too early and you mainly treat the symptoms - effectively setting yourself up for another round in two to three weeks.
The best spring window for paving joint weed control: after the Ice Saints
A far more effective plan is to schedule the main spring effort for the second half of May, after the traditional Ice Saints period (around 11–13 May). From then on, longer settled dry spells are much more likely.
For home remedies or bio contact treatments to work properly, stick to these conditions:
- Check the forecast for at least five days
- Aim for a window of at least 72 hours without rain
- Treat only when joints and leaves are completely dry
- Work in the morning if possible, so the sun can boost the effect
A simple practical check: place a tissue on the joints. If it stays completely dry for several minutes, the surface is ready. If it becomes damp straight away, wait - it is not worth applying anything yet.
Do not miss the autumn slot: that is when you really hit the roots
The second key period is late summer into autumn, roughly early September to the end of October. At this time many plants move sugars and nutrients down into their roots to store energy for winter.
If you remove the weed with the root now, you are attacking those reserves directly. The plant has far less strength to restart the following spring. In practical terms: your joints stay cleaner for longer, and the gaps between major clean-ups increase noticeably.
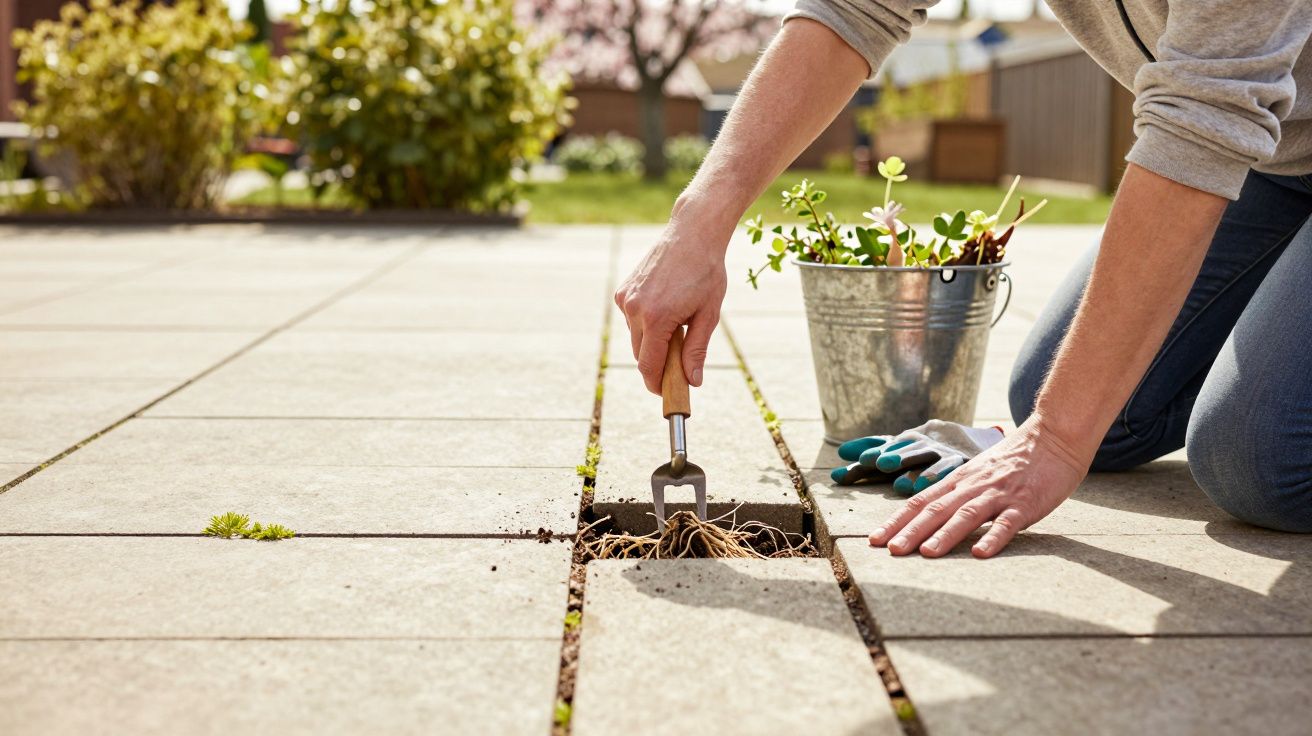
How to actually lift roots out of paving joints
In autumn, a little hand work pays off. The best tools are a joint knife or a narrow root fork of the sort many people use for asparagus.
Follow these steps:
- Work after rainfall or after thorough watering, so the ground is loosened.
- Push the blade vertically into the soil right beside the stem.
- Use gentle leverage to lift soil and root in one piece out of the joint.
- Finish with a wire brush to clear moss fragments and fine debris.
- Refill the joints with clean sand (ideally paving jointing sand) and sweep it in well.
Filled joints leave far fewer places for seeds to settle. With no loose voids, seedlings struggle to anchor.
A useful extra habit between the two main sessions is simple maintenance: sweep joints regularly so wind-blown dust and compostable debris do not build up. That thin layer of “soil” is often what allows new weeds to take hold in the first place.
What you should never use between slabs and blocks
When people are fed up, they often grab whatever is in the cupboard - especially table salt. It can look convincing at first because leaves wilt quickly.
Salt does not just dehydrate plants; it alters the ground long-term and can damage joints, paving and neighbouring areas.
Over time, salt seeps deeper, pulls moisture out of the ground and degrades soil structure. The base beneath the paving can become hard and brittle, joints can fail sooner, and the whole surface may lose stability in the long run. Salty run-off can also affect nearby borders and, in the worst case, contribute to groundwater pollution.
Another frequent mistake is spraying just before an expected shower, or applying treatments onto wet surfaces. Then any product - even biological options - simply runs into the next gaps or towards drains without properly coating the weeds. You spend time and money with no real benefit.
A simple year-round plan for managing weeds in paving joints
If you remember two fixed dates, the work becomes much easier:
| Period | Aim | Method |
|---|---|---|
| Second half of May | Strongly weaken green growth | Dry joints; contact treatment or hot water; use sunshine |
| September to October | Target roots and stored reserves | Lever out roots; clean joints; refill with sand |
Between these periods, brief inspections are usually enough: remove isolated plants immediately by hand or with a knife. Keep to this rhythm and you will have fewer large-scale sessions - and you will not need to re-do the whole patio every spring.
Prevent damage to paving and cut the workload further
Beyond the right season, the way the surface is built makes a difference. Wide, deep joints filled with loose material effectively invite weeds in. For new builds or refurbishments, choosing tighter joints and a stable jointing mortar can prevent part of the issue from the outset.
On existing patios, gradual improvement works well: top up loose joints bit by bit with sand or specialist paving jointing sand, close voids, and check for cracks or movement in the sub-base. The fewer gaps and soft pockets you have, the less chance strong roots have to establish deeply.
Be cautious with high-pressure washers as well: they can strip jointing material out quickly, creating the very voids weeds need, and can undermine bedding layers if used aggressively. If you use hot water, handle it like any scald risk - and avoid flushing loosened debris straight into surface drains.
Avoiding chemical weedkillers protects insects and soil life - and also reduces exposure for you and your pets. With a well-planned calendar built around two key moments each year, plus a few targeted manual interventions, you can keep patios and driveways clear for far longer without resorting to the harsher products once seen as standard.


Comments
No comments yet. Be the first to comment!
Leave a Comment