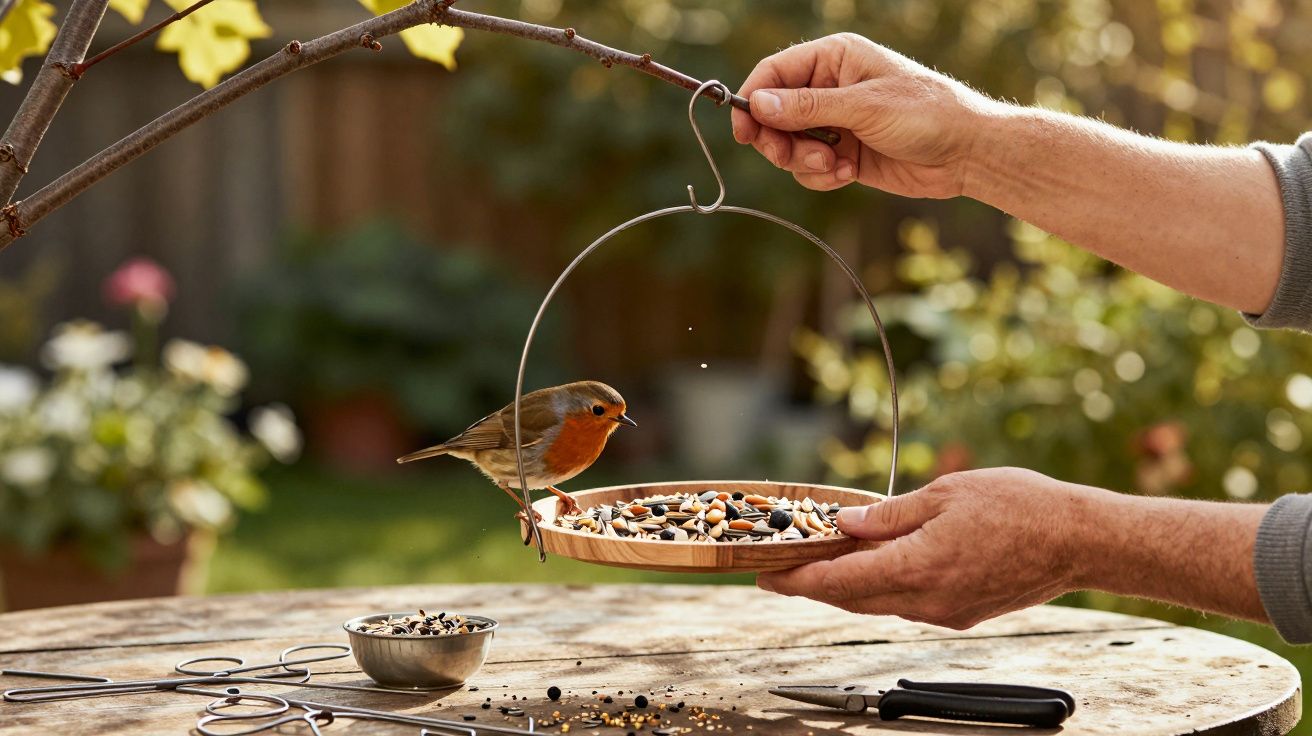
In the first cool hours of the morning, step out on to the balcony and you’ll hear them straight away: blackbirds, tits, sparrows and their neighbours are under constant pressure in spring. They’re pairing up, building nests and burning through energy. Ready-made feeding stations from garden centres can easily cost £20–£30 or more. Yet the makings of a practical, attractive bird feeder are often already sitting in a wardrobe-disguised as an ordinary wire coat hanger.
Why a DIY bird feeder (feeding station) is such a sensible idea
Wild birds are finding fewer and fewer natural spaces in towns and densely populated areas. Shrubs are removed, insects are in decline, and more ground is sealed under paving and tarmac. A bird feeder can’t replace a real habitat, but it can make the demanding breeding season noticeably easier.
With a single bent wire coat hanger you can create a secure landing spot and a food source-while giving a piece of metal a second life.
There’s another advantage: when you build your own feeding station, you control what goes into it. That helps you avoid questionable “mixed” feeds and packaging-heavy products that often contain lots of filler and very little nutritional value.
Materials: what you actually need
The concept is simple: a basic metal coat hanger from the dry cleaners becomes the load-bearing frame for fruit or seed. You don’t need much more than that.
The humble metal coat hanger as the star of the show
Most households have them: thin, slightly bent wire hangers left over from the dry cleaners that do nothing but get in the way. They’re ideal for this job because they are:
- sturdy enough to hold roughly 200–300 g of food,
- flexible, so you can adjust the shape without fuss,
- effectively free, because they’re usually already at home.
Instead of heading for the bin, the hanger becomes a supportive frame that birds can cling to while they feed.
Tools and small bits: a short list with big impact
To shape the hanger, everyday tools are enough-items many people already have:
- wire cutters to snip off unnecessary ends,
- flat-nose pliers or round-nose pliers for neat bends and curves,
- work gloves to protect your hands from sharp edges,
- half an apple or a cut-out plastic bottle base to act as the food holder.
The bottle base can stand in for pricey feeding trays from the shops: it’s lightweight, washable and would otherwise be rubbish.
Extra tip (safety and durability): If the hanger is rusty or flaking, swap it for a cleaner one. After cutting, use the pliers to curl any sharp ends back on themselves so there are no points that could injure birds-or you.
Step by step: from coat hanger to bird buffet
This isn’t a complicated DIY task. If you can use pliers, you can usually finish in around 15 minutes.
Open out the coat hanger and prep the wire
First, turn the hanger into a straight length of wire:
- Use pliers to undo the small twisted section just below the hook.
- Carefully open the wire out until there are no corners left.
- Roll the wire along a table edge or smooth surface to straighten it as much as possible.
You should end up holding a reasonably straight wire rod about 70–80 cm long. A few gentle waves are fine-what matters is that it won’t hang lopsided later.
Shape the feeding platform (two easy options)
Now you give the wire its purpose. There are two straightforward versions: a fruit skewer and a seed bowl.
| Option | Shape | Food |
|---|---|---|
| Fruit skewer | small spiral at the bottom, hook at the top | apple pieces, pear, grapes |
| Seed bowl | ring at the bottom, hook at the top | sunflower seeds, nut mixes (unsalted) |
For the fruit skewer, bend the lower third of the wire into a small spiral about 5 cm in diameter. The spiral acts as a support, while the upright point holds half an apple securely.
For the seed bowl, form the lower third into a closed ring. The plastic bottle base will be hooked into this ring later. Make the ring slightly smaller than the plastic dish so it sits snugly.
At the top, use the pliers to create a wide hook so you can hang the bird feeder from a branch, a balcony rail or a pergola.
The right spring food mix
Many people automatically reach for fat balls or high-fat feeds. That makes sense in hard frosts, but as temperatures rise it becomes less suitable because the mixture can turn rancid quickly. In spring, the aim is high-quality energy without putting unnecessary strain on the birds.
What works particularly well
- Sunflower seeds (hulled or unhulled) for tits, finches and sparrows,
- unsalted peanuts in small amounts,
- apple or pear pieces for blackbirds and other soft-food feeders,
- millet for smaller species such as sparrows.
As a rough guide, offer 50–100 g of food per feeding station per day, depending on how busy it is. It’s better to top up little and often than to put out too much and let it spoil.
Food that harms birds
Not everything from the “leftovers shelf” is safe. Avoid:
- seasoned or salted nuts,
- bread and baked goods,
- cooked leftovers,
- scraps containing spices or garlic.
These foods can swell in the stomach, go off quickly and attract rats. Bird food should be as natural and unprocessed as possible.
Extra tip (another spring essential): Alongside feeding, a shallow dish of fresh water-changed daily-can be just as valuable in dry spells. Place it near the feeding station but not directly underneath, so droppings and husks don’t contaminate it.
The perfect spot: safety comes first
A feeding station acts like a magnet-not only for birds, but also for cats and martens. Where you place it determines whether birds can feed with minimal stress.
Hang it high and keep the approach clear
Good placement usually meets these criteria:
- a minimum height of around 1.5 m,
- no dense shrubs directly beneath (a hiding place for cats),
- a clear flight path of 2–3 m,
- a line of sight from a window or seating area-so you can enjoy watching.
Suitable locations include an open branch, a roof edge, a hook under a patio cover, or a sturdy post. Birds often prefer a nearby higher perch, so they can check the area before dropping down to feed.
Cleaning, hygiene and risks
When lots of animals feed in one place, the chance of disease increases. That’s why cleanliness is crucial for any bird feeder.
Clean regularly and prevent mould
Every few days, check and maintain your setup:
- remove old food,
- rinse the plastic dish with hot water,
- replace spoiled fruit immediately,
- wipe away droppings with a cloth.
If you notice an unusually high number of sick or lethargic birds, pause feeding temporarily and clean the station thoroughly.
Benefits for the environment and your wallet
The appeal of this project isn’t only about helping birds. It saves money and cuts waste. A metal coat hanger stays in use, a plastic bottle avoids the general rubbish bin, and there’s no need to buy expensive bird tables.
Two household leftovers become a fully functional feeding station-hard to beat for cost, and even harder to beat for sustainability.
It can also become a small daily ritual. Many people find that watching birds each day makes seasonal changes feel more noticeable. For children, it’s a close-up look at how different species appear and behave-from the cautious first swoop of a tit to the busy jostling on colder days.
More easy recycling projects for a wildlife-friendly garden
If you enjoy this bird feeder, you can extend the idea with similar low-cost builds. Typical examples include:
- turning tins into an insect hotel filled with tubes and straw,
- screwing old timber boards into simple benches or planter boxes,
- reusing jam jars as mini water dishes for insects (add stones as a way out).
Over time, these small steps can create a compact, species-friendly corner where birds, insects and people all feel at home-without buying pricey “designer” garden objects.


Comments
No comments yet. Be the first to comment!
Leave a Comment