Many people feel attached to inherited family furniture, yet get irritated every day by how heavy and dated it can look in a modern room. Rather than dumping a chunky solid-wood dresser or replacing it with flimsy flat-pack pieces, a straightforward approach can turn these classics into genuine statement items with modest spend and manageable effort.
Why old furniture doesn’t belong in the bulky-waste skip
A large, dark solid-wood cabinet, an ornate chest of drawers, or a weighty dining-room sideboard: countless homes have at least one. These pieces are sturdy and full of history, but visually they often clash with pale parquet, simple sofas and minimalist décor.
Updating an older piece saves money, reduces waste, and keeps a slice of family history-just in a new look.
Instead of buying new, more and more interiors fans are choosing a makeover. The principle is simple:
- The characterful carcass stays.
- Paint and hardware are rethought from scratch.
- Afterwards, the piece sits in your home like a current designer buy.
Cost matters, too. For primer, paint, a sanding sponge, masking/protective materials and new handles, you’ll typically spend around £25–£85, depending on size and condition. A comparable new solid-wood piece can easily cost five to ten times that.
And then there’s the emotional value: many cabinets and chests once lived with grandparents or were bought for a wedding. With a fresh coat and updated handles, those memories don’t disappear-they simply slot naturally into a contemporary scheme.
Before the first brushstroke: the prep that makes or breaks the result
The real “trick” isn’t the colour-it’s the preparation. Cut corners here and you’ll regret it later when paint chips, edges peel, or dents shout through the finish.
Clean properly, don’t just paint over the grime
Start with cleaning. Old polish residue, greasy fingerprints and a thick film of dust often sit invisibly on the surface. They stop primer and paint from bonding.
- Open all doors and pull out drawers.
- Wipe everything down with a mild cleaner or a dedicated degreaser.
- Pay extra attention to edges, handle areas and mouldings.
- Dry thoroughly and leave it to air-dry completely.
It’s also worth protecting the surrounding area: cover the floor with dust sheets or plastic, and use masking tape on nearby walls and skirting boards so splatters don’t become a permanent annoyance.
Remove hardware and check for weak points
Unscrew all handles, knobs and key plates before painting. You’ll reach every corner cleanly and avoid ugly paint ridges around fittings. This is also the moment to spot problems-sticking drawers, loose hinges, or hairline cracks in the timber.
Minor damage can be filled before priming with wood filler. Once dry, a sanding sponge smooths everything into seamless transitions. That extra quarter of an hour is what makes the finished surface look noticeably more premium.
Primer: the quiet star of the whole project
Many DIYers want to jump straight to the coloured coat. This is exactly where the difference between a professional-looking finish and a frustrating mess shows up. The right primer is essential-especially on older, dark woods or previously varnished/painted surfaces.
A good primer saves time, blocks old colours, and turns a patchy cabinet into a flawless canvas.
Apply primer thinly but evenly using a roller and brush. Make sure you cover every visible area, including inner door edges and the front edges of drawer fronts. Then give it proper drying time. If you rush into painting too soon, you risk a tacky surface and weaker adhesion.
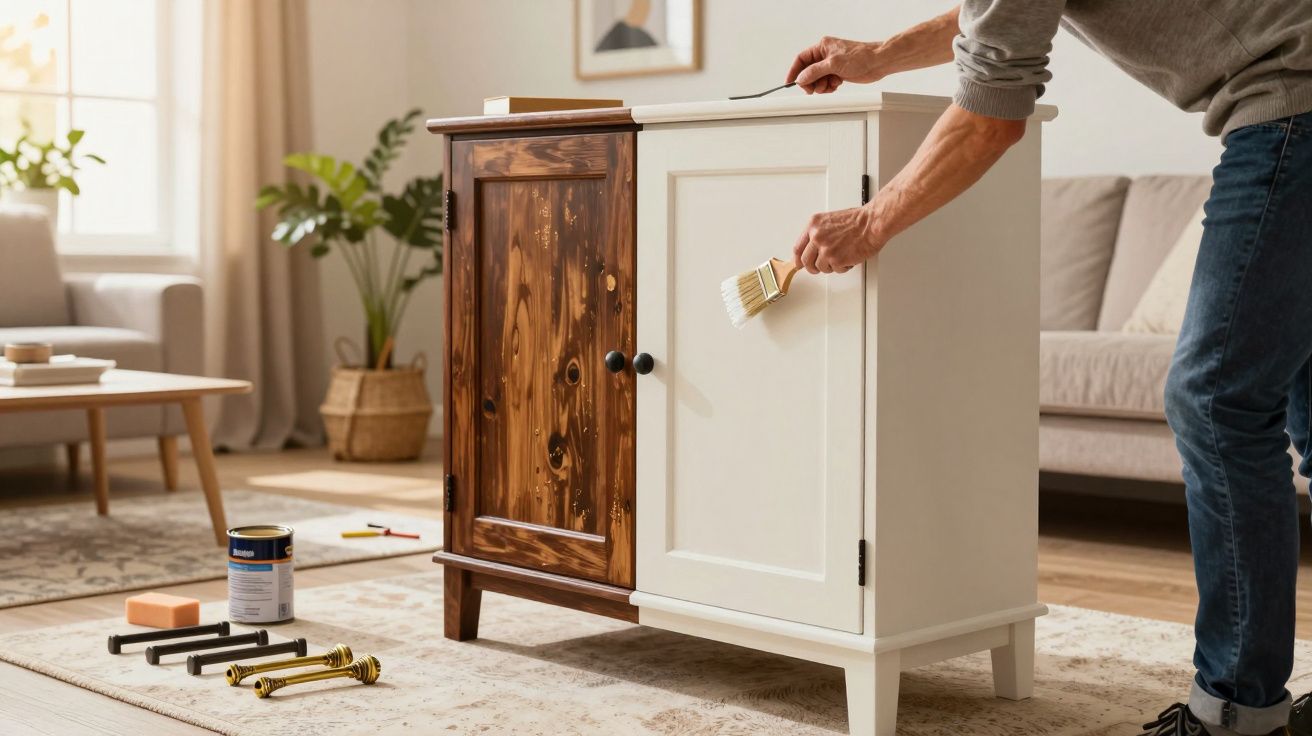
Upcycling old solid-wood furniture: from dark and heavy to light and modern
Choose the right colour and finish
Rather than loud, high-saturation colours, many DIY pros choose calm, pale shades for inherited pieces. Creamy white, warm beige or soft greys instantly lighten a room. They make dark, bulky cabinets look visually smaller and work with almost any floor finish or sofa colour.
A water-based paint with a silk-matt finish is ideal: lower odour, relatively quick drying, and easy control with a roller and brush.
Build coverage in thin coats
One thick coat is tempting-but two or three thin coats look smoother and are less prone to drips. A practical working order is:
- Apply the first thin coat to large flat areas with a foam roller.
- Use a small gloss/trim brush for edges, mouldings and corners.
- Let it dry fully.
- Apply the second coat, then let it dry again.
- If the original timber is very dark, add a third very thin coat.
If you spot a run while painting, deal with it immediately using a slightly damp cloth and a small amount of thinner suitable for the product you’re using. While painting, keep doors slightly ajar so they don’t stick together as the finish cures.
Handles, details and care: how it ends up looking genuinely new
Paint changes the overall character; the handles and other fittings lock in the style. This is where the piece can swing Scandinavian, elegant, or industrial.
Set the look with new handles (or refreshed old ones)
Gold-toned knobs on a pale cabinet feel refined, black bar handles suit modern loft-inspired interiors, and leather pulls read warm and handcrafted. If you want to keep the original fittings, you can update them with a matt gold or black spray finish.
| Handle type | Effect | Best-suited style |
|---|---|---|
| Matt gold knobs | Elegant, lightly glamorous | Modern classic, boho |
| Black bar handles | Crisp, graphic | Industrial, minimal |
| Leather pulls | Warm, homely | Scandi, country |
After the final colour coat, add a protective layer-either clear varnish or wax, depending on how much sheen you want. This helps guard against scratches, stains and moisture. Ongoing care is simple: a soft cloth and a mild cleaner will keep the finish looking good for a long time.
Two extra checks that make DIY furniture painting last longer
Older furniture can hide surprises, so a little caution improves both safety and durability. If your piece is very old and you suspect previous coatings, test a small area first-some legacy finishes react badly with modern water-based products, causing poor bonding or “fish-eye” marks. When in doubt, choose a bonding primer designed for tricky surfaces.
Also think about airflow and curing time. Paint may feel dry to the touch within hours, but it takes longer to harden fully. Keep the room ventilated and avoid heavy use (or sticking drawers back in tightly) until the finish has properly cured-especially on frequently touched areas like doors and handles.
Common mistakes-and how to avoid them easily
If you’re refinishing a large piece for the first time, a few repeat errors crop up again and again:
- Not cleaning enough: grease and dust lead to peeling and chips.
- Applying coats too thickly: drips form and doors can stick.
- Skipping drying time: impatience creates fingerprints and dents.
Patience pays off. Planning an extra day is better than wincing every time you walk past the cabinet afterwards.
How to combine the trend with other decorating ideas
This method isn’t only for one big inherited statement piece. Smaller side tables, bedside cabinets or older chairs can be updated using the same steps. If you keep the colour consistent across several items, you create a clear thread through the home-without having to replace everything.
There’s another bonus: once you’ve seen how dramatically a tired piece can change, you’ll look differently at flea-market finds. With a bit of imagination, you can see past yellowed varnish to the bright, modern focal point it could become in your hallway.
Over time, you end up with a home that doesn’t look like a catalogue-because it reflects you. Each item carries a story, yet still feels current and practical. That blend of emotion, sustainability and style is exactly what makes furniture relooking so appealing-and it finally brings Gran’s cabinet out of the dusty corner.


Comments
No comments yet. Be the first to comment!
Leave a Comment