The fashionable houseplant with its large, split and perforated leaves often outgrows its pot faster than many people expect. Sooner or later it reaches the point where the container simply can’t support healthy growth. If you delay too long-or repot at an awkward moment-you increase the risk of yellowing leaves, waterlogging and even root damage. With a few clear signals and straightforward rules, you can judge very accurately when your Monstera genuinely needs a new pot.
How to tell your Monstera needs a new pot
A Monstera is usually quite direct when it has run out of room; the trick is recognising what it’s telling you.
Roots coming out of the drainage holes
The clearest clue is underneath. If pale or brownish roots are pushing through the drainage holes, the pot has become too tight.
When roots start growing from the drainage holes or circle around the entire base, your Monstera has well and truly outgrown its home.
If you gently lift the plant out, a badly pot-bound Monstera often shows a thick mat of roots where there’s hardly any compost left-just a dense root mass.
Water runs straight through the pot
Another strong warning sign: you water as normal, yet the water shoots out of the bottom immediately and the compost still feels dry.
- The compost no longer holds water properly
- You have to water far more often than you used to
- Even after watering, the plant looks limp
In this situation, the roots have displaced most of the substrate, leaving very little material to retain moisture-so the plant is effectively sitting “on roots” rather than in compost.
Smaller leaves, yellowing, or noticeably slower growth
Monsteras are typically vigorous growers. If new leaves suddenly stay smaller, develop fewer holes, or the plant slows down markedly in spring and summer, lack of space is often the underlying issue.
Typical signs include:
- New leaves are smaller than older ones
- Older leaves turn yellow despite normal care
- The plant feels unstable, and the root ball pushes the compost upwards
If you spot these symptoms, check the pot. When the root ball is hard, tight and heavily root-bound, it’s time for fresh substrate and more room.
The best time of year to repot a Monstera
Even if the pot is packed with roots, timing still matters. A Monstera copes with repotting far better when it’s in active growth.
Spring: the ideal window for Monstera repotting
March to May is widely considered the sweet spot. Days lengthen, temperatures rise, and the plant naturally starts producing fresh growth.
Repotting your Monstera in spring gives it the best chance to grow new roots quickly and bounce back fast.
During this period, the plant has more energy for recovery, responds better to disturbance, and can repair minor root damage more efficiently.
Early summer: fine if it’s urgent
Up to around mid-June, repotting is usually still successful-especially if the root ball is extremely tight or already causing problems. Strong light and steady warmth help the plant settle into its new pot.
High summer, autumn and winter: think carefully
In high summer, heat can become an added strain. After repotting, roots are already under stress; strong sun and high temperatures can amplify that. If you can, delay until spring.
From late summer into autumn, growth slows. Repotting then often results in the plant “stalling” in the new substrate with little visible progress. In winter, during the resting period, only repot in genuine emergencies such as root rot or a severe pest problem.
- Spring: best for planned repotting
- Early summer: acceptable when repotting can’t wait
- Late summer and autumn: only if unavoidable
- Winter: emergencies only-otherwise hold off
How often should you repot a Monstera?
How frequently you need to repot depends largely on the plant’s age. Young Monsteras expand quickly, while mature plants slow down over time.
| Age of Monstera | Recommended frequency | Increase in pot size | Main goal |
|---|---|---|---|
| 0–2 years | about once a year | 5–7 cm wider (diameter) | support rapid growth |
| 3–5 years | every 18–24 months | 5–10 cm wider | steady development |
| Over 5 years | every 2–3 years | max. 5 cm wider, or just refresh compost | maintain health and stability |
| Over 10 years | every 3–4 years | no larger pot required; change substrate | renew nutrients |
One key rule: don’t jump to a pot that’s too large. An oversized container holds more water than the roots can use, which can lead to waterlogging and rot. A reliable guideline is to increase the diameter by roughly two finger-widths.
Step by step: repotting a Monstera properly
Preparation: plant and equipment
Water your Monstera thoroughly about a day before repotting. Slightly moist roots are more flexible and usually release more easily from the old pot.
You’ll need:
- a new pot with drainage holes
- a loose, airy substrate for tropical houseplants or aroids
- disinfected scissors or a knife
- optional: a support pole or climbing aid
Choosing the right pot (material and drainage)
As a practical extra, consider the pot material. Terracotta is breathable and can reduce the risk of overwatering, while plastic retains moisture longer and is lighter for large plants. Whatever you choose, proper drainage is non-negotiable-use a pot with clear drainage holes and ensure excess water can escape freely into a saucer or outer pot (and be tipped away).
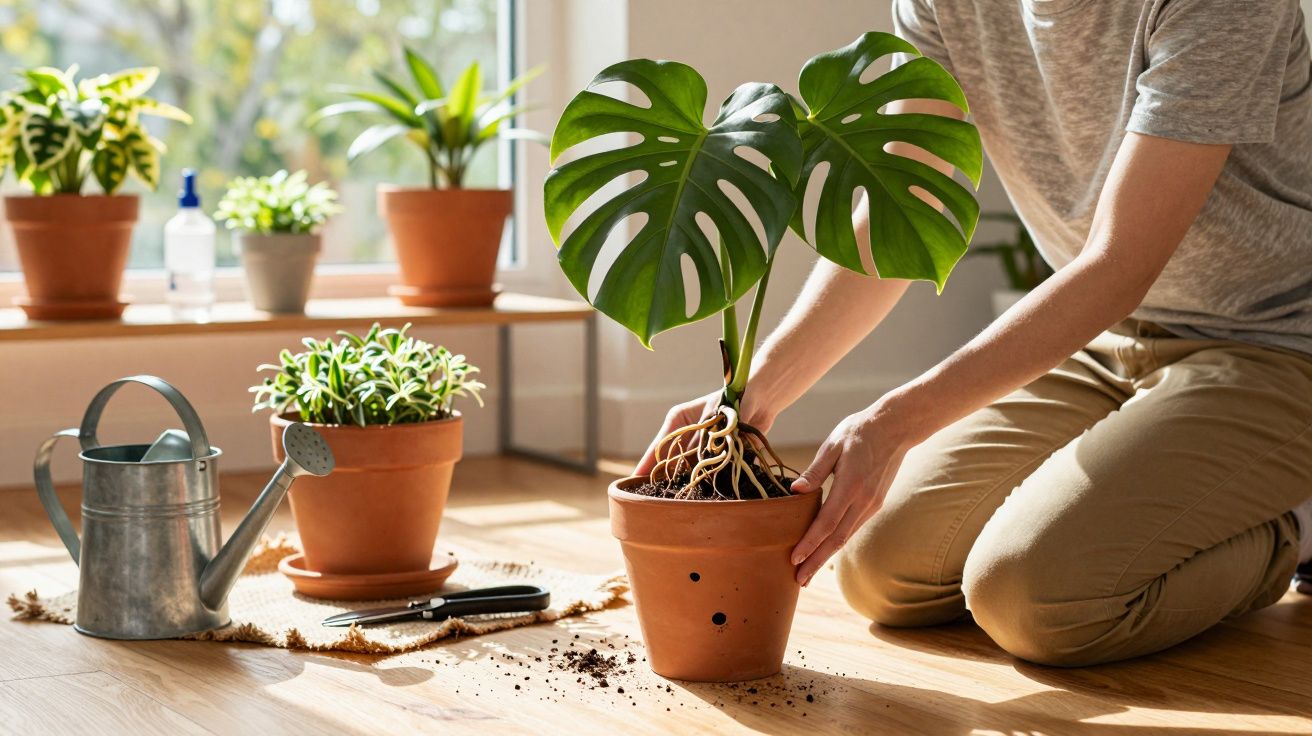
Removing the plant from the old pot
Tilt the plant on its side, support the root ball with one hand, and carefully pull the pot upwards and off. If it’s stuck, gently squeeze the pot (if it’s flexible) or run a knife around the inside edge to loosen it.
If the roots are extremely matted, you can make a few vertical snips around the outside of the root ball. This encourages fresh side roots to form once repotted.
Checking and trimming roots
Now inspect the root system closely. Healthy roots feel firm and are pale to medium brown. Any black, mushy sections or completely dried-out pieces should be removed cleanly with a sterile tool.
Only a well-aerated root ball free from rot will keep leaves strong, lush and richly green in the long term.
Planting at the correct height in the new pot
Add a thin layer of substrate to the bottom of the new pot. Place the Monstera so it sits at the same level as before. Never bury the stem deeper, as that increases the risk of rot at the base.
Fill around the sides with substrate and press gently with your fingers-firm enough for stability, but not compacted. Roots need contact with the substrate, while still having plenty of air.
Care after repotting: helping your Monstera recover quickly
Watering and positioning
Right after repotting, water thoroughly so the substrate settles around the roots and air pockets disappear. After that, only water again once the top layer of compost has dried.
Keeping the compost constantly wet at this stage can overwhelm disturbed roots and promote rot.
Place the plant in a bright spot with lots of indirect light. Avoid strong, direct sun for the first few weeks. Draughts from windows, radiators or air conditioning can slow recovery; stable temperatures of around 18–29 °C are ideal.
A short pause in growth is normal
After repotting, the plant typically prioritises root growth. New leaves may take two to four weeks to appear. During that time, your Monstera can look a bit “paused”-this is entirely expected.
Hold off on fertiliser until you see confident new leaves or shoots again. Usually, you can restart feeding gently around four to six weeks after repotting, using a weaker dose at first.
Extra support and humidity (useful but often overlooked)
If your Monstera is tall or producing aerial roots, repotting is also a good moment to add a moss pole or stake. Securing the stems reduces wobble, which helps newly settling roots. Maintaining moderate humidity can also support recovery-especially in centrally heated homes-by reducing leaf stress while the roots re-establish.
Common repotting mistakes-and how to avoid them
Many issues come not from repotting itself, but from small missteps.
- Pot too large: increases the risk of waterlogging and root rot
- Stem planted too deep: can cause rot where roots meet the stem
- Wrong substrate: plain, fine compost without structure holds too much water and compacts
- Direct sun immediately after repotting: can scorch leaves and add stress
- Too much water in the first few weeks: roots can’t keep up
A loose, chunky substrate with ingredients such as pine bark, expanded clay granules, or coarse perlite keeps air around the roots. Good aeration makes the root zone healthier and the plant more forgiving of occasional care mistakes.
Why correct timing matters so much
If you leave it too long, the problem isn’t just cosmetic-overall performance suffers. A tightly tangled root ball struggles to take up water and nutrients, and leaves may develop spots, yellowing, or stop forming their characteristic splits.
On the other hand, repotting always creates stress. If you repot a Monstera in mid-winter or during a heatwave, it often lacks the energy to rebuild roots quickly. The result can be brown leaf tips, drooping stems, or a complete growth halt for months.
When you match the plant’s signals with the right season, you’ll often see an almost immediate improvement: deeper green foliage, larger leaves, stronger aerial roots and a noticeably sturdier, more confident habit.


Comments
No comments yet. Be the first to comment!
Leave a Comment