Many people bin their old patio cushions as soon as the fabric fades or the seams give way. Yet the real value is usually in the foam insert, which is often still in excellent condition. If you think a bit more strategically, you can save serious money, cut waste, and refresh your outdoor space quickly - using a straightforward sewing method that even beginners can manage.
Why you shouldn’t throw away your old patio cushions
Barbecue stains, sun-bleached colours, stressed stitching - after a few summers, lots of patio cushions look past their best. The easy option is to replace them, but that’s where many people make an expensive mistake.
Most of the time, the foam inside is still sound: it supports properly, springs back, and shows no splitting. What fails is the textile cover. If you reach for a bin bag, you’re mostly throwing away money.
Replacing old cushion covers instead of buying new cushions can save around €40 to €80 per cushion.
There’s also the wider impact: every new purchase means more manufacturing, more transport, and more waste. Repairing, upcycling, and reusing is increasingly the smarter route - outdoors as well as indoors. Re-covering old patio cushions fits that mindset perfectly: you keep what still works and make it look genuinely new.
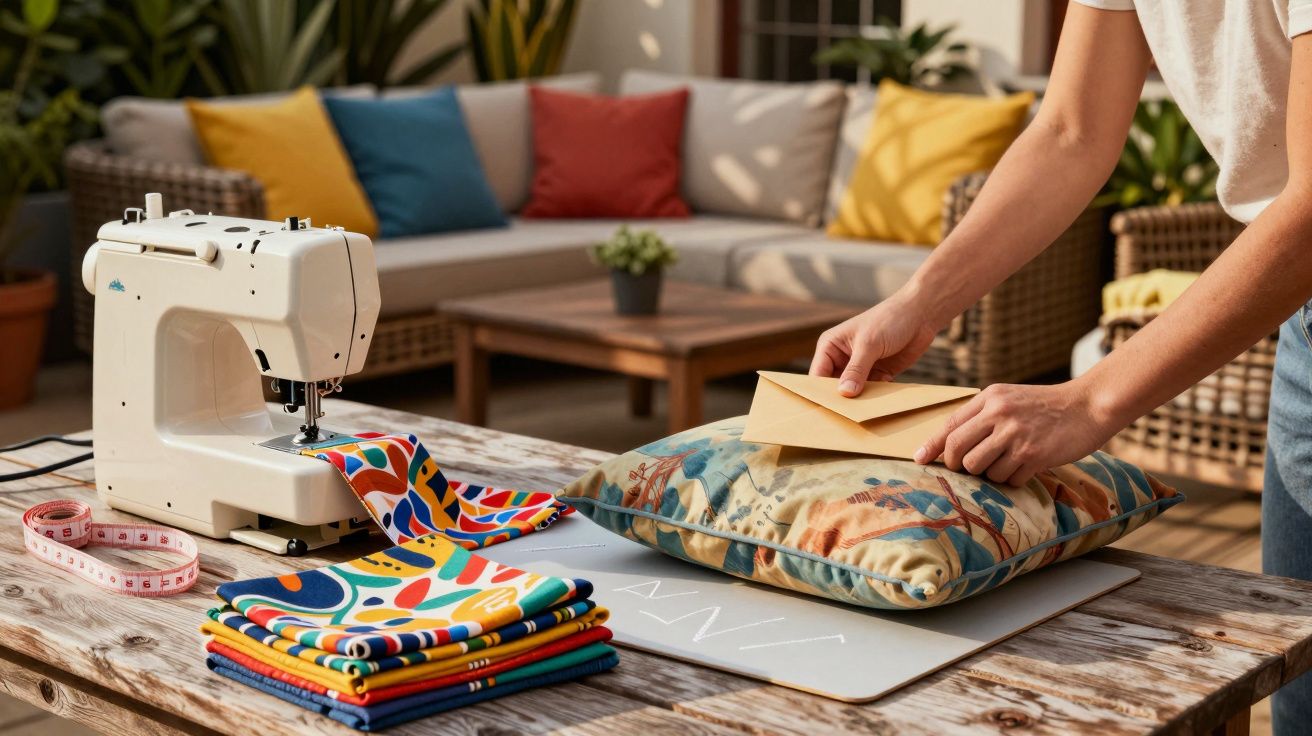
The clever fix: an envelope cover
The key idea is an envelope cover (sometimes called an overlap cover). Think of it as a cushion case that overlaps at the back - like a traditional pillowcase without a zip.
Why this pattern works so well outdoors
- no zip to jam or rust
- no buttons to tear off or leave pressure marks
- tension is carried by the side seams, not a tiny fastening
- the cover can be removed and put back on in seconds
Outside, zips and buttons have a hard life: sun, rain, temperature swings, plus constant sitting and lying down all take their toll. The envelope cover avoids these weak points entirely. It relies on fabric and two straight side seams - simple, strong, and practical.
The envelope cover is one of the most rewarding sewing projects: an easy cut, excellent durability, and ideal for the garden.
Step by step: how to calculate the fabric
You don’t need a complicated pattern. All you need is a tape measure, scissors, fabric, and a sewing machine (hand sewing works too - it just takes longer).
Basic shape for a square cushion (example: 60 × 60 cm)
Start with the size of the foam insert. Example: 60 × 60 cm.
- Width of the fabric rectangle: cushion width + about 3 cm seam allowance
→ for 60 cm, that’s roughly 63 cm - Length of the fabric rectangle: 2 × cushion length + about 20 cm for the overlap
→ for 60 cm, that’s roughly 140 cm
This gives you an overlapping closure of around 15 cm. That’s enough to keep the foam securely inside the cover without the back gaping open when someone drops onto the seat.
Sewing in four simple steps
- On both short ends (these will form the opening), fold over once and stitch to create neat finished edges.
- Lay the fabric flat with the future outer side facing up.
- Fold both ends towards the centre so they overlap by about 15 cm - this creates the envelope opening.
- Stitch the left and right side seams, about 1.5 cm from the edge, then turn the cover the right way round.
Now slide the foam insert in through the back opening. The fabric will sit smoothly, and the overlap will keep everything in place.
Practical example: re-covering a whole lounge area in one afternoon
A common situation: a pallet lounge on the patio still has firm foam cushions, but the old covers are scratched, faded, and in places badly worn through.
Buying ready-made replacement covers can quickly push you into price territory where you could almost justify replacing half the garden lounge set. Fabric off the roll changes the maths completely:
- robust outdoor fabric per metre is usually far cheaper than buying individual cushion covers
- time investment: one afternoon, even for several seat pads
- end result: looks like new and can be matched to your own patio style
A patio instantly looks tidier and more premium when the seat cushions have fresh covers - without buying new furniture.
What to look for in fabric for outdoor patio cushions
Basic decorative fabric from a craft shop is often not tough enough for patio cushions. It fades faster, frays more readily, and doesn’t cope well with constant use. A purpose-made outdoor fabric is the better choice.
Good outdoor fabrics usually have these qualities
- a noticeably dense, sturdy feel (not flimsy or drapey)
- high colour fastness (UV resistance)
- abrasion resistance for frequent sitting and sliding
- ideally water-repellent or quick-drying
The envelope cover already removes common failure points because it doesn’t rely on metal parts or press studs. Choosing a fabric with a bit of structure helps the edges and seams stay crisp after several seasons.
Trick for damp from below: a built-in protective layer
A major issue with many patio cushions is moisture rising from underneath. Pallets, timber slats, or stone paving can hold cold and damp. Foam absorbs it and dries slowly - which increases the risk of mildew.
A simple, almost free upgrade is to add an internal protective layer on the underside of the cushion:
- an old tablecloth with a coated surface
- a spare shower curtain you no longer need
- leftover oilcloth
You can stitch or tack these materials onto the underside panel of the cover. They create a barrier between the patio surface and the foam. Moisture seeps in far more slowly, the core stays dry for longer, and the cover is easier to dry out.
An extra protective layer on the underside can significantly extend cushion life - and costs next to nothing.
How complete beginners can get started
If you’re not confident with a sewing machine yet, begin with a single test cushion. Old bed linen is ideal for practising the method before you cut into pricier fabric.
Beginner tips that make a real difference:
- measure twice before cutting
- start with a basic straight stitch
- plan a seam allowance of about 1.5 cm
- choose needles and thread suited to thicker fabric
Once you’ve made your first couple of covers, you’ll quickly develop a feel for proportions and tension. After that, you can re-cover your patio set piece by piece.
Mistakes you’ll want to avoid
Most common pitfalls are easy to sidestep:
- Too little overlap: if the back overlap is minimal, the cover can open under load. Around 15 cm is a solid guideline.
- Fabric that’s too thin: it may save money upfront but will tear sooner. Outdoors, quality pays off.
- Skipping pre-washing: some cotton fabrics shrink after washing. Wash first, then cut and sew.
Extra upgrades: keeping your patio cushions fresher for longer
To make your new envelope cover last, think about day-to-day care. If the fabric is washable, clean covers before deep dirt sets in, and let them dry fully before putting them back on the foam. In wet periods, store cushions somewhere ventilated rather than leaving them stacked on damp decking or paving.
It also helps to use outdoor-suitable thread (strong, rot-resistant where possible) and the correct needle size for thicker fabric. Neater stitches and properly matched materials reduce seam strain and keep your envelope cover looking smart over repeated seasons of use.
Added value beyond the patio
The envelope cover approach isn’t only for patio cushions. The same method works brilliantly for kitchen bench pads, dog beds, campervan seat pads, and chair cushions. Once you’ve got the hang of it, you can use offcuts, mix patterns, and switch looks with the seasons or your mood.
It also changes how you relate to your belongings. Instead of replacing, you improve, customise, and reuse. A pile of “old” patio cushions can become a modern, individual seating area - with an afternoon of work, a bit of fabric, and a sewing idea that’s surprisingly practical.


Comments
No comments yet. Be the first to comment!
Leave a Comment