The moment nearly always happens at the mirror. The lighting is slightly unforgiving, the bathroom feels unusually quiet, and there they are: silvery roots that have appeared quicker than your last online delivery. You angle your head, separate a section, narrow your eyes. Through the lengths you still see chestnut, copper, or that box shade labelled “chocolate 5.3”. Yet right at the scalp there’s a crisp line - two colours co-existing without blending.
You could book another last-minute “roots emergency” appointment. You could top up at home, again. And you might also notice that small, persistent idea forming: what if you simply didn’t? Grey hair looks striking on other people, doesn’t it?
That’s the precise point where reverse coloring slips in - discreetly, almost like a secret.
Why reverse coloring is changing the game after 50
From about 50 onwards, hair tends to become brutally honest. Natural pigment reduces, the texture can shift, and the much-dreaded root regrowth effect becomes the main event. The all-over colour that looked seamless at 35 starts requiring near-military upkeep: every three weeks, that pale line returns - like an unwanted diary alert.
Reverse coloring rests on a straightforward switch in logic. Instead of battling your grey or white at the roots, you keep it. Then you colour the lengths - not the scalp. That single adjustment changes the entire look and the maintenance schedule.
The reasoning is almost mathematical: if the lightest part sits at the roots (where hair is actually emerging), and the colour gradually deepens through the mid-lengths and ends using translucent tones slightly darker than your grey, your eye reads it as believable and natural. The harsh “helmet” edge disappears because you’re no longer trying to make the scalp darker than everything else. Your natural base becomes a bright canvas rather than something to cover.
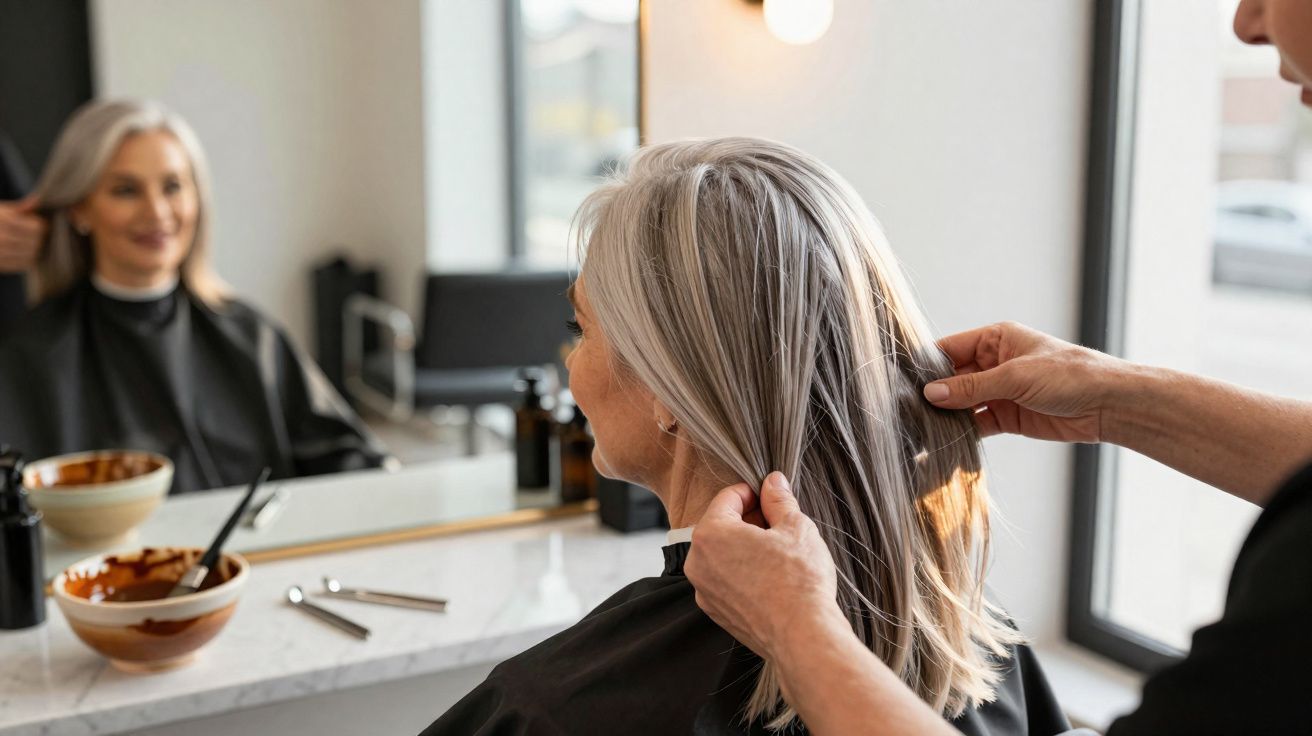
Take Marie, 57. For a decade she chased her regrowth: salon visits, at-home kits, frantic last-minute touch-ups before dinners. Her hairline was often a touch too dark compared with the rest - flatter, more opaque, like a painted strip. Eventually her stylist suggested doing the opposite: stop covering the roots altogether. Use her natural white as the starting point and add cool, soft highlights and lowlights only through the mid-lengths and ends.
They approached it gradually over six months. People started saying, “You look well-rested,” and “Have you changed your skincare?” Nobody commented on her hair colour directly - because the regrowth stopped being the focal point. Instead of a border, there was simply light moving through the hair.
Rather than disguising maturity, reverse coloring arranges it in a flattering, intentional way.
How to do reverse coloring for grey hair without damaging it
The first step is consistent: leave the roots alone. Give it at least 8–12 weeks (roughly two to three months) so a clear band of grey or white grows in, even if it annoys you when your hair is tied back. Your colourist needs that real, visible base to work with. After that, instead of applying one blanket shade, they place colour only through the lengths - building a blend rather than a cover-up.
Most of the shades used are semi-permanent, sheer, or “gloss” formulas: think soft layers of beige, pearl, sand, or a gentle taupe, chosen to suit your natural base. The aim isn’t to delete contrast completely; it’s to soften it so the eye doesn’t catch a line. The roots remain untouched - bright, reflective, and alive.
The biggest mistake is trying to rush it. Asking to “go grey” in a single appointment, or pushing to strip out years of dye all at once, is where breakage, brittle texture, and instant regret tend to appear. A skilled professional will usually talk you through a plan across several visits, not a one-off transformation.
Another common reflex is overloading the lengths with pigment because of the fear of “looking older”. Ironically, that can make features appear harsher. A more forgiving strategy leans into softness: transparent tones, fine placement, and often a slightly cooler note around the face to brighten the complexion. Many of us recognise that moment when anxiety about ageing nudges us into choices that age us more.
“Reverse coloring is like lowering the volume of colour rather than switching it off,” says Ana, a colourist seeing more and more clients over 50 requesting it. “We honour the grey at the root and work with light through the rest. It looks less ‘done’, more premium, and far more freeing.”
- Book a consultation that focuses on your true base colour and your skin tone.
- Map out a transition over 3–6 months rather than aiming for a single dramatic appointment.
- Request translucent, glossy colour on the lengths - avoid heavy, opaque dyes.
- Keep the roots natural and luminous; work mainly through the mid-lengths and ends.
- Refresh the tones every 8–12 weeks, without applying colour to the scalp.
A useful extra to discuss at your appointment is your haircut strategy during the transition. A small trim every 6–10 weeks can gradually remove old, overly-warm dyed ends and keep the silhouette fresh. Even a subtle change - soft layers, a slightly shorter length, or a fringe that skims the brows - can make the blend look more intentional while you’re growing out your natural base.
At home, think in terms of preserving shine and keeping brassiness under control. A gentle purple or silver shampoo once a week (not daily) can help neutralise unwanted yellow tones in white or grey areas, while a hydrating conditioner or mask keeps the lengths supple - especially if they’ve been coloured repeatedly in the past.
Living with your new hair: more freedom, less drama
Once reverse coloring is established, everyday life shifts in practical, noticeable ways. The bathroom shelf clears out: no more emergency root kits tucked beside cotton pads. Salon visits typically stretch from every 3–4 weeks to around every 8–10 weeks. And the mirror stops shouting “regrowth!” - it simply shows hair that changes at a natural pace.
It can soften your relationship with ageing as well. You’re not making a sudden, performative “embrace the grey” announcement. You’re making peace with it - reducing the contrast, keeping nuance, allowing a mix of light and shadow. In reality, nobody feels confident about this every single day, but you may catch yourself appreciating how the white picks up sunlight rather than trying to hide it.
For some people, that extra breathing space sparks other updates: a lighter cut, a fringe, bolder spectacle frames, or a lipstick shade half a tone brighter. Hair stops being a battleground and becomes enjoyable again.
| Key point | Detail | Value for the reader |
|---|---|---|
| Reverse the logic of colour | Natural grey/white at the roots, soft shades on the lengths only | Reduces the “root regrowth effect” without fully committing to all-grey immediately |
| Transition in stages | Plan 3–6 months using glosses, highlights, and small cut adjustments | A smoother shift with less damage and fewer regrets |
| Softer, translucent tones | Beige, pearl, sand, or taupe veils rather than opaque dyes | A more youthful look, brighter complexion, and hair that stays flexible and soft |
FAQ
Does reverse coloring work if I’m only 30% grey?
Yes - provided you can grow a visible grey band at the roots. Your colourist will use finer, lighter placement on the lengths so it doesn’t look uneven or “patchy”.Can I do reverse coloring at home?
You can maintain the look with glosses or colour-depositing conditioners, but the initial approach is best done in a salon. The placement and tone selection are precise and make or break the blend.Will my hair be damaged by the process?
When done properly, reverse coloring is typically kinder than years of full-head root coverage. You’re colouring less hair, less often, using sheerer formulas.How often will I need touch-ups?
Many women settle into a rhythm of every 8–12 weeks (sometimes longer), depending on hair growth and how much contrast they prefer.What if I decide later to go fully grey?
Reverse coloring can actually make that transition easier. Because the lengths are already lighter and blended, you can simply extend the time between glosses and gradually shorten the cut.


Comments
No comments yet. Be the first to comment!
Leave a Comment