Last Tuesday morning, I stood in my bathroom staring down at the tiles, caught between irritation and sheer embarrassment. The grout lines that used to look clean and crisp had dulled into grimy, dark seams, making the whole room feel unclean no matter how hard I scrubbed the tile surfaces. I nearly grabbed the heavy duty bleach cleaner from under the sink out of habit, then stopped. It was partly the thought of those sharp fumes in a small, badly ventilated bathroom, and partly the nagging worry about what that sort of chemical exposure means for a family over time. That pause brought back my grandmother’s old cleaning habits - the practical, no-nonsense tricks that often worked better than anything shop-bought. Sometimes the best answer is already in the cupboard.
Why bathroom grout gets so disgustingly dirty (and why bleach isn’t the answer)
Bathroom grout is effectively a trap for all the things you don’t want lingering in your home. Because most grout is porous, it readily absorbs soap scum, moisture and dead skin cells like a sponge. Combine that with poor airflow and you’ve created ideal conditions for mould and mildew to take hold.
I found this out the hard way when I moved into my current flat three years ago. The previous tenant had clearly surrendered the battle with grout maintenance, leaving behind lines so stained they looked like they belonged in a petrol station toilet. The property manager advised bringing in professionals, but the estimate came back at around £240 for what appeared to be a straightforward task. That was the moment I decided I’d become my own grout-cleaning expert.
Bleach is the option many people reach for first, but it’s not the hero it’s made out to be. While it can make grout appear whiter for a short time, it can also weaken grout over time by breaking down binding materials. The result is grout that becomes even more porous and even more likely to stain again. And, frankly, very few people fancy breathing harsh fumes just to make a bathroom feel fresh.
The baking soda and hydrogen peroxide grout-cleaning paste that actually works (no harsh chemicals)
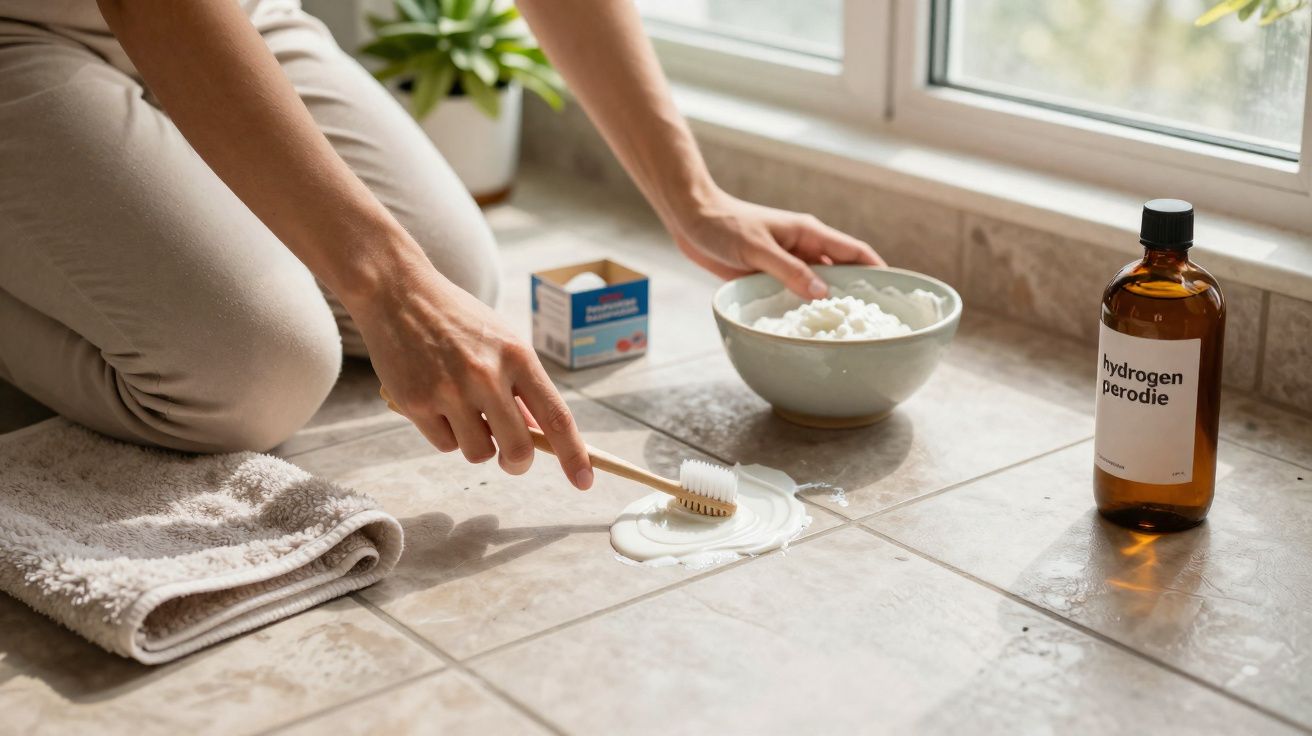
The most effective fix I’ve found is surprisingly simple and probably already in your kitchen: baking soda and hydrogen peroxide. Combine three parts baking soda with one part hydrogen peroxide and stir until it forms a thick, spreadable paste. You’re aiming for a toothpaste-like texture - dense enough to cling to vertical grout lines, but not so dry that it crumbles as you apply it.
Where most people go wrong is trying to rush. Time matters. Spread the paste generously over the grout using an old toothbrush, then leave it alone for at least 10 minutes. I usually put a wash on or make a cup of tea while I wait. During that pause, the hydrogen peroxide works as a gentler bleaching agent, and the baking soda contributes mild abrasive power to lift the grime without shredding the grout.
Technique counts more than you might expect. Work in small areas and scrub with the toothbrush in tight circular movements.
“I was skeptical at first, but this paste removed stains that I thought were permanent. My bathroom looks like it belongs in a hotel now, and I didn’t have to wear a gas mask to clean it.” – Sarah M., homeowner
- Never use metal brushes on grout - they can scratch and damage the surface
- Work from top to bottom so dirty water doesn’t run onto areas you’ve already cleaned
- Rinse well with warm water when you’re finished
- Keep a window open or run an extractor fan to improve air circulation
Beyond the quick fix: keeping grout clean so it stays clean
The real win isn’t just cleaning grout once; it’s stopping it from slipping back into that “always looks dirty” state. After using the paste method, I started running a squeegee over the shower walls after each use. That small habit prevents soap and water from settling into the grout lines in the first place. Your future self will absolutely appreciate those extra 30 seconds of daily upkeep.
Another helpful step, once the grout is fully dry, is to consider applying a grout sealer. Sealing doesn’t replace cleaning, but it can reduce how quickly moisture and stains soak in, especially in showers used daily. If you do seal, follow the product instructions carefully and ensure the bathroom is well ventilated while it cures.
It’s also worth tackling the cause, not just the symptoms: better ventilation makes a noticeable difference to mould and mildew. If your extractor fan is weak or rarely used, running it for 15–20 minutes after showers (or cracking a window where possible) can reduce lingering moisture that feeds staining in grout.
| Key point | Detail | Value for the reader |
|---|---|---|
| Cost-effective solution | Baking soda and hydrogen peroxide cost under £5 in total | Saves hundreds compared with professional cleaning |
| Non-toxic approach | No harsh fumes or chemical residue | Safer for families, pets and people with sensitivities |
| Long-term grout health | Gentle cleaning helps preserve grout integrity | Reduces the risk of costly grout replacement later |
FAQ: baking soda and hydrogen peroxide for grout
How often should I use this paste method?
Once a month is usually plenty for most bathrooms, although high-use showers may need attention every two weeks.Can I add essential oils to make it smell better?
Yes. Tea tree or lavender oil work well and can add natural antimicrobial properties to your cleaning paste.What if my grout is really, really bad?
For heavy discolouration, you may need to apply the paste twice, leaving it for 15–20 minutes each time.Is this safe for coloured grout?
Test a small, hidden section first. Hydrogen peroxide can lighten some coloured grout, so proceed carefully.Can I make a big batch and store it?
It’s best mixed fresh each time. Hydrogen peroxide loses effectiveness when exposed to air and light for long periods.


Comments
No comments yet. Be the first to comment!
Leave a Comment