You’re due out at 08:30. Your hair, meanwhile, has decided to start its own protest. Somewhere between “I’ll just wear it down” and “Maybe I can throw it into a bun?”, you find yourself in front of the mirror, twisting random sections and wishing for a miracle that looks more Vogue and less frantic video call.
You reach for an elastic, then a claw clip, then that odd little metal pin you panic-bought on TikTok at midnight. Somehow, nothing sits right. Everything gives off the unmistakable energy of “I attempted this… and it didn’t work”.
And then there’s always her: the woman on the train with hair swept up in a loose, chic twist that looks both effortless and expensive. You can tell she didn’t spend 20 minutes engineering it.
So what if the gap between your chaos bun and her French-girl updo really is one tiny move?
The real reason your “quick bun” never looks chic
Most of us go at our hair as if we’re wrestling it into submission. We drag it back, haul it into a ponytail, twist until it feels painfully tight, and then expect an elastic to magically turn stress into elegance.
What usually happens instead is a bumpy knot that tugs at your scalp and sags by lunchtime. It’s fine for the gym, but it doesn’t deliver that “I woke up in a Paris hotel” mood. And no, the difference isn’t your hair type or a mysterious French gene.
It comes down to two things: where the volume sits and what you do with the ends.
Last spring, on a busy street in London, a stylist friend stopped mid-conversation, pointed at a woman crossing the road, and murmured, “That. That’s a 30-second updo.” The hair wasn’t flawless-there were a few loose pieces-but the overall effect looked deliberate, almost editorial.
Later, she explained why it worked: the twist began around the middle of the head rather than right at the nape; the hair wasn’t slicked flat; and the ends were tucked upwards, not folded underneath. No product cocktail. No visible pins. No salon-perfect blow-dry.
We’re sold the idea that a chic updo requires a curling wand, texturising spray, upper-body strength, and a YouTube tutorial paused every ten seconds. Let’s be honest: nobody truly does that every day. When you start paying attention in real life, most hairstyles you envy are held together with one elastic and pure muscle memory.
Once you notice where other people place their twists and how they hide the ends, you’ll see the pattern everywhere.
A tight, low knot pulls the whole look down. It flattens the crown, makes the face look harsher, and deletes that soft “lift” that reads as stylish in photos. Shift the anchor point higher and use tension only where it actually helps, and your profile changes in seconds.
Hair also looks more interesting when it isn’t plastered to the scalp. A little looseness at the front plus a cleaner line at the back quietly signals, “This is intentional, not accidental.” That’s why the same messy bun can read as either sofa-and-Netflix or rooftop-cocktail ready.
The move you’re missing is working with your hair’s natural bend and placing the twist where the head curves-instead of forcing everything into a low lump at the neck.
The one-minute “half-twist tuck” French twist updo (claw clip or U-pin)
Here’s the trick that floats around backstage at shoots: the half-twist tuck. Think of it as a pared-back French twist, simplified enough for a Tuesday morning when you’re half-dressed and low on patience.
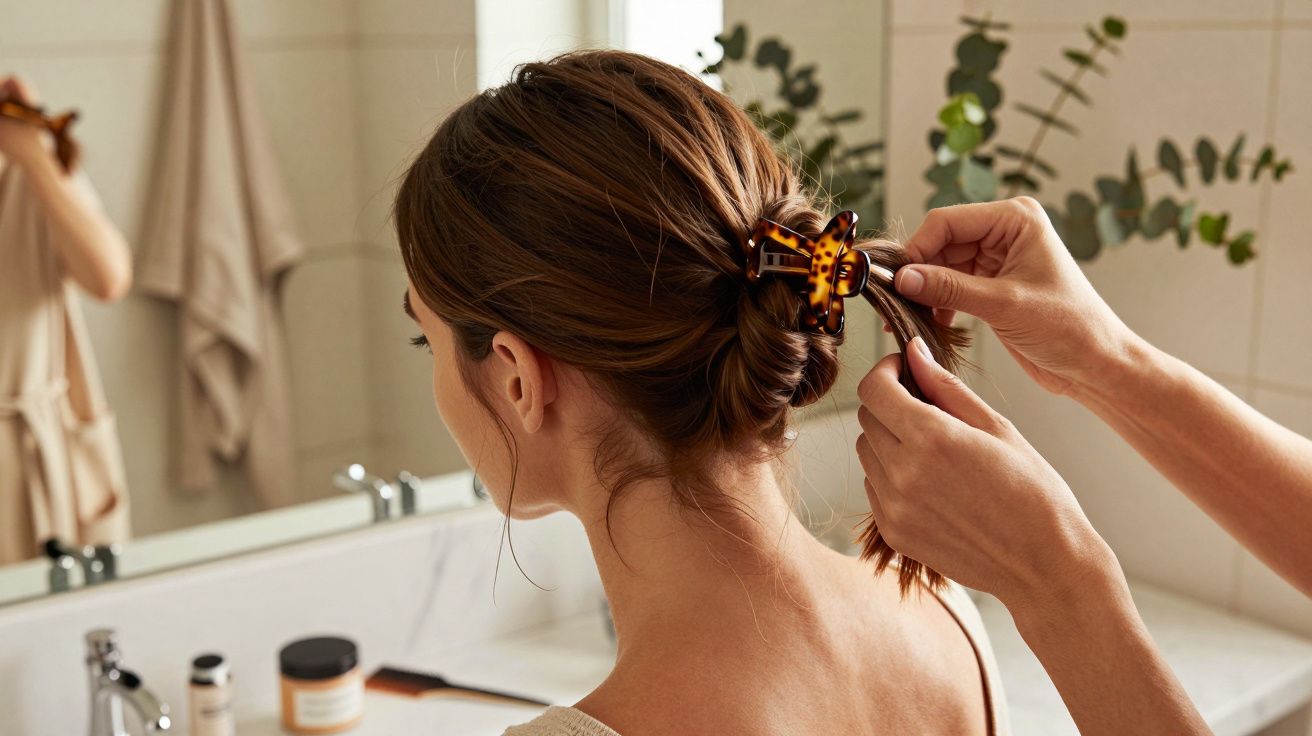
- Gather your hair as if you’re making a low ponytail-but stop with your hand at the middle of the back of your head, not down at the nape. Don’t bother with a brush; use your fingers.
- Holding that “ponytail”, twist the length upwards once, loosely, so the hair starts folding against your head.
- Key step: instead of rolling into a tight, polished log, fold the ends up and tuck them behind the twist.
- Secure with one claw clip or a U-pin, placed vertically (up-and-down), not horizontally across the twist. Done.
The urge is to overdo it-smooth every baby hair, twist five times, add spray, then question your life choices. Don’t. This updo relies on that slightly undone quality.
If your hair is very silky, add a tiny bit of dry shampoo before you begin, focusing on the lengths rather than the roots.
To finish, use your fingertips to ease out two small, face-framing pieces. Not big chunks-just wisps that skim your cheekbones or jawline. Instantly softer, instantly more “effortless”.
If the clip feels too high, slide it down about 1 cm. Small adjustments completely change the vibe.
We’ve all had that 15:00 moment when you catch yourself in a window reflection and realise your once-cute bun has collapsed into something vaguely birdlike. The half-twist tuck holds up better because the twist sits into the curve of your head instead of dangling off a single elastic.
“People think they need ten bobby pins for a chic updo,” laughs London hairstylist Erin L., who works on editorials and weddings. “In reality, I can put up 80% of heads with one clip and one twist. The rest is just confidence and a bit of mess.”
A few common mistakes can make this simple trick feel oddly hard:
- Starting too low. If your hand is resting on your neck when you twist, the updo will look droopy. Aim higher-closer to where you’d place a mid-ponytail.
- Twisting too tightly. Over-tension creates a harsh, overworked finish.
Keep the first twist relaxed, then add tension only when you tuck and clip.
If your hair is very thick, split it into two sections, give each a light twist, then merge them into one larger twist under the clip. If it’s very fine, a pea-sized amount of texturising paste warmed between your hands before you touch your hair can make all the difference.
Quick checklist - Gather hair at mid-head, not at the nape. - Twist upwards once, keeping it loose at first. - Tuck ends upwards behind the twist. - Secure with a vertical claw clip or U-pin. - Loosen a couple of face-framing wisps at the end.
Two small upgrades that make it look even more intentional (without extra time)
If you want the “I meant to do this” finish without adding a full styling routine, keep one practical extra in your bag: a compact claw clip and one kirby grip (bobby pin). Even if the goal is “one clip, one twist”, having a single hidden pin for emergencies means you can rescue the back if you’re dealing with layers or a slippery section.
Also, think about placement relative to your parting. If you wear a deep side part, let a little more softness fall on the heavier side, and keep the opposite side slightly cleaner. It makes the half-twist tuck look balanced, rather than accidentally lopsided-especially under harsh office lighting.
Why this tiny trick feels like a small act of rebellion
There’s something quietly radical about getting ready in 60 seconds and still looking like you made an effort. For years, the chic updo has been treated as “special occasion only”: weddings, important meetings, or carefully staged “get ready with me” videos. Doing it in a stripped-back, everyday way pushes against the idea that beauty must be time-consuming.
It changes how you carry yourself, too. People often say they feel oddly “taller” with the half-twist tuck, even when it barely lifts off the neck. With hair away from your face your features open up, but because the twist stays soft, it never looks severe. The message it sends is subtle: I’m capable, but I’m not trying too hard.
Once you practise it a handful of times in low-stakes moments-at home on a Sunday, popping out to the shops-it becomes muscle memory. Then one day you’re running for a train, your inbox is on fire, your hair is doing that frizzy-flat-confusing thing… and your hand is already twisting and tucking before you’ve fully thought about it.
The real magic isn’t only the hairstyle. It’s the micro-ritual: those 40 seconds at the mirror where you take chaos and give it just enough structure to feel like the day isn’t driving you.
And the honest answer, when someone says, “Your hair looks amazing-what did you do?” is: not much. One clip, one twist, one small decision to choose chic over “I give up”.
Key points at a glance
| Key point | Detail | Why it helps you |
|---|---|---|
| Twist placement | Position the twist at the middle of the back of your head, not at the nape | Instantly shifts your profile and gives a more chic lift |
| The “half-twist tuck” move | One upward twist, then tuck the ends up and secure vertically | Creates an elegant bun in under a minute without complicated technique |
| Soft finishing | Pull out a few wisps around the face and keep a little texture | Avoids a too-severe look and creates that sought-after “effortless” finish |
FAQ
- Will this trick work on very thick hair?
Yes. Split your hair into two sections first, twist each lightly, then combine them into one larger twist and secure with a bigger claw clip or two strong U-pins.- What if my hair is super fine and slippery?
Prep with dry shampoo or a texturising spray, focusing on the lengths, and twist a bit tighter before you tuck the ends so the clip has something to grip.- Can I do this on wet or damp hair?
It’s best on dry or nearly dry hair; on very wet hair the twist can feel heavy and may tug at the roots as it dries.- How do I stop pieces from falling out at the back?
Slide the clip in vertically so it catches both the twist and a thin layer of hair against your scalp, then add one hidden kirby grip (bobby pin) at the base if you need backup.- Is this updo suitable for formal events?
Yes. Add a touch more polish: smooth flyaways with a light cream and swap your everyday clip for a sleeker barrette or a decorative comb.


Comments
No comments yet. Be the first to comment!
Leave a Comment