The timer on her phone flashed 10 minutes. That was the limit she set herself. In the living room, the children were bickering over a cartoon, something bubbled away on the hob, and in the small, quiet square of the bathroom she looked down at the floor. The tiles themselves looked fine. The problem was the grout: a tired, grey, stubborn outline that seemed to record every hurried shower and every “I’ll do it properly later” clean from the past few months.
She’d already gone through the usual options-sprays, a pricey foam that promised the world, even a so‑called “magic” sponge that fell apart after a couple of uses. Nothing made much difference. Or it did… but only if she scrubbed as though she were in training for the Olympics. And realistically, no one keeps that up every day.
Later that evening, mindlessly scrolling on her phone, she spotted a comment: “Two ingredients. Ten minutes. Like new.” It sounded too neat to be true. It wasn’t.
Why dirty grout bothers us more than dirty tiles
If you really look at a bathroom or kitchen floor, your eyes don’t settle on the tiles first. They go straight to the thin lines between them. When those lines are dark, stained, or tinged yellow, the whole room looks worn out-even when everything else is spotless. It’s not fair, but it’s how we’re wired: we fixate on the flaw, not the 90% that’s perfectly acceptable.
That’s why grimy grout can feel oddly personal. It isn’t just “a bit untidy”. It reads like neglect, as though nobody is looking after the space. And if you’re trying to keep on top of work, children, meals, and the never‑ending to‑do list, that narrow strip of grey can start to feel like evidence you’re not keeping up.
Most of us know the scene: you kneel down with a sponge, full of good intentions. You scrub one grout line, then another, and within ten minutes your shoulders are complaining while the floor looks almost the same. The dirt feels baked in, as if the stains have become part of the house. You stand up, irritated, and promise yourself you’ll “sort it one weekend”.
That celebrated weekend rarely arrives. The grout gets darker, you stop looking at it, and those bright bathroom photos in magazines start to feel like fiction. Crisp white lines-who actually lives like that, and do they have a cleaning lab?
The key detail is this: grout doesn’t behave like tile. Tiles are glazed and hard; most everyday sprays can shift soap scum and splashes from the surface. Grout is porous. It soaks up water, shampoo residue, greasy cooking vapour, and even fine dust brought in from outside. Those narrow channels between tiles act like tiny sponges, holding onto pigments and bacteria.
So you can spray the surface repeatedly, but if your cleaner isn’t getting into those pores, very little changes. Shop-bought products often try to force the issue with aggressive chemicals and thick foam. They may work, but they can be harsh, expensive, and unpleasant for eyes, lungs, and little noses passing through. A simple, focused mixture targets the actual problem: the grime lodged inside the grout.
Grout cleaning with baking soda and white vinegar: the 2‑ingredient mix that changes everything in 10 minutes
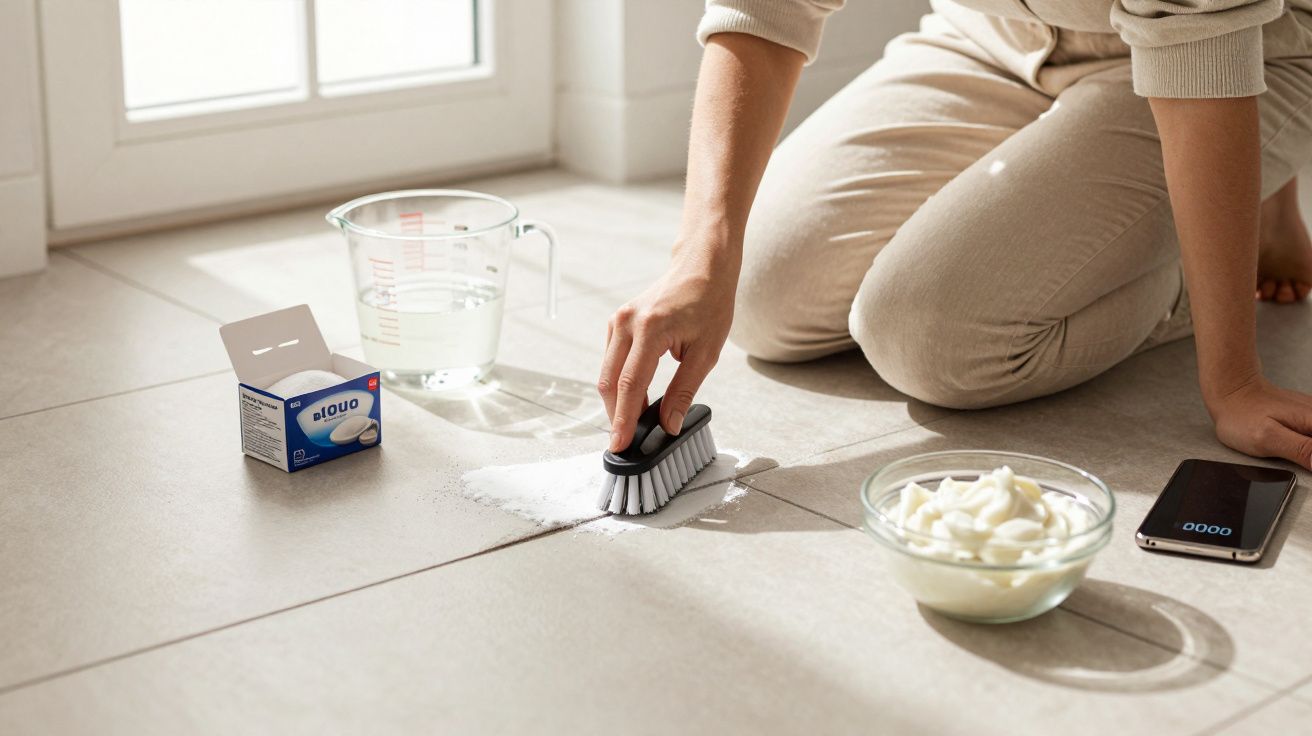
The “recipe” that turned her bathroom around began with a bowl and two everyday kitchen staples: baking soda and white vinegar. No specialist powder. No niche cleaner. Just a classic pair your gran likely used long before anyone called it a hack.
She tipped a few spoonfuls of baking soda into the bowl, then added white vinegar gradually until it became a thick, slightly fizzy paste.
The aim isn’t a runny liquid-it’s closer to toothpaste. You want a consistency you can pick up with an old toothbrush and that will stay on the grout instead of sliding off the tiles. She spread the paste along each grout line, not worrying about perfection, simply tracing the grid across the floor. After a few seconds, the fizzing eased. Then she left it alone-ten minutes on the clock.
This is where people often get disappointed: they expect the paste to do everything on its own, like in an advert where dirt disappears on contact. In real life it’s more subtle. Those few minutes matter because the mixture needs time to work its way in and loosen the film that has built up over months-or years. Scrub immediately and you lose a lot of the benefit. Leave it for an hour and it dries out, meaning you end up scraping at a crust.
Ten minutes is just long enough to fold a bit of laundry, reply to a couple of messages, or drink a coffee leaning on the kitchen counter. When she came back, she didn’t go to war with the floor. She used small circular movements with the toothbrush, applying a bit of pressure but nothing extreme. The surprise wasn’t that it worked-it was how quickly the dull grey started moving back towards a creamy, lighter shade.
“Honestly, I thought the grout had always been that colour,” she laughed. “I’d forgotten it was meant to be light. Watching it return felt like finding a new bathroom underneath the old one.”
What you need (and why it helps)
Ingredient 1: Baking soda
A gentle abrasive that cleans without scratching tiles and helps lift stains trapped in porous grout.Ingredient 2: White vinegar
Mildly acidic, it breaks down mineral deposits, soap scum, and grime, and it activates the baking soda to help the mix work deeper.Tool: Old toothbrush
A small head with firmer bristles lets you target the grout line precisely without damaging the tile edges.Time: About 10 minutes of rest
The sweet spot where the mixture can act on dirt without drying into a hard layer.Finish: Rinse and dry
Wipe with a damp cloth or mop, then dry with an old towel to reveal the true colour of your grout.
A couple of practical notes before you start (added)
Good ventilation makes the whole job more comfortable. Even though baking soda and white vinegar are common household items, the smell can be sharp in a small bathroom. Open a window, leave the door ajar, and if you have sensitive skin, wear washing-up gloves-especially if you’re doing a large area.
Once your grout looks fresh again, prevention becomes much easier than rescue. If your grout is unsealed (or the seal has worn away), consider applying a grout sealer once everything is fully dry; it helps reduce how much water and residue can soak in. Even a quick wipe after showers and splashes can slow down that slow drift back towards grey.
When a clean grout line feels like a small reset button
There’s a strangely satisfying moment when the first square of floor changes. One minute it looks flat and tired; the next, the grout is lighter, the tiles appear newer, and the room feels as though it has a bit more air in it. It’s only a floor, yet it changes how you enter the space. You stop rushing out so quickly, and you’re less tempted to avoid switching on the bright light when someone’s coming round.
This routine won’t magically erase the mental load, the washing pile, or the email you’ve been dodging. But it does give you one clearly defined patch of control, using nothing more than two kitchen jars and a toothbrush with a second job. Those ten minutes stop feeling like punishment and start to feel like a small ritual: mix, spread, step away, return, rinse, enjoy.
| Key point | Detail | Value for the reader |
|---|---|---|
| 2 simple ingredients | Baking soda and white vinegar, mixed into a thick paste | Low-cost, easy to find, with no need for specialist products |
| 10-minute action time | Let the paste sit before lightly scrubbing with a toothbrush | Less physical effort while still giving fast, visible results |
| Regular light touch-ups | Quick pass on the most used areas every few weeks | Stops grout darkening again and keeps that “fresh” feel for longer |
Suggested reads (from her scrolling)
- The bright promises of EyePulse, the French military drone from Daher that the armed forces lack
- Why keeping a wooden spoon in your pasta water prevents messy boil-overs every single time
- Microwaving a lemon: a simple kitchen trick you’ll keep using
- During Black Friday, this full-suspension electric mountain bike hits a very competitive price at Decathlon
- I tried this homemade comfort recipe instead of ordering food and didn’t regret it
- Fatty liver: how to recognise symptoms and identify the disease
- Probably F15s, F16s, F22s and F35s: dozens of US jets now converging on the Middle East
- And while this is happening, China is building giant landing barges - and they’re definitely not meant for Normandy
FAQ
Question 1: Can I use this 2‑ingredient mix on coloured grout?
Answer 1: Usually, yes-baking soda and white vinegar are typically gentle enough for coloured grout. Still, test a small hidden patch first to make sure the colour doesn’t fade or shift.Question 2: Will this method damage my tiles?
Answer 2: On ceramic or porcelain tiles it’s generally safe: baking soda is mildly abrasive and the vinegar is diluted. Avoid using it on natural stone such as marble or travertine, which can react badly to acid.Question 3: How often should I clean my grout like this?
Answer 3: In busy bathrooms or kitchens, once every 4–6 weeks is usually plenty, with quick spot-cleaning on the darkest lines when you notice them changing colour again.Question 4: What if the grout is still dark after one round?
Answer 4: Very old or deeply stained grout may need two or three sessions. Repeat the process on the worst sections and leave the paste resting a little longer before scrubbing again.Question 5: Can this replace all my bathroom cleaners?
Answer 5: Not completely. This mix is ideal for grout and some stubborn marks, but it’s still useful to keep a mild daily cleaner (or warm soapy water) for quick wipe-downs of tiles, glass, and fixtures.


Comments
No comments yet. Be the first to comment!
Leave a Comment