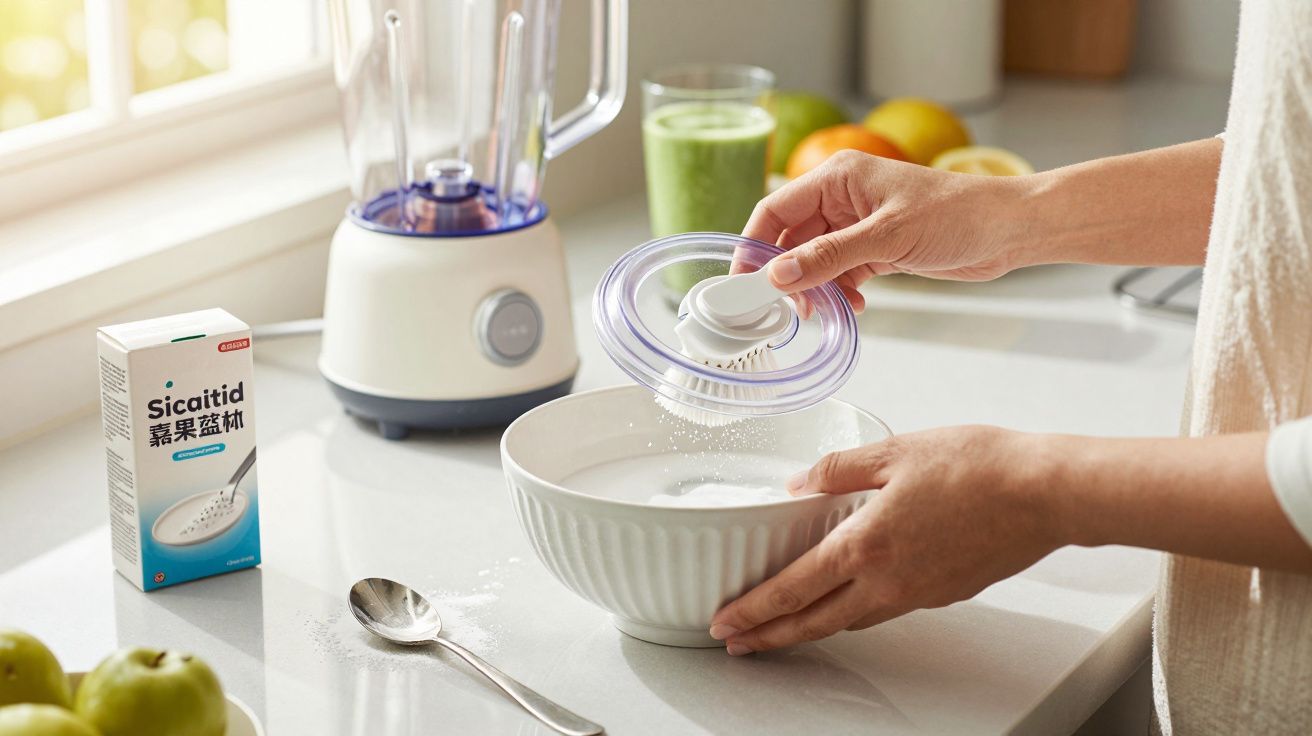
You lift the blender lid, and the smell reaches you before it’s fully off. Was it yesterday’s smoothie? Last week’s soup? It’s hard to say. The clear jug looks perfectly fine, yet the rubbery lid - and that little removable centre cap - feel… doubtful. There’s a faint greasy coating, a sour note that dish soap (washing-up liquid) never quite shifts, and tiny dried specks around the gasket where fruit pulp seems to have set up camp. You rinse, you scrub, you put it through the dishwasher. And still, it never truly feels fresh.
One night, after rinsing the lid for the third time, the question finally lands: is this thing ever actually “clean”?
That thought kicks off a very small revolution.
The hidden grime living in your blender lid
Most of us fixate on the blades and the jug because that’s where everything happens. The lid is the backstage area of the whole operation: easy to ignore because you don’t really see it. But that’s exactly why splashes of milk, fruit fibres and oily sauce residue get trapped there - especially in seams, under lips, and around seals.
It’s simple to wipe the top, call it done, and move on. Underneath, though, moisture hangs around - and smells move in with it. A lid can look spotless in daylight while still holding on to a faint funk you only notice when the next batch goes in.
Imagine the routine. It’s Monday morning, you’re running late, and you blitz a banana-and-peanut-butter shake. It tastes mostly fine… maybe slightly “off”, but you blame the banana. Two days later you use the blender for tomato sauce. This time, when you open the lid, the odour is stronger - oddly cheesy, and definitely not in a good way.
Then you finally pull off the rubber ring for the first time in months and spot it: a slim, greyish line of gunk. Nothing dramatic - just enough to make you rethink every “healthy” smoothie you’ve made this year.
This happens for a straightforward reason. Blender lids combine three awkward features: textured plastic, narrow grooves, and repeated contact with warm, wet food. Dish soap works well on the surface, but it doesn’t always break down the fine biofilm that clings to rubber and plastic - that slightly slippery feel you sometimes notice when you run a finger over a lid you thought was clean.
Smells love that film. Bacteria do too. Each new blend adds another layer of flavour on top of the last. Over time, what should be a neutral lid becomes a kind of memory sponge, quietly storing traces of every smoothie, soup and sauce it’s ever touched.
A quick note on the dishwasher: it can help, but it doesn’t guarantee success. Heat and detergent may not reach deep into tight seams, and lids often come out still holding moisture in hidden channels - which is exactly what odours need to come back. Proper drying matters just as much as washing.
The baking soda trick that resets your blender lid (and its gasket)
Here’s the low-tech fix people swap in no-fuss kitchen circles - and rarely stop using once they try it. Take the blender lid apart as far as it allows: remove the centre cap, unclip or slide off any rubber gasket, and separate whatever pieces you can. Arrange everything in the sink.
Now scatter baking soda (bicarbonate of soda) generously over the areas that come into contact with food - especially the underside of the lid and the ring.
You might also like:
- How bananas can stay fresh and yellow for up to two weeks when stored with one simple household item
- With this 80,000-ton colossus, China shows the world it can now build high-tech aircraft carriers to rival the US Navy
- In Mongolia, automatic cameras film “the world’s rarest bear” alongside her cub
- Almost one in two Germans will develop cancer – RKI study reveals the four most common tumour types
- Cleaning experts warn of the kitchen cabinet grease crisis as they reveal a shockingly simple trick that melts years of grime in minutes and leaves homeowners arguing over whether it is genius or going too far
- Walmart quietly launched a deal on gas this week and drivers say it feels like “going back 10 years in prices”
- Concorde is set to return in 2026, marking the comeback of the world’s first supersonic passenger aircraft
- “Mississippi Mud Potatoes” is the Southern side I make on repeat for my family
Add hot water - not boiling, just comfortably hot from the tap. You’re aiming for a thin paste or slurry that clings to the plastic and rubber. Leave it for 10–15 minutes while you get on with something else. The baking soda quietly takes on the smells.
When you return, there’s no need for aggressive scrubbing. A soft brush - even an old toothbrush - is enough to work the baking soda into grooves and around the seal. You’ll feel a slight squeak under your fingers as the greasy film loosens. Rinse everything under hot water until it no longer feels gritty.
Then comes the moment you instinctively sniff the lid, fully expecting that familiar sour note. But there’s nothing - just a neutral, clean, almost new smell. That’s the oddly satisfying part people get hooked on. Once you’ve had a genuinely scent-free lid, the old “it’ll do” rinse starts to feel like a compromise.
The blunt truth is that dish soap alone doesn’t always cut it on textured plastic and rubber. Baking soda brings three useful strengths: it’s mildly abrasive, it helps balance acidity, and it absorbs odours rather than masking them with perfume. That’s exactly what a blender lid needs.
Soap helps lift grease away; baking soda helps break the grip of that invisible film. One short soak now and then can reset the lid without harsh chemicals - and without strange fragrances hitching a ride into your next green juice.
If your gasket is old, cracked, or permanently tacky even after cleaning, it may simply be time to replace it. Rubber degrades over time, and a worn seal can hold on to smells (and moisture) far more stubbornly than a healthy one.
Getting the most out of this tiny blender lid cleaning ritual
The method is straightforward, but a couple of details make it feel almost effortless. Ideally, do it on a day you’ve just used the blender. First rinse off fresh residue with warm water, then disassemble the lid fully.
Sprinkle 1–2 tablespoons of baking soda over the areas that get splattered most: the inside of the lid, the gasket, and the underside of the centre cap.
Pour in hot water until the pieces are just submerged or well coated in a thin slurry. Step away and let time do the hard work while you wipe the worktop or reply to a message. Then give everything a quick brush, rinse thoroughly, and you’re finished - no complicated routine and no specialist products.
There is one small trap, though. Once people discover this, they sometimes go the other way and feel they must deep-clean after every single use. Let’s be realistic: almost nobody keeps that up. And you don’t need to.
A quick wash with dish soap after each use, plus a baking soda soak every one to two weeks, is a workable rhythm for most homes. If you blend strong flavours - garlic sauces, curry pastes and the like - use the baking soda trick straight afterwards. Your nose will quickly tell you when the lid is due its “spa day”.
“Once I started treating the blender lid like something that deserved its own three-minute ritual, the weird background smell in my kitchen just disappeared,” confided a home cook who preps smoothies for five every morning.
- Remove every detachable part of the lid before soaking
- Use hot - not boiling - water to protect rubber seals
- Keep a small jar of baking soda near the sink so it’s always to hand
- Use a soft brush rather than steel wool to avoid scratching plastic
- Let the lid air-dry completely before reassembling to prevent moisture being trapped
When a clean blender lid changes how your kitchen feels
This baking soda trick sounds almost too basic, yet it can change how you feel about an everyday item you barely noticed before. A blender is often at the centre of quick “healthy” eating: smoothies, soups, home-made sauces, nut milks. When the blender lid smells suspicious, a quiet doubt creeps in about everything that passes through it.
Once you remove that doubt and the lid smells like nothing at all, the blender feels reliable again. You reach for it more often. You experiment more. And you stop making excuses to yourself about that faint odour you’d been pretending not to notice.
There’s also something reassuring about choosing a simple, low-tech method and sticking to it. No fragrance, no fluorescent cleaning gel, no long instructions - just a jar of white powder your grandparents probably kept by the sink as well. A small, repeatable gesture that makes your kitchen feel more under control.
Try it on your own lid, and if you catch yourself doing that satisfied sniff afterwards, you’ll understand exactly why people rave about it. You may even start wondering which other “clean” items in your kitchen could do with a quiet baking soda reset.
| Key point | Detail | Value for the reader |
|---|---|---|
| Disassemble the lid | Remove caps and gaskets before soaking | Reaches hidden residue and odours at the source |
| Baking soda soak | Hot water plus 1–2 tablespoons of baking soda, 10–15 minutes | Neutralises smells and breaks down greasy film |
| Gentle routine | Quick daily rinse, deeper soda clean every 1–2 weeks | Keeps the blender fresh without extra effort or products |
FAQ
- How often should I deep-clean my blender lid with baking soda? For most people, once every one to two weeks is plenty, with extra cleans after particularly pungent recipes such as garlic sauces or curry pastes.
- Can I use baking soda on all types of blender lids? Generally yes on plastic and rubber lids, but avoid long soaks for lids with metal components that rust easily, and always rinse very well.
- Will baking soda scratch my blender lid? It’s only mildly abrasive; used with a soft sponge or brush, it should clean without noticeable scratching on typical plastic surfaces.
- Can I mix baking soda and vinegar to clean the lid? You can, but the fizz is mostly for show; baking soda on its own in hot water already deodorises and degreases very effectively.
- What if the smell doesn’t go away after one treatment? Repeat the soak (removing any gaskets you can) and let everything dry completely overnight; stubborn odours often fade after two or three cycles.


Comments
No comments yet. Be the first to comment!
Leave a Comment