Anyone who has ever picked ripe, sun-warmed raspberries straight from the cane will want that moment back every year - ideally in generous bowls rather than a few scattered berries. The thick walls of fruit you see in professional gardens are rarely down to luck alone; they often come from a surprisingly straightforward, almost ingenious approach that uses a cup and a humble kitchen leftover.
Why many raspberry bushes never reach their potential
Raspberries are often described as easy-going, but without at least some attention they seldom deliver bumper harvests. Many plants end up in soil that is too heavy, receive too little nutrition, or dry out repeatedly through summer. The result is predictable: fewer berries, smaller fruit, and plenty of disappointment.
Raspberries do best with:
- slightly acidic, crumbly soil
- evenly moist ground that never becomes waterlogged
- a reliable nutrient supply, especially in spring
- a bright, sheltered spot away from harsh midday sun
If you meet those basics, you can already expect a decent crop. If you also apply the coffee trick thoughtfully, you’ll often notice a clear lift in both the quantity and size of your berries.
The cup method: turning coffee grounds into a raspberry turbo
The idea is simple: give your raspberry bushes small, well-judged nutrient top-ups straight where they’re most useful - around the roots - and use a cup to keep the dose consistent. The key ingredient is something many households produce every morning anyway: fresh coffee grounds.
"The contents of your coffee filter can turn into a natural specialist feed that strengthens growth, roots and soil life around your raspberry bush."
Coffee grounds contain, among other things:
- nitrogen - for vigorous, rich green leaves and strong new shoots
- potassium - supports flowering and fruit formation
- phosphorus and trace elements - help build roots and overall plant structure
They also add organic matter to the soil. As microbes break that material down over time, it is converted into plant-available nutrition - a slow-release process raspberries tend to respond to particularly well.
Step by step: how to use the coffee trick properly
1. Prepare the coffee grounds - don’t tip them out wet
Fresh, damp coffee grounds can clump together, go mouldy, and create issues rather than benefits. A quick preparation step makes a big difference:
- Remove the grounds from the filter and spread them out on a plate or baking tray.
- Leave to air-dry for one to two days, loosening them occasionally.
- Store the dried grounds in a tin or an old jar with a lid.
Once you’ve collected a cupful, it’s time to use them in the garden.
2. Stick to a cup measure per bush
Using a cup is essentially a built-in measuring tool, helping you avoid overdoing it. Too much coffee grounds at once can acidify the soil too strongly or form a crust on the surface.
"For a mature raspberry bush, around one standard coffee cup of dried coffee grounds in spring is enough - ideally split into two portions."
Apply the first portion as soon as you see strong spring growth starting. Add the second dose four to six weeks later.
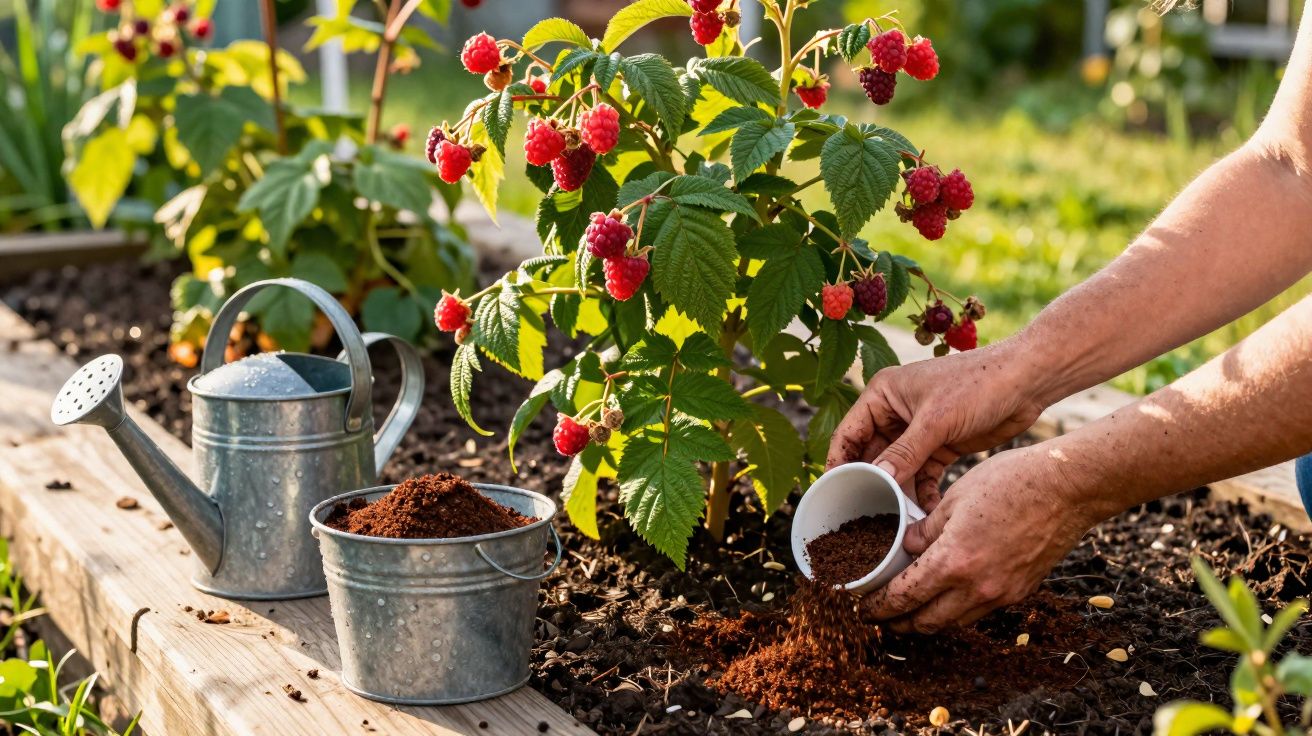
3. Position the grounds so the roots benefit
To make sure the plant can actually use what you’ve added, follow a simple routine:
- Loosen the soil lightly around the bush, without digging deeply.
- Sprinkle the coffee grounds thinly over the root zone, rather than pressing them right up against the canes.
- Cover with a little garden soil or a ready mulch (e.g. bark chips, leaves, straw).
- Water thoroughly once after applying.
Covering helps the soil stay moister, keeps microbes comfortable, and encourages the grounds to be worked in gradually instead of sitting on the surface.
Why raspberries respond so strongly to this care
In spring, raspberry plants put a lot of energy into fresh canes and developing flowering sites. That growth spurt demands nutrients and a stable, well-structured soil. The coffee trick supports several key points at once:
- Stronger roots: the nutrients encourage robust, finely branched root growth.
- Improved water balance: the soil holds moisture more effectively - invaluable during dry spells.
- More active soil: organic matter stimulates soil life, benefiting the plant over the long term.
- Mild acidification: many raspberry varieties prefer a slightly acidic pH, which is where coffee grounds can help.
There’s also a pleasant side effect: the smell and texture can deter some slugs and ants a little. It’s not a complete solution, but it can be a small extra benefit.
Common mistakes when using coffee grounds in the garden
Because coffee grounds are so convenient, it’s easy to scatter them too generously - and that can backfire. Typical pitfalls include:
- Applying too much in one go: soil can become “sealed”, water may run off, and fine roots can suffer.
- Leaving damp grounds on the surface: mould and unpleasant odours may develop.
- Relying on coffee grounds alone: raspberries need balanced feeding, not just coffee.
- Using them in unsuitable soil: very acidic soil shouldn’t be pushed even further in that direction.
If you’re unsure, start by adding coffee grounds to the compost heap. Mixed with other materials, they break down more evenly and later reach the bed in a gentler dose.
Combining coffee grounds cleverly: mulch, compost and water
The cup method works best when you pair it with a few other simple habits. Three combinations are particularly useful for raspberries:
Coffee grounds plus compost
Use some dried grounds directly on the bush, and put the rest into your compost. There, they act like an activator, helping the pile break down faster. Later, the finished compost can be returned to the raspberry bed, building a longer-term nutrient reserve.
Coffee grounds plus a mulch layer
A thin sprinkling of coffee grounds under a mulch layer of leaves, grass clippings or straw feeds the surface while also reducing drying out. In hot weather, that extra protection can make root moisture noticeably more stable.
Coffee grounds plus rainwater
If you grow many bushes, you can add a small amount of coffee grounds to a watering can of rainwater, let it steep briefly, then pour it around the root area. The nutrient concentration stays low, but the plants receive repeated gentle boosts.
For balconies and containers: does the trick work in pots too?
Container-grown raspberries are now common, especially on city balconies. The cup method can still be used - just at a much smaller scale.
"In containers, one to two heaped tablespoons of dried coffee grounds per plant per season is usually enough, lightly worked into the surface."
Because potting compost loses nutrients more quickly and has less buffering capacity, combining this with an organic liquid feed is often worthwhile. That way, the balance stays stable without pushing the pH too far towards the acidic side.
Risks, limits - and which other plants also benefit from the coffee trick
If you water with very hard, lime-rich tap water or garden on fairly neutral soil, coffee grounds can be a good middle ground for raspberries. In extremely acidic soils (such as in woodland-style gardens), use them sparingly to avoid tipping conditions into a range where plants begin to weaken.
It’s also worth looking at other plants with similar preferences. In moderate doses, these often respond well:
- blueberries and lingonberries
- blackcurrants and redcurrants
- rhododendrons and hydrangeas
- strawberries (very lightly applied)
Delicate herbs such as lavender, or Mediterranean plants that prefer leaner, more limey conditions, tend not to appreciate regular coffee additions. In those cases, coffee grounds are better kept for the compost.
If, in spring, you do more than just prune and water your raspberries - and instead use a cup to serve small, targeted portions of coffee-based feed - you set the scene for much fuller bowls in summer, without paying for expensive specialist fertiliser from the garden centre.


Comments
No comments yet. Be the first to comment!
Leave a Comment