Many DIY enthusiasts know the feeling: spring arrives, you fancy a quick refresh, and a tin of paint seems like the simplest way to make your home look more modern. The bathroom often sits right at the top of the list. But if you reach for a brush without thinking it through, you can be in for a nasty surprise a year later-flaking paint, ugly blisters and, in the worst cases, costly remedial work.
When the dream bathroom turns into an eyesore
It looked flawless at first
The story usually starts innocently-and familiarly. You’ve got a free weekend, you pick up an inexpensive tin from the DIY store, muster a bit of motivation, and suddenly the old, yellowed bathroom wall is bright white again or finished in a stylish pastel shade. The surfaces look smooth, coverage seems good, and the room feels lighter and larger.
For the first few weeks, everything appears to be working perfectly. The shower gets used as normal, and each time you walk in you enjoy the fresh look. Nothing crumbles, nothing discolours, and there isn’t a crack in sight. That’s the moment many people relax and assume they’ve done everything correctly.
First impressions can be misleading: in damp rooms, the real character of a wall paint often doesn’t show itself until many months later.
The real issue is hidden in the detail: that “standard” interior wall paint was designed for dry rooms from the outset. It can last for years in a living room or bedroom. In a bathroom, however, it has to fight water vapour, temperature swings and splashes on a daily basis-and it gradually, but inevitably, loses that fight.
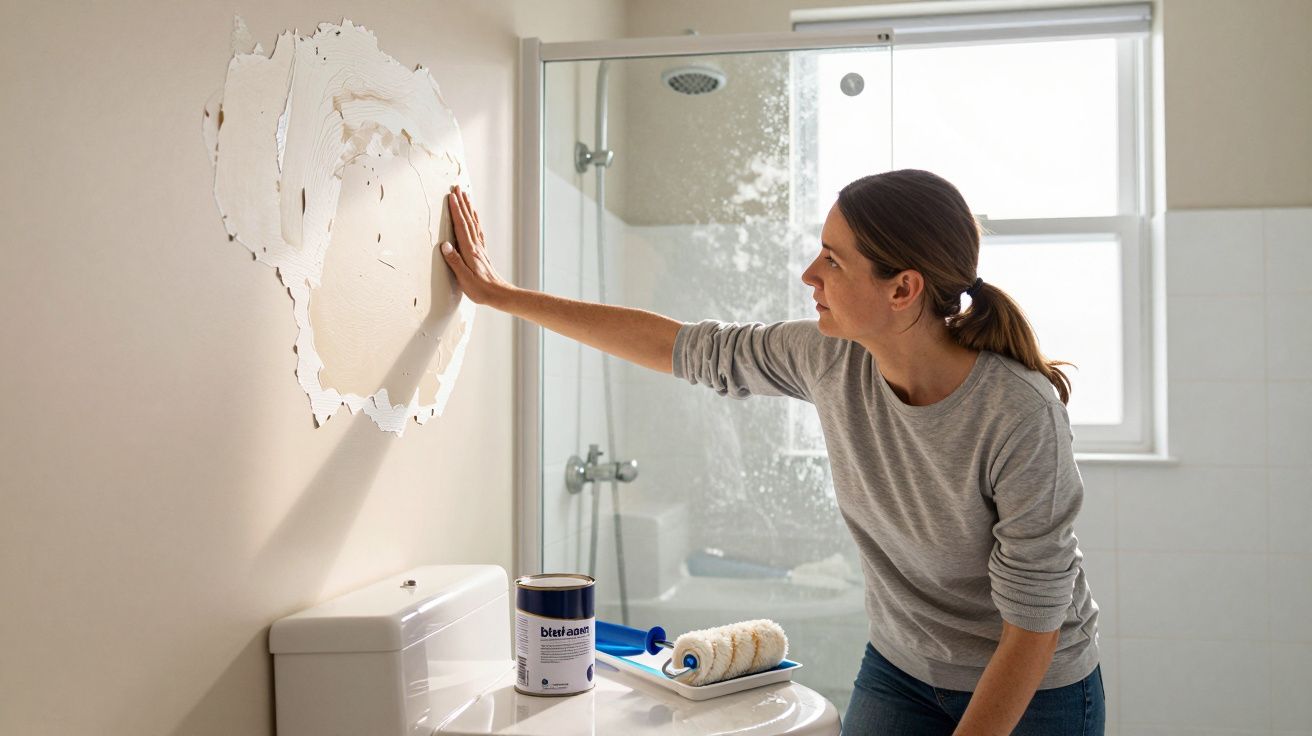
After 6 to 18 months, the blisters appear
The tipping point is usually somewhere between 6 and 18 months. That’s when you see what warm water vapour has been doing to the wall over time. At first, the affected areas may only look slightly uneven. Later, visible bubbles and raised blisters develop in the paint, especially:
- on the ceiling above the shower or bath
- on walls directly opposite or next to the shower
- in corners where vapour tends to linger
In these zones, relative humidity is often well above 80%. For standard interior emulsion, that’s simply too much. It absorbs moisture, loses adhesion and begins to detach from the surface. Eventually, a light press of a finger can be enough-and whole sheets of paint can break away.
What’s actually happening behind the paint failure
Why normal wall paint doesn’t stand a chance in a bathroom
The cause isn’t necessarily “poor painting technique”; it’s choosing the wrong material. When you shower, a large amount of water vapour is produced. That vapour spreads through the room, hits cooler walls and partially condenses. Some of that moisture then penetrates through the paint film into the substrate.
If the coating isn’t specifically protected against moisture, it behaves like a sponge. Fine cracks and micro-pores allow damp to creep behind the coating. From there, it gradually pushes the paint layer back outwards until it lifts and peels.
The paint doesn’t fail from the outside in-it’s effectively pushed up from behind by water vapour.
Simply painting a fresh coat over the top usually makes things worse. The moisture gets trapped, bubbles return faster, and you end up with two layers failing instead of one.
How to recognise truly suitable bathroom paint (Badfarbe) for damp rooms (Feuchträume)
What matters is a coating designed for damp rooms. In practice, that means choosing specialist bathroom paint (Badfarbe), kitchen paint, or products that clearly state moisture resistance.
Professional decorators look for technical performance classifications. A commonly referenced European marking is a standard that assesses wet scrub resistance (Nassabriebbeständigkeit) and resistance to moisture. The higher the resistance class, the better the paint tends to perform in a bathroom.
| Criterion | Unsuitable paint | Suitable paint for bathroom |
|---|---|---|
| Intended use | Living rooms, hallway | Bathroom, kitchen, utility room |
| Moisture resistance | Low | High, explicitly stated |
| Cleaning | Wipe dry only | Wipeable when wet, scrub-resistant |
| Binder | Basic emulsion (dispersion) paint | Special resins, hard-wearing dispersion |
At the DIY store, it pays to read the tin carefully. Terms such as “for damp rooms”, “bathroom paint”, “mould-inhibiting”, or references to wet scrub resistance are strong indicators. Cut corners here, and you often pay twice later.
Rescue plan: how to make your bathroom paintwork last
Strip failed paint and stabilise the surface
If the paint is already blistering, a decisive reset is the only sensible route. All loose areas must be removed thoroughly-scrape back, sand down, and take off anything that isn’t firmly bonded. Any section that sounds hollow or feels soft has to go.
After that, the wall needs to be made sound again. Small cracks and uneven patches can be levelled with filler. Only once the substrate is stable and fully dry is it worth applying a new finish.
The best bathroom paint finish isn’t built on the most expensive paint-it’s built on a clean, dry, properly prepared substrate.
Primer (Grundierung) and the right paint are non-negotiable
Before applying the finish coat, a suitable primer (Grundierung) should always be used in bathrooms-particularly in heavily loaded areas such as the ceiling above the shower. The primer reduces suction from the substrate and acts like a barrier layer against moisture.
Then comes the actual bathroom paint (Badfarbe). A two-coat system is a sensible approach:
- Apply the first coat evenly with a roller or brush
- Allow at least 24 hours to dry fully
- Apply the second coat, rolling in a slightly different direction
This “cross-rolling” method helps create a more evenly closed surface. If you rush the second coat, you can create tension in the coating-another route to premature damage.
Even the best paint loses without proper ventilation (Lüftung)
No coating will last long-term if the room stays permanently tropical and damp. That’s why ventilation (Lüftung) plays such a decisive role. In many homes, a window left on the latch isn’t enough, because the moist air only escapes slowly.
The ideal solution is mechanical extract ventilation-for example, a fan that vents air from the shower or bath area directly outdoors. As a rule of thumb, the air in the bathroom should be replaced completely several times per hour. In practice, it already helps a great deal if the fan continues running for a few minutes after you’ve finished showering.
- Open the window fully straight after showering
- Don’t keep doors permanently shut-air needs to circulate
- Clean the extractor fan regularly so it keeps its performance
- Avoid drying towels and laundry in the bathroom all the time
Extra protection many people forget: deal with existing mould before repainting
Where damp persists, mould can take hold-especially in corners and on ceilings above showers. If you paint over it, even mould-inhibiting products struggle, and staining often returns through the new film. Before priming and painting, treat any visible mould with an appropriate mould remover, then rinse and allow the area to dry thoroughly. Only then should you proceed with primer (Grundierung) and bathroom paint (Badfarbe).
Choosing the right finish for real-life cleaning
Bathrooms are wiped down more than most rooms, and that cleaning can be harsh on coatings. A tougher, wipeable finish with good wet scrub resistance (Nassabriebbeständigkeit) is usually the better choice, especially near sinks, baths and showers where splashes are frequent. Pairing a hard-wearing paint with the correct drying times reduces the chance of shiny patching, abrasion marks and early failure.
What DIYers can learn from the “blistering fiasco”
Prevention beats repainting every year
Anyone who has watched a beautiful bathroom finish peel off in layers after a year tends to be far more careful next time about products and system build-up. The combination of:
- a suitable primer (Grundierung) for damp rooms (Feuchträume)
- specialist bathroom paint (Badfarbe) or mould-inhibiting paint
- clean application with proper drying times
- reliable ventilation (Lüftung) of the room
significantly extends the service life of the paintwork. Instead of redecorating every 12 to 18 months, a well-planned system can last for years without blisters or cracks spoiling the look.
Practical checks before your next bathroom project
Especially in older flats and houses with limited ventilation tech, it’s worth doing a quick “bathroom check-up” before you pick up a brush:
- How high does humidity get during a shower? A basic hygrometer costing only a few pounds can tell you quickly.
- Where does most vapour collect? Watch ceiling areas and corners more closely.
- Is the extractor fan still working properly, or is it underpowered?
- Are the walls or ceiling already visibly stained, chalky or powdery?
Checking these points in advance reduces the risk of falling into the same trap as many well-meaning weekend DIYers who grab the first interior paint they see. A bathroom isn’t just another living room-technically, it plays in a different league.
As a rule of thumb: the more often the shower or bath is used, the more disciplined you need to be with product choice and ventilation. In family bathrooms with daily showers, a robust, damp-room-rated system is always advisable. In a rarely used guest WC, a solid standard paint plus a good primer can sometimes be sufficient-provided there’s no daily hot showering creating persistent water vapour.


Comments
No comments yet. Be the first to comment!
Leave a Comment