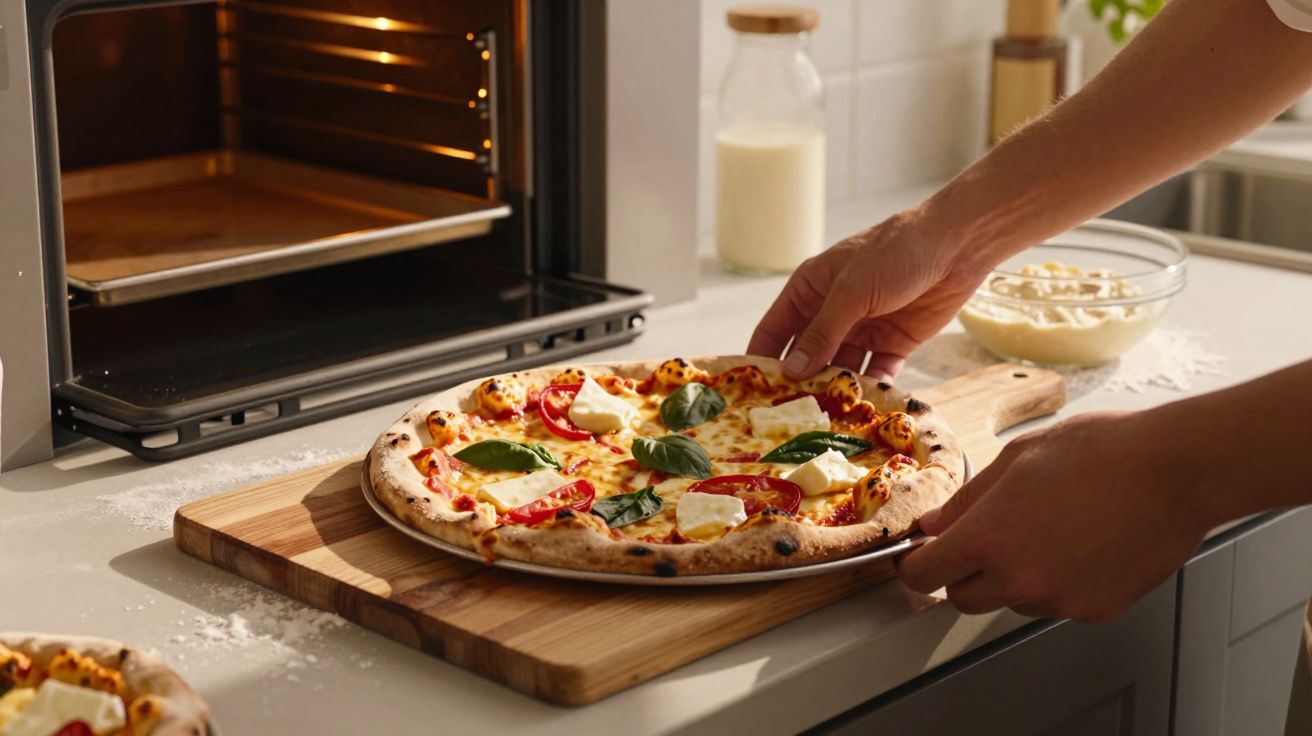
The smell arrived first: thick and cosy, faintly sweet from the dough, with a tiny edge of singed flour hanging in the air. In my small kitchen the oven glowed like a fireplace, and two of us stood in front of it pretending we were perfectly relaxed while “waiting” for the pizza. In reality we were peering through the glass every few seconds. Would the base come out crisp this time, or slip back into that chewy, rubbery zone? Pulling a homemade pizza from the oven always feels like a small gamble. And that blend of anticipation with a quiet bit of worry is exactly what makes homemade pizza so addictive. You’re listening for one specific sound when the knife meets the base: that dry little krrt.
Why a crispy base at home so rarely works out
Anyone who has eaten in a genuinely good pizzeria knows the mild humiliation that follows: you think back to your own tray-baked pizza and wonder why it never looks-or feels-like theirs. This is not about fancy toppings or buffalo mozzarella. It’s about the base that somehow manages to be thin yet sturdy, and still light. At home the dough often ends up too soft, too pale, and damp in the middle. You eat it anyway, you smile and say, “That’s lovely,” while knowing it’s not what you pictured. That gap between expectation and reality can be stubborn.
We all know the moment: you slide the tray out, lift the pizza carefully, and find an underwhelming patch of pale dough underneath. No darker spots, no firm bite-just a tired, soft surface that feels more like a pancake than a pizza base. A friend told me recently he nearly bought an expensive pizza oven after guests started favouring the takeaway instead. But let’s be honest: very few people are going to do that every day. Most of us need a solution that works in a normal kitchen, with a standard oven-no pizza stone, no £100 accessories, no theatrics.
The line between a gummy base disaster and a properly crisp pizza is more practical than most people assume. It isn’t a secret professional dough or some mystical yeast trick. It comes down to three straightforward levers: how wet the dough is, how hot the surface becomes, and how directly that heat reaches the base. Your oven won’t become a wood-fired oven at 450°C-and it doesn’t need to. Once your tray is properly scorching, the dough is just slightly wetter than a typical bread dough, and you top the pizza at the right moment, the result flips. Suddenly the base crackles, and you wonder why you made it so hard for yourself for so long.
The simplest method for homemade pizza with a crispy base: hot tray, wetter dough, short rest
The core trick for a crispy base at home is almost embarrassingly plain: preheat your baking tray on the lowest shelf-properly, thoroughly, and for long enough. Set your oven to 250°C conventional (top and bottom heat) or to the highest temperature it will hold, then give it at least 25–30 minutes to heat through. While that tray turns into a small sheet of heat, mix a no-nonsense dough: flour, water, salt, a touch of yeast, and a small glug of oil. The dough should be slightly sticky; that’s how you get the combination of thin crunch and a softer interior. Then comes the key move: pull out the blistering-hot tray, place the stretched dough straight onto it-no baking paper, just a light film of oil-top it quickly, and get it back into the oven immediately.
A lot of the disappointment happens long before the pizza goes anywhere near the heat. People often under-knead, add extra flour “to make it manageable”, and end up wrestling a tough, dry dough that refuses to stretch. Then, worried about sticking, they add even more flour underneath or put the dough on lukewarm baking paper-and the heat you desperately need never reaches the base properly. Patience is the other common stumbling block: the dough gets rolled out straight after kneading, still tight and springy, so it tears and shrinks back. Give it 30–60 minutes at room temperature and something shifts. The dough relaxes, stretches thinner with far less effort, and the struggle disappears. That calmness shows up later in the oven.
An Italian baker once put it to me like this:
“Good pizza isn’t art-it’s consistency. The same movements, the same heat, the same respect for dough and time.”
Since hearing that, I think about routine rather than talent whenever a base goes wrong. Build just three habits into your homemade pizza rhythm and the outcome reliably moves towards crisp:
- Preheat the baking tray (or a cast-iron pan) for 25–30 minutes every time
- Use a dough with a slightly higher water content (around 60–65% hydration) and give it at least 30 minutes of rest
- Bake the dough directly on hot, oiled metal, not on a thick layer of flour or baking paper
That’s all you need to “master”. Everything else is repetition.
A quick note on toppings (so the base stays crisp)
One overlooked detail: toppings can undo great dough. Watery mozzarella, overly sauced bases, and piles of raw vegetables release moisture as they cook, which can soften the centre even if the underside started well. Keep the sauce thin, drain fresh mozzarella, and consider pre-cooking mushrooms or courgette if you like a generous topping layer. A crisp base is as much about moisture management as it is about heat.
Using your oven’s heat more intelligently
Even with a standard oven, you can improve how the heat hits the pizza. Keeping the tray on the lowest shelf concentrates heat under the base, and switching to the grill (broiler) for the final 30–90 seconds can help colour the top without overbaking the underside. The goal is balance: quick, aggressive heat below for crispness; a brief finishing blast above for browning.
How to find your own homemade pizza routine
The most satisfying realisation usually arrives after the third or fourth pizza using this method. You suddenly notice the dough isn’t an enemy anymore-it’s more like a familiar acquaintance that behaves predictably. You learn how soft is “right”, when it feels ready, and when it needs another ten minutes of rest. You stop forcing it into shape and start letting it relax into the circle. Then, in the oven, the small transformation happens: the rim puffs, the underside dries quickly, and the base develops those faint darker freckles. When you slice it, you can tell you’re getting somewhere-the knife works with you rather than squashing its way through.
You might never be the person who sets dough at 7 a.m. on a Sunday, ferments it for 48 hours, and records every bubble. You don’t have to. A practical, weekday ritual is enough: mix the dough in the evening, store it in a lidded, oiled bowl in the fridge, let it come back towards room temperature for an hour the next day, shape, bake. Pizza shifts from an “event cook” to a relaxed meal after a long day. Somewhere between the third and fifth pizza with this set-up, you become the person friends say to: “Are you bringing your pizza again?”
There’s something oddly calming about that. In a world that keeps getting more complicated, a crispy pizza base stays refreshingly simple: water, flour, salt, time, heat-nothing more. No course, no specialist kit, no perfect social-media slice required. Just the willingness to give your oven half an hour to properly heat up, and your dough a real pause. In a way, learning to bake a simple crispy base is a quiet resistance to rush: you slow down, you wait, you watch, you eat. And next time, it’s a little better.
| Key point | Detail | Benefit for the reader |
|---|---|---|
| Hot tray | Preheat the baking tray for 25–30 minutes at the oven’s maximum temperature | Delivers an immediate heat boost and a crispy base without a pizza stone |
| Softer dough | Slightly more water, plus 30–60 minutes of resting time | Easier shaping, a lighter structure, and a sturdier rim |
| Direct base contact | Bake the dough on hot, oiled metal instead of on heavy flour or baking paper | Better heat transfer, less soggy middle, more crunch |
FAQ
How much water should I use for a crispy pizza dough?
A good rule of thumb is 100% flour to 60–65% water-for example 500 g flour with 300–325 ml water. The dough should feel a little sticky; that helps create a better internal texture and more crispness later.Which flour works best at home?
A standard white wheat flour works very well (roughly equivalent to German Type 550). If you like, replace 10–20% with durum wheat semolina for extra bite in the base.Do I really need to bake without baking paper?
For maximum crunch, direct contact with hot metal helps most. Lightly oil the tray and lay the dough on carefully. If you’re unsure, use a thin sheet of baking paper at first and try going without next time.How long should the pizza stay in the oven?
At 250°C conventional heat, 8–12 minutes is usually right, depending on thickness and toppings. The rim should be clearly browned and the underside should have light dark spots-browned, not black.Can I prepare the dough the day before?
Yes-and it’s often even better. Make the dough with a small amount of yeast, rest it in a sealed bowl in the fridge for 12–24 hours, then let it acclimatise at room temperature for 45–60 minutes before shaping and baking as usual.


Comments
No comments yet. Be the first to comment!
Leave a Comment