The varnish had turned milky, the arms were scored with scratches, and a flat, dull film caught the afternoon light like an unflattering camera filter. It wasn’t “vintage”; it was simply worn down.
One rainy Tuesday, a furniture restorer popped in “just to take a look”. He took out a small bottle, borrowed a soft microfiber cloth from my kitchen drawer, and stirred a quick blend in an old mug. No specialist kit, no sanding block, no harsh chemical smell.
About ten minutes later, the chair arm he’d treated looked unexpectedly revived-warmer, with a slightly deeper colour. The scratches hadn’t vanished, but they looked gentler, as though time had been softened rather than erased. He gave a small grin and said, “It’s mostly in the mix.”
The quiet problem hiding on your wooden furniture
Most wooden furniture doesn’t fail because of one dramatic mishap. It fades in tiny, easy-to-miss stages: a dab of washing-up liquid here, a fine layer of kitchen grease there, the same patch catching too much sun each morning. Gradually, the surface loses its depth and character.
You often don’t clock the change until someone else runs their hand along the table and you suddenly see it through their eyes: cloudy halos from old water rings, streaks from a rushed spray of all-purpose cleaner, edges where the stain has drifted towards a tired grey.
We tend to blame “age”, but the culprit is frequently just build-up and dryness. The timber beneath is usually sound; it’s the finish on top that’s dulled and trapped under a film.
On a street in Manchester, a retired carpenter called Alan showed me his coffee table-a chunky slab of oak he’d owned for 25 years. “I nearly stuck it on Facebook Marketplace,” he said. “It looked like it had been smoking two packs a day back in the 90s.”
Instead, he used a blend an old colleague had taught him. With a clean microfiber cloth, he worked in slow circles and then wiped it away. No stripping, no sanding. The table didn’t become “new”, but it regained that calm, cared-for glow you notice in older pubs that take pride in their wood.
A 2023 survey by a UK interiors retailer found that nearly 6 in 10 people considered replacing wooden furniture mainly because it looked “tired” or “outdated”, rather than because it was broken. That’s a lot of good timber heading towards the tip for what is often a surface-level issue.
From a practical standpoint, most modern wooden furniture is sealed with a finish-varnish, lacquer, oil, or polyurethane. The part you see going flat is that protective layer. Many everyday cleaners are formulated to cut grease quickly, so over time they can gradually strip, haze, or fog the finish.
The encouraging bit: you don’t always need to replace a finish to improve how it looks. Many finishes respond well to gentle cleaning and light reconditioning rather than being sanded back. That’s where a straightforward homemade blend can be useful: it loosens greasy residue and lightly nourishes a dry-looking finish without soaking the wood.
Microfiber cloths are a key part of why this works. Their very fine fibres lift and hold onto grime that kitchen roll tends to smear around. Used with the right mixture, they can soften the visual “noise” of years of misuse and bring back what’s still there underneath.
The simple white vinegar and olive oil mixture experts actually use
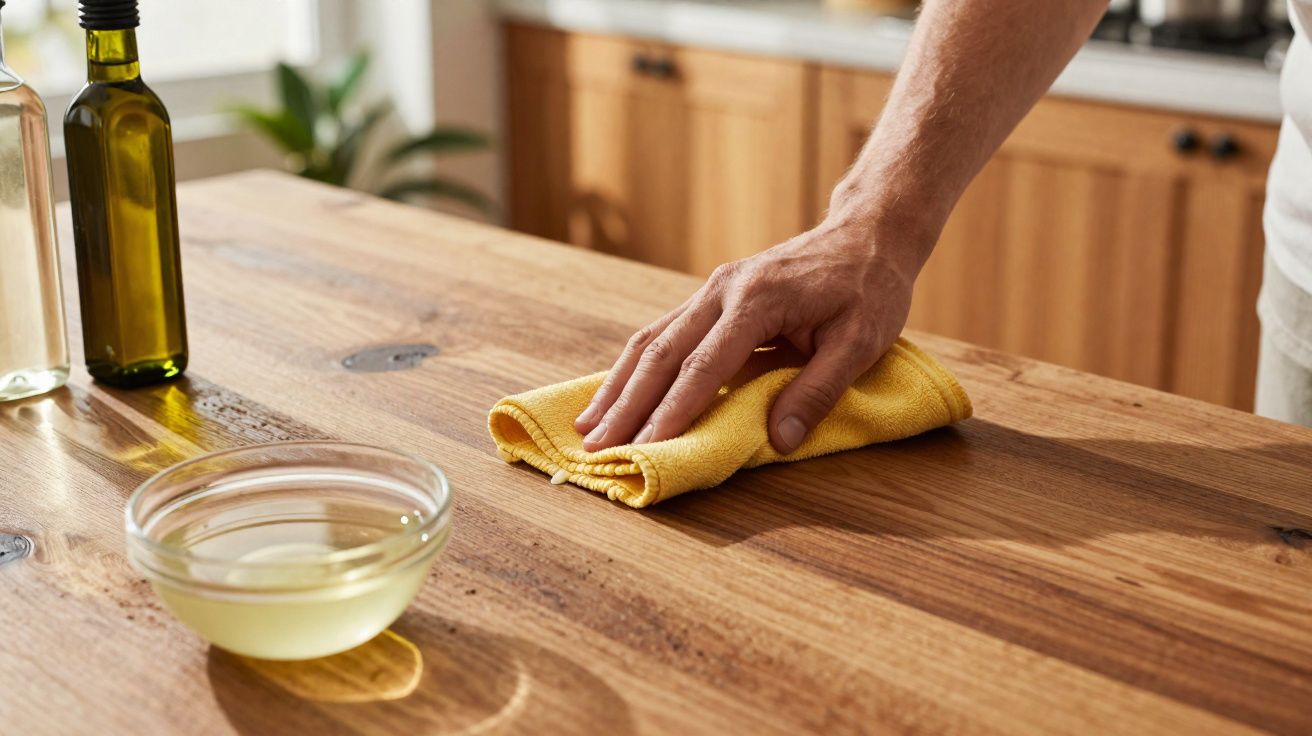
A basic blend many restorers quietly rely on is almost suspiciously simple: equal parts white vinegar and olive oil, plus a little water. A handy starting point is:
- 1 tablespoon (about 15 ml) white vinegar
- 1 tablespoon (about 15 ml) olive oil
- 1 tablespoon (about 15 ml) lukewarm water
Mix it in a small bowl, mug, or a jar with a lid and shake until it looks lightly cloudy and combined.
The vinegar works as a mild cleaner, cutting through old polish, fingerprints, and the greasy film that builds up-particularly in kitchens. The olive oil adds temporary richness and sheen, helping to visually soften fine scratches and bring warmth back to the surface.
To apply it, swirl the mixture, lightly dip a folded microfiber cloth, then squeeze it until it’s almost dry. You want the cloth barely damp-never wet. Work on small areas at a time, follow the grain, and then buff immediately with a second, dry microfiber cloth.
This is the point where many people go wrong: pouring the mixture directly onto the table, or saturating the cloth until it drips. That usually leads to a sticky, streaky surface that attracts dust and looks worse by the evening. The secret is restraint-less liquid, more rubbing and buffing.
Microfiber helps because it spreads the mixture in a thin, even layer. Old T-shirts can leave lint and drag the oil into little clumps. With microfiber, you’re gliding rather than scrubbing, and the cloth is better at holding onto dirt while releasing only a small amount of the mixture.
Let’s be honest: almost nobody does this every day. Most people only bother when the table looks a bit miserable in a photo, or just before visitors arrive. That’s perfectly fine. For many pieces, once or twice a year is plenty. The aim is to refresh the finish, not fuss over it.
“I tell clients: this mix won’t repair deep damage, but it nearly always makes things ‘good enough’ to fall in love with again,” says London-based furniture restorer Claire Jensen. “And that’s usually exactly what people want.”
A few simple guardrails keep this from backfiring. First, don’t use it on waxed-only furniture without testing a discreet corner, as the vinegar can dull certain waxes. Second, always test on the underside or the back of a leg before committing to the entire piece.
- Skip this mixture on raw, unfinished wood-it can absorb unevenly and stain.
- On dark woods, use a lighter touch and buff for longer to avoid a faint haze.
- If the surface feels tacky after 10 minutes, buff again with a clean, dry cloth.
On an emotional level, watching that first patch of timber “wake up” under your cloth is oddly satisfying. On a practical level, you’ve likely added a few more years of life to a piece of furniture using items from the kitchen cupboard.
A quick note on cloths and technique (small details, big difference)
If you can, use two microfiber cloths: one for applying the mixture and one purely for buffing. Keep them clean and wash them without fabric conditioner, as conditioner can coat the fibres and reduce their ability to lift residue.
Also, treat this as a light, controlled wipe-not a soaking. Your goal is to clean the finish and gently condition it, not to leave oil sitting on top. If you can see wet patches, you’ve used too much.
How to make the effect last without turning into a cleaning robot
After you’ve revived a dresser or table with the vinegar–oil mix, the smartest next step is to stop blasting it with harsh sprays. For weekly dusting, switch to a barely damp microfiber cloth and plain water. That lifts day-to-day film without stripping the finish.
If you prefer something with a scent, choose a wood-friendly cleaner that’s silicone-free and intended for finished wood. Silicone polishes can leave a stubborn residue that complicates future repairs. Think of them like glossy social-media filters: flattering at first, awkward later.
Day to day, the boring habits do the heavy lifting: use coasters, wipe spills promptly, and don’t put hot takeaway boxes straight on the table. It’s not exciting advice, but it saves you from wrestling with white heat marks down the line.
On a grey afternoon in Lyon, a young couple showed me their kitchen table: soft pine, scuffed by lockdown home-office life. Laptop outlines, coffee rings, and the faint circle of a plant pot that had stayed put for far too long.
We did the microfiber-and-mix routine on only half the tabletop. The contrast looked like one of those online before-and-after ads you’d normally scroll past with suspicion. The revived side wasn’t glossy; it just looked quietly alive again. They went silent for a moment, then started debating whether to keep the table or sell it ahead of their move.
Technically, pine is a softwood, so the dents and scratches remained. But they stopped shouting. The mixture slightly darkened the marks so your eye didn’t snag on every line. They didn’t get a new table-they got their old one back.
There’s a wider shift behind this, too. One European sustainability study found that extending the life of a single wooden dining table by just 10 years can avoid emissions linked to felling, processing, and transporting roughly 40–50 kg of new wood. It’s not world-changing on its own, but across a street, a city, a country-it adds up quickly.
And there’s a quieter benefit: the memories inside the wear. The spot where a toddler once drummed a spoon. The softened groove where someone always rests their elbow. Those stories don’t survive a trip to the tip, but they sit comfortably in a freshly revived finish.
When restorers talk about “feeding” wood, they usually mean caring for the finish in a way that’s gentle, reversible, and low-drama. The vinegar loosens the grime that mutes the surface; the oil fills microscopic gaps and adds a warm, short-lived glow.
That glow won’t last forever-and that’s fine. What lasts much longer is the reset: removing the stubborn film you stopped noticing years ago. After that, simple habits keep the piece in the “used and cherished” category rather than “future bulky waste collection”.
We all know the feeling of walking past the same gloomy table every day, promising we’ll “sort it” at the weekend. Then the weekend arrives, and the thought of sanding, varnishing, or paying someone pushes the job back into the drawer.
A small bowl of kitchen ingredients and a clean cloth isn’t a miracle cure, but it lowers the effort barrier. It’s easy enough to try on one drawer front, one chair arm, one bedside table. And once you see that first patch brighten, it becomes strangely tempting to carry on.
When to be extra cautious (antiques and delicate finishes)
If you suspect your piece is an antique, French-polished (shellac), or has an unknown finish, treat it as a special case. Even gentle mixtures can react unpredictably with older coatings. In that situation, testing a hidden area is essential-and if the finish becomes sticky, smeary, or dull straight away, stop and consider getting advice from a professional restorer.
Key takeaways at a glance
| Key point | Details | Why it matters to readers |
|---|---|---|
| Basic mixture ratio | Mix 1 tbsp (≈15 ml) white vinegar, 1 tbsp (≈15 ml) olive oil, and 1 tbsp (≈15 ml) lukewarm water in a small bowl. Stir or shake in a jar until slightly cloudy and blended. | Gives you a repeatable kitchen-cupboard “recipe” rather than guesswork, so results are more consistent from piece to piece. |
| Correct way to use the microfiber cloth | Fold the cloth into quarters, dip one corner lightly, then wring or squeeze until almost dry. Work in small sections, following the wood grain, then buff immediately. | Prevents streaks, avoids soaking the finish, and stops you leaving a greasy film you’ll regret later. |
| Where to avoid the mixture | Skip raw, unfinished wood, waxed-only surfaces (unless tested), and heavily damaged lacquer. Always test under a chair seat or along a back edge first. | Helps protect sensitive or unusual finishes and reduces the risk of pale patches or dull spots on a favourite piece. |
FAQ
Can I use any cooking oil for this mixture?
It’s best to stick to light olive oil or a neutral vegetable oil such as sunflower. Strongly scented oils, or oils that turn rancid quickly, can leave an unpleasant smell or a sticky feel on the surface.How often should I revive my wooden furniture with this method?
For most pieces, once or twice a year is enough. Between treatments, dust with a dry or slightly damp microfiber cloth to keep the finish clear without constant “top-ups”.Will this mix fix deep scratches and water rings?
It can soften the look of light scratches and make rings less obvious, but it won’t remove deep damage. Heavy staining or gouges typically require sanding, refinishing, or professional help.Is white vinegar safe on dark wood finishes?
Generally yes-if you dilute it in the same ratio, test a hidden spot first, and buff thoroughly. Very dark, glossy finishes can show haze if residue is left behind.What if my furniture feels greasy after using the mix?
That usually means too much oil remained on the surface. Buff again firmly with a clean, dry microfiber cloth until it feels smooth rather than slick.


Comments
No comments yet. Be the first to comment!
Leave a Comment