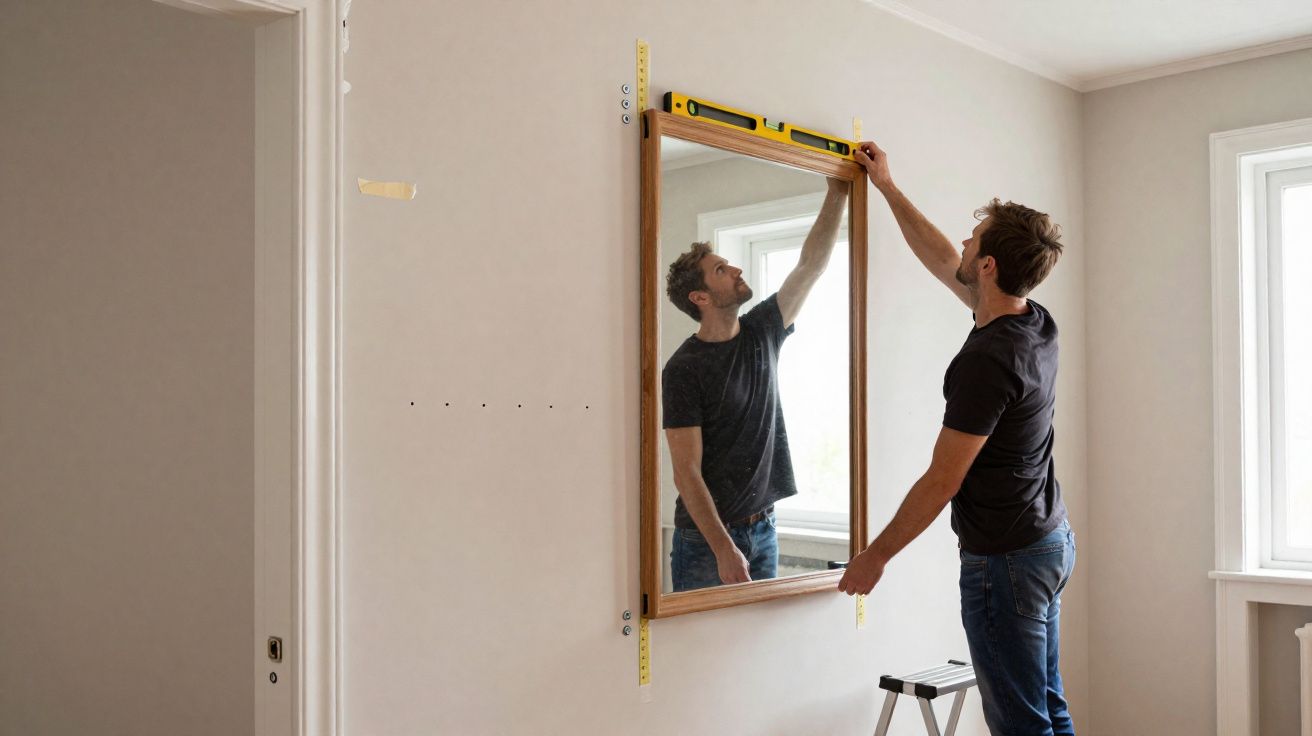
You’ve got a large, good-looking mirror. You’ve got a plasterboard wall. Your stud finder has vanished. This is the point where plenty of DIY jobs start to wobble - not because it’s complicated, but because nobody fancies a cracked wall or a mirror in pieces. Here’s a steady, safe way to hang something heavy using the right fixings and a bit of calm.
The mirror had been resting against the hallway wall, throwing back a tall, slightly distorted version of me. It was spot-on for the landing - and also clearly too weighty to trust to two sheets of gypsum and whatever timber might (or might not) be behind them.
I measured up, drew a faint pencil mark and stepped back to check the height felt right. Then I rapped the wall with my knuckles; it sounded hollow exactly where I wanted to drill, like the wall politely telling me to rethink. I don’t have a stud finder. I do have persistence. The wall still said no.
What actually holds in plasterboard
Plasterboard isn’t flimsy - it just behaves differently. It deals with weight far better when the force is shared over a larger area. That’s the whole point of cavity fixings and toggles: they open behind the board like a small anchor, gripping the back of the panel rather than pulverising it. A basic plastic plug isn’t the right tool for a heavy mirror.
How the mirror is built matters as much as the wall. D-rings on the back? A French cleat? A hanging wire? Each option changes how the load pulls on the fixings. Wire tends to drag everything towards one point and can dip over time. A cleat spreads the weight across a longer rail and allows more fixings. Spread the load is the quiet principle that stops mirrors slipping out of level - or ripping free months later.
The stated load ratings aren’t there for decoration. Decent metal toggles, spring toggles, and snap toggles specify safe loads per fixing in 12.5 mm board. UK favourites such as GripIt or Fischer cavity fixings usually show clear figures. Work out how many fixings you’ll use, add them up, then keep a sensible safety margin. Treat weight ratings as law, not as a rough idea. Your wall - and your feet - will be safer for it.
Hanging a heavy mirror on plasterboard without a stud finder
Begin with the position, not the hardware. Use tape to mark the mirror’s outline on the wall so you can judge the height properly. Lightly pencil a centreline. If the mirror uses D-rings, measure the gap between them, then transfer those measurements onto the wall with a level. Put masking tape over each drilling spot and write the measurement on the tape so it doesn’t disappear into smudged pencil.
When you’re using cavity fixings, start with a small pilot hole - just enough to confirm you’re in plasterboard and not unexpectedly in masonry. If you meet crumbly dot-and-dab adhesive, move up to heavier-duty anchors. Push metal toggles or snap toggles through the board, set them, then tighten so the collar sits flush to the surface.
If the mirror is extremely heavy, a timber French cleat is worth considering: fix the wall section with four anchors spread across a longer run, then hang the mirror section so the load is shared rather than concentrated.
Realistically, most of us don’t do this weekly. A couple of checks before you lift the mirror will save a lot of swearing. Give each fitted fixing a firm tug before the mirror goes up - it should feel secure, with no spinning and no crunchy movement. Hang the mirror, then bring it level. If you’ve used wire, you can twist a small loop to nudge the height into place. If you’ve used a cleat, you’ll get that satisfying single “click” as it drops home. Use toggles, not rawlplugs when it’s genuinely heavy.
Mistakes you can avoid
The first error is rushing the measuring. Two minutes with a tape measure, a level and a strip of masking tape can prevent an hour of filling and repainting. Don’t guess the height by eye; lay the mirror on a blanket, measure the D-rings accurately, and work from a centreline.
Also, take a moment to check for hidden pipes or cables. A simple method is a strong magnet and a cautious pilot hole - the magnet can grab onto hidden drywall screw heads, which may hint at stud rails or typical service zones.
The next pitfall is choosing fixings that are too small. If your mirror is 15 kg, don’t buy fixings rated at 15 kg and hope for the best - go comfortably above that. Add redundancy: use four fixings instead of two. If the back plate looks a bit flimsy, upgrade to a cleat. If you’re dealing with dot-and-dab over brick, consider longer cavity anchors that expand beyond the adhesive layer. Everyone knows that moment when your second thoughts are louder than the drill.
Don’t let dust - or nerves - slow the job down. Tape a bin bag under the drilling point to catch debris. Run screws into each anchor once before the lift so you’re not wrestling stiff threads while holding a pane of glass. Then stop for a breath.
“Heavy mirrors don’t fail suddenly - they fail slowly, from poor fixings and tiny sags. Build it like future-you is picky.”
- Choose plasterboard-rated fixings that suit your mirror’s weight.
- Mark out D-rings or a cleat accurately using a level.
- Pilot first, then commit: anchor, tighten, and hand-test.
- When unsure, use four fixing points and spread the load.
- Shield the mirror edges with cardboard during the lift.
The masking tape trick for razor-sharp paint edges
New wall, or fresh paint around your mirror? Masking tape can give genuinely crisp lines if you do it properly. Apply good-quality low-tack tape along the edge, press it down with a plastic card, then paint a thin coat of the existing wall colour along the tape edge first. That seals the tiny gaps. Once it’s dry, roll on the new colour. Peel the tape back on itself while the paint is still slightly tacky. It’s oddly satisfying.
This small step fixes the classic paint bleed that ruins skirting lines and door frames. It’s fast, straightforward, and genuinely effective. It feels like cheating, but it’s science. On textured walls, burnish the tape a little more firmly and keep the coats light. If you’re painting the area where the mirror will sit, feather the paint out so a future move doesn’t leave a sharp “ghost” edge.
There’s another advantage: masking tape is brilliant for layout as well. Use little tape tabs to mark drilling points, jot heights and fixing notes on them, then pull them off when you’re finished. Clean paint edges, neat holes, and a mirror that sits inside a crisp frame of colour.
Putting up a heavy mirror is part physics and part judgement. When you break it down into small actions - mark, pilot, anchor, test, hang - the anxiety fades and the work becomes… calm. The mirror brightens the space, bounces more daylight around, and adds a slightly hotel-like feel to an everyday landing. Share a before-and-after and people will inevitably ask which fixings you used.
If you’ve used the tape trick to get clean paint lines around it, you’ll get questions about that as well. The nicest bit isn’t even the finish. It’s the quiet buzz when you step back and the spirit level bubble sits perfectly centred - and that strange moment later, catching your reflection and thinking: I made that.
| Key point | Detail | Why it matters to you |
|---|---|---|
| Choose proper cavity fixings | Metal toggles, snap toggles, or UK choices such as GripIt with clear load ratings | Helps prevent wall failure and keeps your mirror safe |
| Map the hardware, not wishful thinking | Measure D-rings or a cleat carefully, then transfer using a level and tape | Avoids wonky holes and gradual sagging |
| Seal masking tape edges | Paint the wall colour along the edge first, then paint and peel while tacky | Produces crisp paint lines around the finished piece |
FAQ
- How heavy is “heavy” for plasterboard? Anything over 8–10 kg should use proper cavity anchors or a cleat. Above 20 kg, spread the load across four fixings and consider a French cleat.
- Can I hang on a wire, or should I use the D-rings? D-rings with two fixing points distribute weight better. Wire can work for lighter mirrors, but it can sag and concentrates the load.
- What if I hit dot-and-dab adhesive or brick behind? Change to longer cavity anchors that extend past the adhesive. If you genuinely reach solid brick, standard wall plugs and masonry screws are the right choice.
- How do I find a stud without a finder? Slide a strong magnet along the wall to locate drywall screws. Repeated hits at 400 or 600 mm spacing are common in the UK.
- Is grab adhesive enough on plasterboard? No. Use mechanical fixings. Adhesives can creep under load, and humidity or heat can worsen that over time.


Comments
No comments yet. Be the first to comment!
Leave a Comment