A tiny tweak to the way you water can change everything.
In countless living rooms there’s a lush green peace lily, yet the familiar white spathes never seem to appear. It has a reputation for being easy-going, forgiving plenty of care mistakes - and still, it barely flowers. The key is usually not fertiliser or repotting, but an unremarkable daily habit: watering.
Why your peace lily isn’t producing flowers
The peace lily, botanically known as Spathiphyllum, comes from shady, humid tropical forests. There, it grows in loose soil that stays lightly moist all the time. In a pot you can only imitate those conditions to a point - and that’s where the trouble often begins.
Many people water either too infrequently or too generously. Both can hold back flowering:
- Too little water: the plant switches into survival mode and puts its energy into staying alive, not into blooms.
- Too much water: the roots don’t get enough oxygen, start to rot, and the peace lily weakens. Flowers won’t show up then either.
What matters isn’t “a lot” or “a little”, but a consistently lightly moist root zone with a top layer of compost that dries slightly.
The compost should stay soft and moist deeper down, while the surface dries out by about 1–2 cm. Get that balance right and you encourage abundant flowering rather than simply producing more leaves.
How the peace lily “speaks” to you
One pleasant advantage of this houseplant: it makes its condition very obvious. A quick glance is often enough to judge its water needs.
- Leaves droop limply: the peace lily is thirsty. After watering, the leaves usually perk up again within a few hours.
- Leaf tips turn brown: either the dry spell was too long, or hard tap water with lots of limescale and salts is stressing the plant.
- Leaves yellow across larger areas: often a sign of waterlogging or compost that stays wet for too long.
Even so, looking at the leaves doesn’t replace the most important check of all: feeling the compost.
The “finger test”: how to spot the right moment to water
Professionals rarely stick to fixed watering schedules. Instead, they use a very simple check. It takes less than three seconds and is far more reliable than any calendar rule.
The finger test is the safest way to hit the perfect watering time - with no gadget required.
Here’s how to do it:
- Push your index finger about 2–3 cm into the compost.
- Check the feel: is the surface dry but still slightly moist underneath?
- If yes, it’s time for a moderate watering.
If the compost is dry even deeper down, the plant needs a more generous drink. If it still feels clearly moist throughout, wait. This way you respond to room temperature, season and pot size, rather than automatically reaching for the watering can every week.
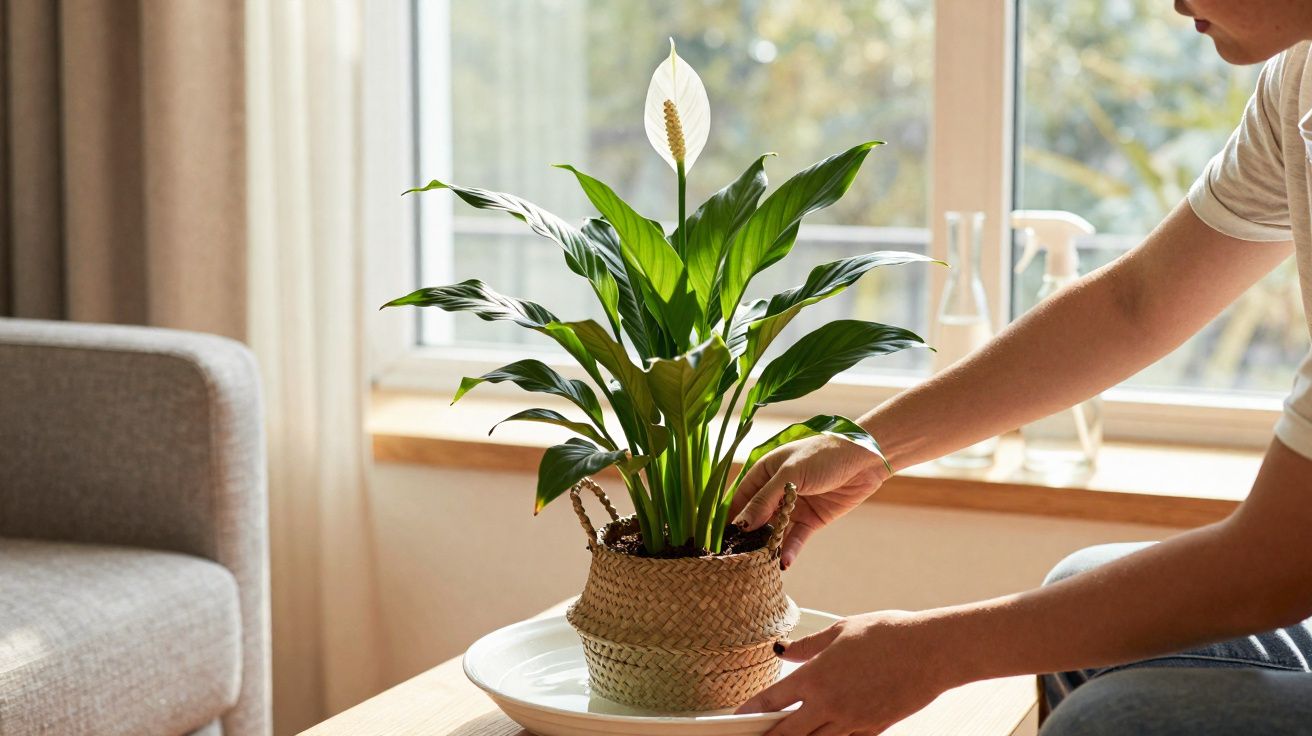
Watering from below like a professional: better than pouring from the top
A common mistake is pouring water onto the compost from above until it runs out of the drainage hole. That can flood some root areas while leaving others dry. It becomes even more risky if water is left sitting in the decorative outer pot - then root rot is a real possibility.
Much gentler is what’s known as watering from below.
Step-by-step: watering from below for your peace lily
To water your peace lily in a way that matches its needs, do the following:
- Place the pot in a bowl, bucket or the kitchen sink.
- Add water so the base of the pot stands in it, but the pot is not fully submerged.
- Wait 10–15 minutes for the compost to soak up what it needs.
- Lift the pot out and let it drain thoroughly.
- Pour away any leftover water so waterlogging can’t develop.
When watering from below, the peace lily draws up exactly as much water as it needs - any excess simply remains in the bowl.
Especially for plants that already look weakened, or for anyone who tends to overwater, this method can be a real lifeline. It significantly lowers the risk of root rot and stops the compost surface from staying soaking wet all the time.
How often does a peace lily need water?
There’s no single fixed number, but rough guidelines help so you’re not completely guessing. The deciding factors are temperature, light and pot size.
| Season | Typical rhythm | Note |
|---|---|---|
| Spring | 1–2 waterings per week | Growth picks up; do the finger test more often. |
| Summer | 2–3 waterings per week | Warm rooms dry the compost faster. |
| Autumn | every 7–14 days | Less light; growth slows down. |
| Winter | every 10–20 days | Cooler rooms often mean much longer gaps. |
These figures don’t replace the finger check - they’re only there to give you a general sense. If you rely on dates alone, you can quickly end up with waterlogging or drought stress.
Light and humidity: the quiet success factors
Even the best watering routine won’t help much if the location and indoor climate aren’t right. The peace lily prefers bright, indirect light. Direct sun can scorch the leaves, while gloomy corners reduce flowering.
A good spot is:
- near a window, but out of direct midday sun,
- with temperatures between 18–24 °C,
- away from draughts and not right next to constantly hot radiators.
The plant also appreciates slightly higher humidity. In very dry homes, one simple trick helps: set the pot on a saucer filled with damp clay pebbles, so the root ball isn’t sitting in water, but the evaporating moisture improves the air around the peace lily.
Misting the leaves - yes or no?
Many people swear by misting the leaves with low-limescale water, especially on hot days. That can genuinely help, as long as the mist is fine and the leaves dry again quickly. If droplets sit on the leaves for long periods, spots can form more easily.
Typical mistakes - and how to avoid them
If you stick to the straightforward watering approach, you’ve already done the biggest part. A few other common pitfalls are easy to sidestep:
- The wrong compost: very dense, heavy compost holds water and encourages stagnation. Better are loose, structurally stable mixes that retain moisture but still let air reach the roots.
- No drainage hole: a decorative outer pot without drainage is an open invitation to waterlogging. A pot with a hole plus a saucer is safer.
- A cold position: below 16 °C the peace lily becomes sluggish. Cold draughts at a window can cause problems too.
- A permanently wet saucer: water left in the saucer for hours leads to rotting roots - always empty it.
If you also add a weakly dosed green-plant fertiliser to the watering water every few weeks, you can further support flowering. Patience still matters: even under ideal conditions, a peace lily needs time to build strength and set new blooms.
Why this method is ideal for beginners with houseplants
Combining the finger test with watering from below removes the biggest uncertainty in day-to-day care. You don’t need to measure exact millilitres, and you don’t need an app pinging you about watering days. The plant and the compost provide the signal themselves.
For anyone who hasn’t had much luck with houseplants so far, this routine is well worth trying. A peace lily still forgives more than many fussier species - but it responds clearly once water and light are properly balanced. Anyone who experiences the shift from plain green foliage to recurring white spathes usually sticks with this simple method.


Comments
No comments yet. Be the first to comment!
Leave a Comment