The leaves looked flawless that morning.
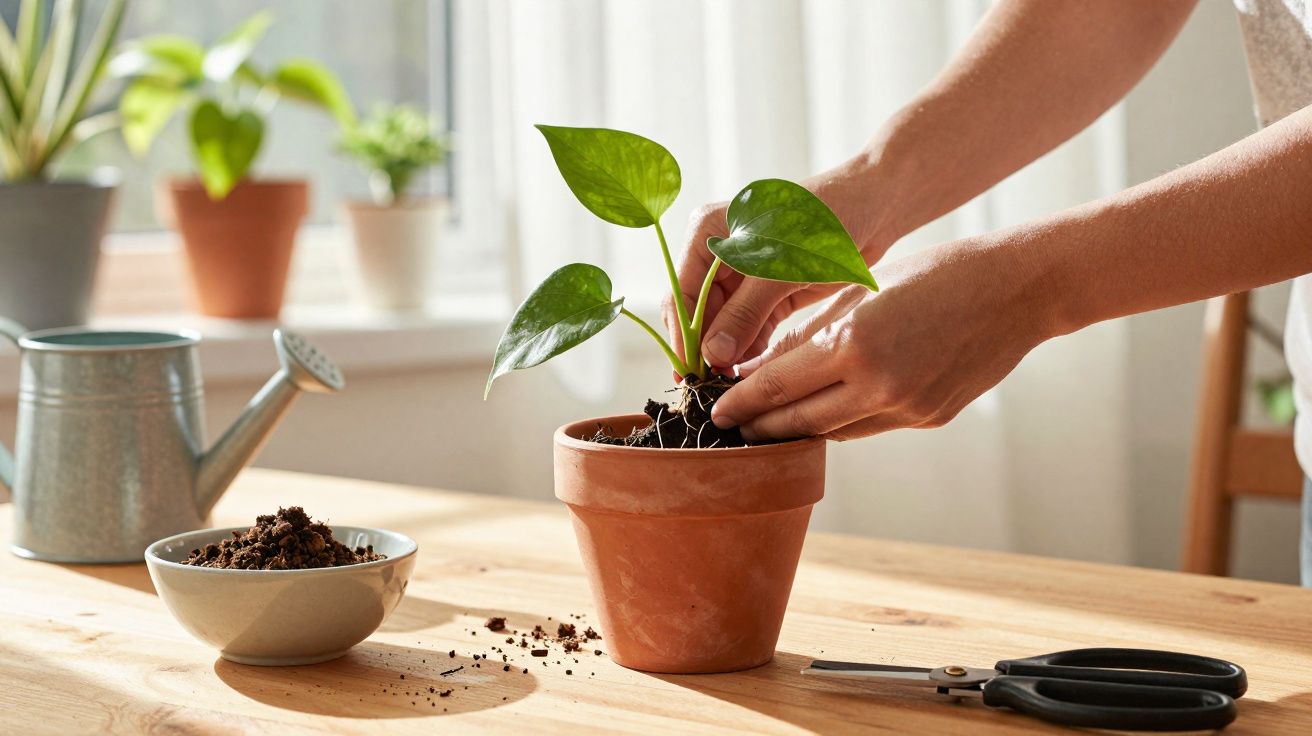
Shiny, upright, almost self-satisfied in that way only a healthy houseplant can manage. You’d chosen a new terracotta pot, ripped open a fresh bag of compost, and eased the root ball out just like the tutorials promise. A quick neaten of the roots, a light firming-in of soil, then a generous first watering. Finished, you tell yourself. A clean slate.
Forty-eight hours later, everything feels different. The leaves droop like damp washing. The compost sits dark and sodden-looking. The plant that used to welcome you at breakfast now slumps off to one side, as if it’s having second thoughts about the whole arrangement. You run through your steps again and again, trying to spot the mistake.
Your thoughts jump to pests, dodgy compost, maybe even a curse. Friends just shrug: “Oh yeah, plants sulk after repotting.” But why do some bounce back better than ever while others never really return? The real explanation is usually in the place you barely see: beneath the surface.
Why your plant looks “dramatic” after repotting
Repotting rewrites a plant’s world in a single afternoon. The angle of light changes, roots lose their familiar air gaps, water moves through the pot differently, and the soil’s microbial community is suddenly unfamiliar. For you it’s an easy weekend job; for the plant it’s like moving house, starting a new job and swapping your mattress on the same day.
Most houseplants don’t truly “hate” being repotted. What they struggle with is the shock. Roots that were snug and predictable are now sitting in a wider, wetter universe of fresh compost. Water clings in new ways. Oxygen reaches the root zone differently. The plant has to spend energy adapting to this new baseline instead of pushing out fresh leaves.
From a botanical point of view, the usual causes of post-repot misery boil down to three issues: root damage, a pot that’s too large, or a sudden shift in moisture and oxygen around the roots. Fine feeder roots are astonishingly delicate. Even a well-intentioned “root massage” can snap hundreds almost instantly. When those go, the plant’s ability to take up water and nutrients drops sharply. Add a larger pot that holds more water and often less air, and roots can end up in a low-oxygen environment. That’s when rot organisms take advantage, and the foliage shows the strain.
Online, there are endless posts about “sad plants after repotting”. A shop owner in London told me that almost half the complaints he hears from new plant parents involve drooping within a week of changing pots. One woman carried in a peace lily that had gone from thriving to limp in four days. She assumed it was diseased. In fact, she’d taken it out of a tight plastic nursery pot and put it into an enormous decorative one “so it has room to grow”. The roots were effectively sitting in a pool of wet compost.
It’s a familiar sequence. At first, the plant still looks fine because the compost is damp and the leaves are holding plenty of water. Then, after a short lag, the root system begins to falter. In an oversized pot, moisture hangs around far longer than young roots can cope with. A few roots rot, then more follow. Lower leaves turn yellow first, tips crisp to brown, and the whole plant seems to deflate in slow motion.
How to repot houseplants without breaking your plant’s spirit
The gentlest repotting method is, frankly, a bit unglamorous. Choose a pot only one size larger-typically 2–3 cm wider than the current one, not a massive upgrade. Insist on a drainage hole; without it, it’s decoration rather than a working pot. Put a shallow layer of your potting mix in the bottom, then ease the plant out by tipping the old pot and supporting the stem-never pulling.
Try to keep the root ball largely as it is. Shake off only the loosest compost; don’t hack at the roots like you’re carving a Sunday roast. Position the plant so the previous soil line sits at the same height in the new pot. Fill around it and settle the mix by gently tapping the pot’s sides rather than packing it down hard. You’re aiming for small air spaces, not a compressed brick.
Once you’ve repotted, water slowly a single time until water runs out of the bottom-then pause. Give the plant time to recover before you add more moisture. Put it back where it was already doing well, rather than “treating” it to a totally new spot by a bright window. Familiar light and steady temperatures support recovery. Think of it as changing the building but keeping the same postcode.
In practice, the biggest problems often come from good intentions. People repot too frequently, pick pots that are wildly too big, or swap to a rich, water-retentive compost because it “must be good”. And plants that look stressed, thirsty or pale are often repotted to “save” them-when they’re actually too fragile to handle extra upheaval.
We’ve all done the same thing: a plant looks a bit tired, and the instinct is to give it everything at once-new pot, new compost, more water, a new place by the window. From your side of the pot, it feels like care. From the plant’s side, it’s a cascade of disruption: different light, different microbes, new moisture patterns, altered airflow. Any one change might be manageable; all together, it becomes a stress test.
Let’s be honest: hardly anyone does this with laboratory precision every time. Most people aren’t routinely checking root colour, tailoring substrates to each species, or measuring every pot-size increase. We grab half an hour on a Sunday, spread a plastic bag across the kitchen floor, and hope it works out. That’s exactly why a few simple guardrails help. Repot only when roots are tightly circling or when water runs straight through. Keep the light consistent. Go easy on watering at first. Change one thing at a time.
“The best repot is the one your plant barely notices,” says an indoor grower I met in Manchester. “If it looks exactly the same a week later, you’ve done it right.”
There’s a quiet strength in working like that. Instead of chasing instant “after” photos, you’re thinking in months. You’re watching leaves over weeks rather than hours. You’re respecting the delay between what the roots experience and what the foliage eventually reveals. The plant isn’t a project; it’s a slow conversation.
Keep a handful of quick checkpoints in mind whenever you repot:
- Choose a pot one size up, with drainage, not a giant leap
- Use a well-draining mix adapted to your plant type
- Disturb roots as little as possible; avoid aggressive teasing
- Water once deeply, then let the mix partly dry
- Put the plant back in the same spot for at least 2–3 weeks
Letting your houseplants recover – and reading their signals
Once the compost has settled and you’ve cleaned up, the real work happens out of sight. Your plant is repairing tiny root tips, rebuilding connections and rebalancing how much water it draws upwards. In this stage, doing less is surprisingly effective. Fight the urge to keep prodding, turning, feeding or “fixing” things. Consistency is its own kind of treatment.
Plan for a small wobble. One or two leaves may yellow. Some plants-fiddle-leaf figs and calatheas, for instance-respond to any disturbance like drama queens. That doesn’t automatically mean you’ve failed. Look instead for quieter indicators: a stem that stays firm, leaves that still feel full rather than papery, and new growth points that remain green instead of drying out. Those details usually mean the roots are steadily recovering.
When you begin to view repotting as cooperation rather than a rescue mission, everything feels less tense. You stop blaming yourself for every floppy leaf and start noticing patterns. That peace lily that collapsed? Perhaps the pot was too big, not your care “skills”. The monstera that took off? Maybe you left the roots mostly alone. These small lessons add up over time until you realise you’re not simply “bad with plants”. You were missing the script written in the root zone.
Plants move at their own speed. Repotting can test your patience as much as your gardening ability. And yet, when a delicate plant you nearly wrote off finally pushes a new leaf into that fresh compost, the whole narrative changes. That small green curl is a reminder that stress isn’t always catastrophe. Sometimes it’s the beginning of a stronger, deeper root system you’ll never actually see-but your plant will depend on for years.
In a culture that loves instant transformations and flawless before-and-after shots, there’s something quietly radical about letting repotted plants recover slowly, out of the spotlight. Telling the fuller story-the droop, the doubt, the waiting, the recovery-may be more helpful to other plant owners than another perfect photo. And the next time you hold a pot in one hand and a root ball in the other, you’ll understand what truly matters: not just the new container, but how gently you manage the shock in between.
| Key point | Detail | Why it matters to the reader |
|---|---|---|
| Choose the right pot size | Move up by one size only, with a drainage hole | Reduces the risk of root rot and water stress |
| Minimise root stress | Remove only loose compost; avoid snapping fine feeder roots | Helps the plant recover faster after repotting |
| Keep the environment stable | Maintain the same light levels and water moderately at first | Lowers overall shock and “dramatic” leaf reactions |
FAQ:
- How long will my plant look sad after repotting? Most plants perk up within 1–3 weeks. A brief droop or a few yellow leaves is normal while roots adjust.
- Did I kill my plant by choosing a pot that’s too big? Not automatically. Let the soil dry more between waterings and watch the new growth. If stems stay firm, it might still recover.
- Should I fertilise right after repotting? No. Fresh compost already contains nutrients. Wait 4–6 weeks before feeding to avoid burning stressed roots.
- Can I repot a plant that’s already struggling? Only if it’s root-bound or sitting in clearly bad soil. Otherwise, improve light and watering first, then repot once it’s slightly stronger.
- Is root pruning always bad? Light trimming for very root-bound plants can help, but aggressive root cutting adds a lot of stress. Keep it minimal unless you know the species tolerates it well.


Comments
No comments yet. Be the first to comment!
Leave a Comment