Staying off the pressure washer and steering clear of harsh chemicals, one British DIY professional relies on a surprisingly straightforward blend: two inexpensive cupboard staples, a stiff brush - and a bit of patience. The payoff is a patio that looks newly laid, without damaging joints or nearby flower beds.
Why your patio looks so bad after winter
After months of rain, frost and limited sunshine, concrete slabs, block paving and natural stone surfaces build up algae, moss, lichen and everyday grime. Weeds take hold in the joints, while rust marks can form around garden furniture and brownish staining may appear from wood tannins.
Many people automatically reach for three familiar options: a pressure washer, chlorine-based cleaner, or “home remedies” involving strong acids. It can look effective at first, but it often creates fresh issues:
- Pressure washers roughen the surface and wash jointing material out.
- Aggressive cleaners can attack mortar and certain types of stone.
- Acidic products may discolour natural stone and upset the soil balance in nearby beds.
Especially in small gardens where the patio, lawn and borders sit close together, run-off from cleaning quickly seeps into the ground - with knock-on effects for micro-organisms, earthworms and plants.
The good news: for the vast majority of patios, two simple household staples, water and a brush are more than enough.
Why it’s better to avoid vinegar
Vinegar is often treated as a “natural” all-purpose household fix. On stone, however, it’s only suitable in limited situations. Acetic acid can etch certain natural stones, leave dull patches and, in the worst cases, damage fine surface detail. Concrete slabs can also suffer over time - particularly if the surface is treated repeatedly.
There’s another problem: the acid seeps into joints, into adjacent borders and onto the lawn. The micro-organisms that keep soil healthy do not cope well with that. Nutrient cycles and soil life can be disrupted - and the harm is not always immediately obvious.
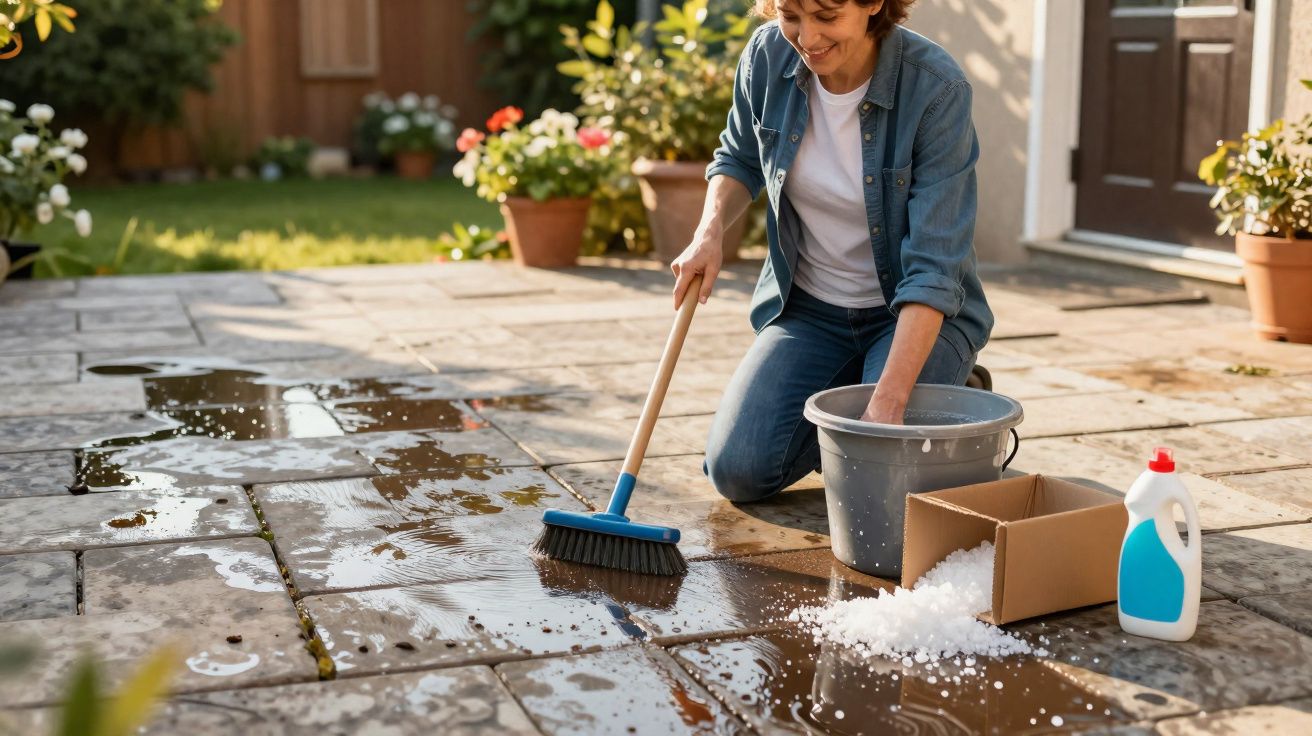
The two simple products for a clean patio (Fix it with Fowlers)
The British DIY channel “Fix it with Fowlers” uses a far gentler mix:
- Soda crystals (washing soda)
- Ordinary washing-up liquid
What soda crystals actually do
Many people know washing soda from laundry care. It’s an alkaline salt that breaks down grease, loosens organic dirt and lifts films from hard surfaces. Unlike highly caustic sodium hydroxide (also known as “caustic soda”), washing soda is much milder and, with a few basic precautions, safer to use around the home.
Common effects on patios include:
- Algae and green staining release from the stone more readily.
- Greasy, dark deposits (for example, barbecue fat) scrub away more easily.
- General dirt and road film soften and then rinse away with water.
Why washing-up liquid works well alongside it
Washing-up liquid adds surfactants - ingredients that surround grease and grime and keep it suspended in water. That’s particularly useful after barbecues, heavy candle wax use or when road dirt has been tracked in. A basic, colourless washing-up liquid without chlorine or bleaching additives is perfectly adequate.
Soda crystals loosen the dirt; washing-up liquid carries it away with the water - a simple but highly effective combination.
Step-by-step: how the two-product method works
1. Prepare the patio
- Sweep away loose leaves, soil and twigs thoroughly.
- Remove weeds from joints with a joint scraper or a narrow scraper.
- Dampen the patio well with a garden hose. The surface should be wet, not flooded.
2. Apply the cleaning mix
Now use the two products:
- Sprinkle soda crystals lightly over the wet surface - don’t coat it heavily; use a modest amount.
- Add washing-up liquid in small amounts; a few lines or drops across the area are enough.
If you prefer working from a bucket, you can also mix a solution: dissolve a few tablespoons of soda crystals in a bucket of hot water, add a squirt of washing-up liquid, stir well, and apply with a stiff yard brush.
3. Work it in with a brush
Use a hard scrubbing brush or a yard broom with firm bristles to scrub the mixture into the surface, tackling the patio in small sections:
- Work from the outer edge towards the centre, or away from the house wall, so dirty liquid doesn’t keep running back over cleaned areas.
- Spend extra time on heavily marked spots - such as rust staining - and scrub in circles.
- Don’t neglect the joints, as algae and lichen often cling there.
4. Leave it to work - and be patient
Rather than rinsing straight away, the DIY professional lets the mixture do the heavy lifting: the surface is left for up to two days. Rain isn’t ideal, although a light shower usually won’t matter as long as the solution isn’t completely washed away.
You’ll often notice changes after about a day: deposits turn greyish, dry out and lift more easily. Once the dwell time is up, rinse again with the garden hose - or, if the area slopes slightly, use a bucket of clean water poured out slowly.
The longer the mixture is left, the more thoroughly it lifts old build-up - without noise and without damaging the surface.
Safety, common mistakes and differences between materials
How to protect your home and garden
- Keep children and pets off the area while the solution is working.
- Rinse thoroughly afterwards so no puddles of concentrated solution remain.
- If you have delicate border plants along the edge, lightly water them first if needed, so roots are less likely to come into contact with concentrated alkaline run-off.
For very pale or sensitive natural stones such as limestone, sandstone or travertine, test first in an inconspicuous corner. Leave it briefly, rinse, and check that both colour and surface finish remain unchanged.
What you should avoid doing
A few “quick fixes” can cause longer-term problems:
- Chlorine cleaners and strong solvents may create pale patches and make joints crumble.
- Wire brushes and abrasive pads scratch the surface - which can make dirt stick even more in future.
- Too much pressure-washer force washes out joints and chips edges, particularly on older patios.
Keeping the patio cleaner for longer
A simple in-season routine
If you adjust a few small habits, you won’t need to repeat a full deep clean as often:
- Sweep the surface every one to two weeks to stop a damp film of leaves and soil building up.
- Use saucers under plant pots and avoid standing water, which helps prevent dark rings.
- Deal with barbecue and grease marks promptly using a little washing-up liquid and warm water.
Before winter, it’s worth doing a lighter repeat of the two-product method. That way, the patio comes into spring in much better condition - without thick green growth.
Extra tips for different patio surfaces
Concrete slabs and block paving
This approach usually works without fuss on these surfaces. Their texture holds the solution well, and grime tends to brush out fairly easily. The main caution is with very old, crumbling joints, where you should work gently so too much material isn’t washed away.
Natural stone and premium finishes
More delicate stones can react differently to alkaline cleaners. A quick test is essential. If the surface becomes dull or the colour shifts, move to a weaker mix or switch to a stone-care product specifically approved for that material.
If you’ve invested in an expensive natural stone patio, you may also want to consider adding an impregnating sealer. It helps prevent stains from soaking in and makes future cleaning with mild products easier.
This keeps the patio looking smart for longer, without firing up a noisy pressure washer every spring or handling harsh chemicals - in many cases, two simple products and a little time are all that’s needed.


Comments
No comments yet. Be the first to comment!
Leave a Comment