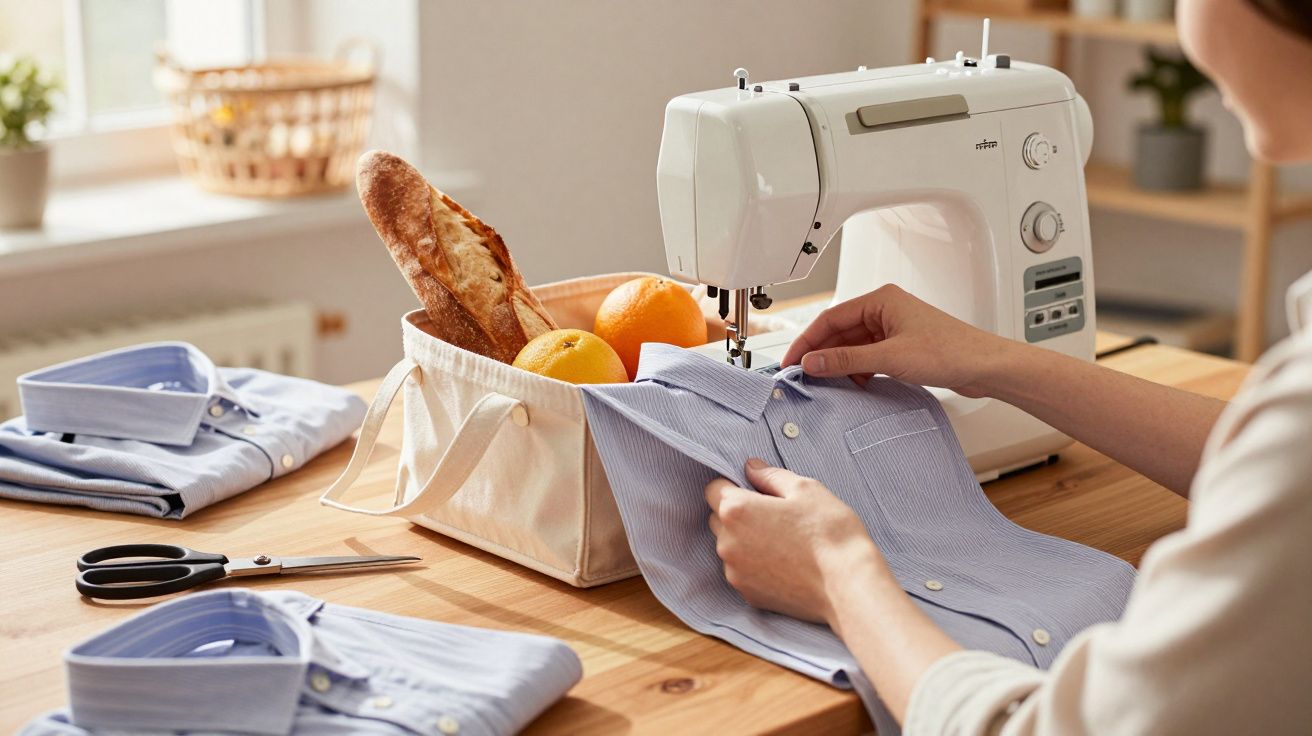
Discarded men’s shirts pile up in the wardrobe, while pricey “eco” shopping bags tempt you at the supermarket checkout.
A simple sewing trick can bring the two together neatly.
If you shop regularly, you’ll know the routine: flimsy paper bags that buckle, plastic carriers that split, and yet another reusable tote that costs more than it should. At the same time, shirts sit unworn because the collar is frayed, the cuffs are worn through, or a few buttons have gone missing. Rather than binning them, you can turn a single shirt into a surprisingly sturdy shopping bag in about an hour-practical, low-cost, and far more sustainable than an impulse purchase at the till.
Why old men’s shirts are far too good for the bin
Men’s shirts are often treated as disposable fashion, yet they’re built to work hard. Most are made from tightly woven cotton-often poplin or fine fil-à-fil fabric-designed to cope with day-to-day wear at work, commuting, and travelling.
A worn-out shirt can become a robust shopping bag in roughly an hour-without buying extra materials and without spending more money.
There’s also the environmental angle. Each person throws away several kilograms of textiles every year. Extending the life of a shirt reduces household waste and lowers demand for new products. And because well-made shopping bags have become noticeably more expensive, a DIY alternative helps your budget too.
Men’s shirt upcycling: how tough shirt fabric really is
The strongest argument for upcycling a shirt is durability. Firm cotton shirting can carry far more than you’d assume at first glance. Jars of jam, bags of flour, wine bottles-your finished bag will handle them comfortably as long as your seams are secure.
Larger sizes are especially handy. An XL shirt typically provides enough material for a roomy tote bag. Even if the collar and cuffs are beyond saving, the front and back panels are often still in good condition-and those become the main body of your bag.
- Poplin: tightly woven cotton, highly tear-resistant, excellent for heavier groceries
- Fine cotton shirting: lighter in feel but strong enough for fruit, vegetables, and bread
- Lightweight blends: ideal for “lighter-duty” bags, such as for the pool, day-to-day errands, or spare storage
Step-by-step: turn a shirt into a sturdy tote bag
A basic home sewing machine is enough. Confident sewists can finish this in around an hour; beginners may want to allow a little longer. Either way, the method is straightforward.
1) Preparation: choosing the right shirt
Pick a loose-fitting men’s shirt made from a firm fabric. Small marks or a slightly yellowed collar usually don’t matter, because those sections are often removed. What does matter: the main fabric should be free from large tears or areas that have gone thin.
- Button the shirt up and smooth it flat on a table.
- Check the sleeves along their length-these will become your handles, so they need to be sound.
- Note any chest pocket: it can be kept as an external extra compartment.
2) Cutting: reshape the shirt into a bag
First, you’ll give the shirt a new outline:
- Cut off both sleeves right at the shoulder seams.
- Remove the collar (including the collar stand), then cut a straight line just below to create a clean opening.
- Neat edges make sewing easier and give a more professional finish.
That new opening becomes the bag’s top. Keeping the button placket visible adds a relaxed look and makes the finished tote bag feel intentionally “designed”, not improvised.
3) Sewing: turning the shirt body into a shopping bag
Now it’s time for the machine. Use a straight stitch for strength and a zigzag stitch (or overcasting) to prevent fraying.
- Turn the shirt inside out so the inner side faces outward.
- Align the bottom edges and pin them in place.
- Stitch the entire bottom edge with a straight stitch.
- Add a zigzag stitch alongside the seam to secure the raw edge.
If you want sturdier corners, box them: pinch each lower corner into a small triangle and stitch across it. This creates a flatter base so bottles and jars sit more securely.
4) Handles from the sleeves (no extra fabric needed)
You don’t need to buy anything for the straps-the sleeves provide plenty of material:
- Cut a strip around 10 centimetres wide from each sleeve.
- Fold each strip lengthways, right sides together.
- Stitch along the long edge, then turn the tube right side out.
- For extra strength, topstitch close to the edge.
Attach the finished handles to the top edge at two points on the front and two on the back so the weight is balanced.
Set the handles wide enough to carry the bag by hand or comfortably over your shoulder.
Finally, inspect every stress point-especially the base seam and where the handles are attached. If any area looks slightly wavy or feels thin, add a second line of stitching for reinforcement.
The chest pocket “secret” compartment: make the most of small extras
One of the nicest details is the original chest pocket, which becomes a handy place for items that would otherwise get lost at the bottom.
- Shopping list or small notepad
- Trolley token or a coin
- Keys or a travel card
If you want to personalise the bag, add simple touches such as a stitched initial, a small patch, or a recovered name label. These details are also a great way to get children interested-and they’re often much more willing to carry something they helped customise.
What you’ll save-money and waste
A well-made reusable shopping bag can easily cost £15–£30 in shops. If you need several for the market or a weekly big shop, the total adds up quickly. Each tote bag made from an old men’s shirt avoids that spend.
| Number of shirts | Number of bags | Estimated saving |
|---|---|---|
| 1 shirt | 1 bag | £15–£30 |
| 3 shirts | 3 bags | £45–£90 |
| 5 shirts | 5 bags | £75–£150 |
At the same time, you’ll rely less on paper bags and plastic carriers. Over years-especially for households doing multiple shops per week-that reduction becomes significant. Rescue a few shirts from the wardrobe, and you quietly build a dependable stock of reusable shopping bags.
Practical tips for a longer-lasting result
A few small decisions make a big difference to how your bag performs:
- Go large: XL shirts give the most volume and are ideal for a weekly shop.
- Choose darker fabrics: they disguise scuffs and food marks better-useful for vegetables and bread.
- Secure the button placket: if you want extra stability, topstitch along the placket to keep layers from shifting.
- Test washability: wash the finished bag once before carrying heavy loads, so any shrinkage happens early.
It also helps to sew a small “set” of bags for different jobs: one for jars and tins, one for fruit and veg, and one for bakery items. Your shopping stays organised and nothing gets crushed.
Extra upgrade (optional): strengthen the handles for heavy groceries
If you regularly carry heavier items, reinforce the handle attachments with a simple box-and-cross stitch (a rectangle with an X inside) where each strap meets the bag. Using slightly thicker thread or a denim needle can also help on dense cotton, particularly when sewing through multiple layers at the top edge.
Upcycling as a gateway to more sustainable habits
Once you’ve experienced how a supposedly useless garment can become something genuinely useful, you start viewing your wardrobe differently. Old jeans, T-shirts, and even worn bedding can be repurposed with similar techniques-into produce bags, a bread bag, or a shoe bag for travel.
Your sewing skills also improve with every project. Minor imperfections are part of the appeal: a seam that’s not perfectly straight, one handle a touch shorter than the other. None of that affects function-if anything, it proves the bag was made at home, not mass-produced.
If you have children, involve them in the easier stages, such as pinning (with supervision) or marking where to cut the sleeves. A shirt nobody wanted to wear becomes a shared project-and a shopping bag that will stand out the next time you head to the shops.


Comments
No comments yet. Be the first to comment!
Leave a Comment