The rain stopped ages ago, yet your border still looks like a miniature pond.
Your best tulips are sitting there, right in the water, as though you’d bedded them into a bath. You prod the earth with a trowel, and water immediately seeps up to meet it - and that expensive bag labelled “drainage compost” suddenly feels like money poorly spent.
On a bright afternoon you can almost pretend it never happens. Then the next downpour arrives and the pattern repeats: leaves turning yellow, roots quietly rotting out of sight, and sticky clay welding itself to your boots. On a slope the water bolts away; in dips it lingers. Either way, the soil refuses to behave like the gardening books suggest it should.
Online advice is packed with supposed quick fixes - drilling holes, adding sand, tipping grit into planting holes. A few approaches help a little, plenty do nothing at all, and some actively create new problems. Among the noise, though, there’s one small, slightly untidy habit that changes drainage in a surprisingly lasting way.
The quiet problem under your feet: drainage, pores, and soil structure
You can often feel drainage as you walk. One part of the garden has a springy, forgiving bounce; a few steps away the ground feels as hard as a car park, with rain collecting in dull, silvery puddles.
That difference usually comes down to something you can’t see: how freely water can move through the tiny pore spaces between soil particles.
When those pores are clogged or collapsed, rainfall either sits on the surface or skims off in sheets. Roots are then forced to cling to the thin, airy layer near the top, rarely risking deeper ground. It’s much like trying to raise a tree in a pot with no drainage holes. In dry spells the surface splits and cracks; in wet weather it turns airless and sour. Plants end up stuck on an exhausting cycle of drought stress followed by suffocation.
Soil scientists describe soil structure as if it’s architecture - and that’s a fair comparison. The “bricks” are sand, silt and clay; the “mortar” is organic matter; and the gaps in between are corridors that carry air and water. When we repeatedly tread, dig deeply, and leave bare soil to bake, that structure slumps and compacts.
At that point, water behaves as it does on tarmac: it pools or it runs. What many gardeners miss is that good drainage is not simply “getting rid of water”. Healthy drainage is about slowing water down, letting it soak in, and keeping both moisture and oxygen available to roots. In a living soil, water travels through the profile - it doesn’t just disappear.
Surface mulch for drainage: the organic “sponge” trick (from above, not below)
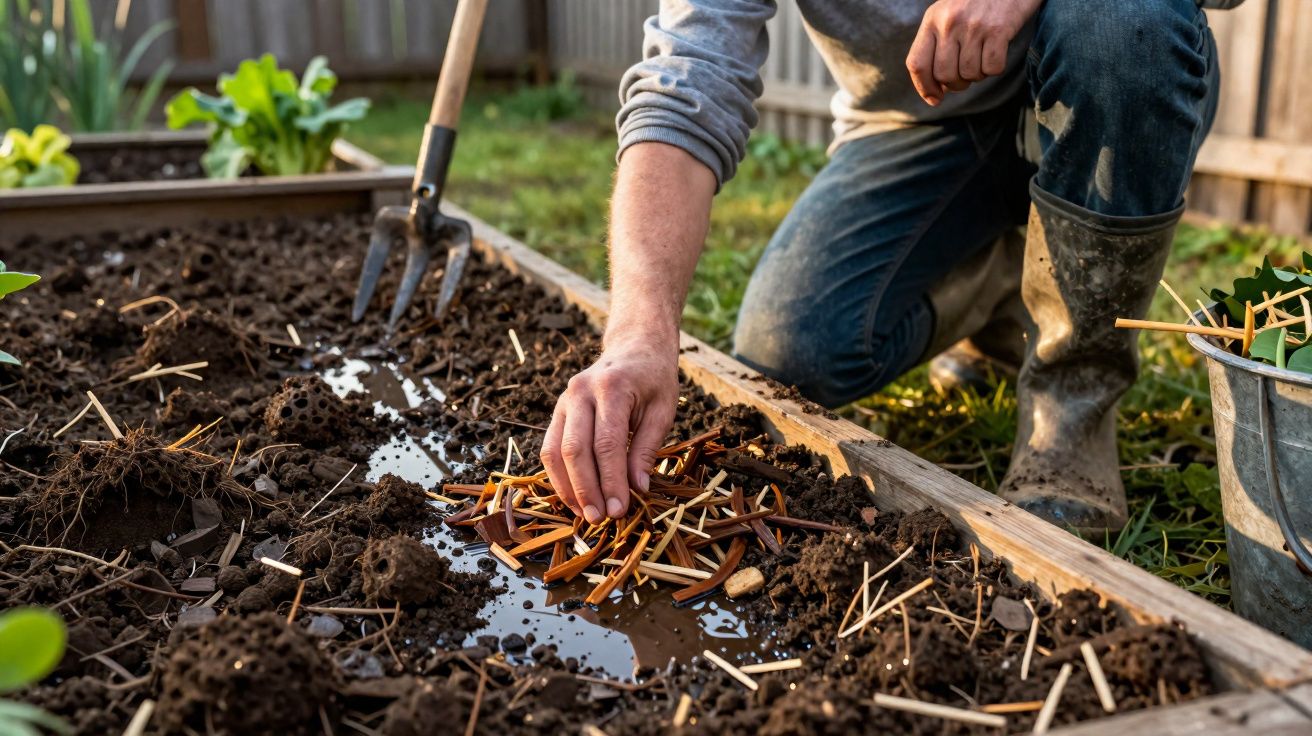
Here’s the move that makes the biggest difference: instead of digging organic matter in, start laying it on top in thick, generous layers.
Think of it as building a soft, slow-working sponge over the soil surface - using compost, leaf mould, shredded prunings, or half-rotted straw as mulch.
Rather than forcing drainage by stabbing holes or burying gravel, you let nature rebuild the soil from the top down. Earthworms tug fragments of mulch underground. Fungi thread through decaying material. Beetles and microscopic life chew, drag and blend. Month by month, this busy, living traffic forms channels that water can actually follow.
A gardener on a suburban street near Bristol kept records on her long-suffering “bog bed” for a full year. She timed how long it took for a full watering can to soak away. In April, the water took around 2 hours to vanish. By November - after changing just one habit - the same volume was gone in under 20 minutes.
The weather hadn’t shifted. The bed received the same rain, held the same plants, and got the same sun. What changed was the level of life in the ground: worm tunnels, crumbs of partly decomposed leaves, and fungal threads stitching through darker, looser soil - the underground “city” you never see in glossy seed catalogues.
A similar test played out on a small city balcony with heavy planting troughs. One trough got the traditional treatment: compost dug in, coarse sand added, plenty of forking. The other was left undisturbed but topped in early spring with a 5 cm blanket of leaf mould and shredded stems.
By late summer, the “improved” trough still puddled after storms. The mulched trough absorbed water steadily, even after days of rain. Its surface stayed open and crumbly - like chocolate cake that never quite dries out. When the containers were tipped out, the difference was obvious: in the mulched trough, roots had travelled further down through soil flecked with organic strands.
The reasoning is almost embarrassingly straightforward. Much old advice tries to “improve drainage” by repeatedly turning soil and mixing in foreign materials. But drainage depends on stable pathways - aggregates, worm channels, and old root runs. Constant disturbance collapses these natural pipes and leaves water with nowhere sensible to go.
Mulching works the other way round. It feeds the top layer gently, encouraging it to crumble into stable, irregular clumps. Those clumps create pores for air and water, while also holding just enough moisture on their surfaces to keep roots supplied between rains.
Over time the boundary between “mulch” and “soil” fades. You stop seeing a distinct layer, and start seeing ground that drains steadily after downpours without turning to concrete in summer. Natural drainage isn’t instant; it’s a quiet shift that builds season by season.
An extra edge that helps: stop compaction before you try to fix drainage
One overlooked detail is how easily we recreate the problem. Working soil when it’s wet, walking repeatedly on the same bed edges, and dragging barrows across borders all squeeze out pore space that mulching is trying to rebuild.
If you can, keep foot traffic to paths, use boards when you need to reach into a border, and avoid digging or cultivating when the soil is saturated. These small habits protect soil structure so the benefits of compost, leaf mould and organic matter last longer.
How to use “slow mulching” to fix soggy beds
Begin with a single difficult bed or border rather than tackling the whole garden at once. Spread 5–8 cm of organic material across the surface, leaving a small clear gap around stems and trunks. Choose something that breaks down gradually: compost, leaf mould, finely shredded bark, or chopped plant debris from your own garden.
Don’t fork it in. Leave it sitting on top like a soft quilt. When rain falls, the mulch cushions the impact so the soil underneath doesn’t get sealed and compacted. As weeks pass, worms and soil life start drawing that material down. You may still see pooling at first, but you’ll notice that water starts soaking away more evenly.
Fight the urge to keep “helping” with a fork. If the mulch mats, loosen it lightly with a rake and then leave it alone. As the layer shrinks, top it up with a thin refresh once or twice a year. Let’s be honest: nobody does this daily. The result comes from steady repetition over years, not flawless effort over a fortnight.
Many gardeners trip up by choosing mulch that’s too coarse or too inert - big bark chunks that sit for ages without feeding the soil below. They can protect the surface, but they don’t always improve drainage. A mix of particle sizes works best, because finer pieces can settle into gaps while larger pieces keep the surface open.
Another common mistake is laying a very thick mulch over already waterlogged, compacted ground and expecting a miracle within a month. If you have standing water, begin by gently aerating the surface with a garden fork - prick the soil without turning it over. Then apply mulch. Think: “air first, food second”.
Clay can test your patience. For a season or two it may still smear and clump, and that’s normal. The longer-term goal is to change the behaviour of the clay so it forms crumbs rather than slabs. On sandy soil, the same method helps in the opposite way: the organic “sponge” holds moisture so it doesn’t race straight through, while still allowing excess water to drain.
“I used to fight my soil with tools,” says Mark, a home gardener who took on a waterlogged plot near Manchester. “When I stopped attacking it and kept feeding the surface, the worms improved my drainage more than I ever did with a spade.”
This approach is part science and part mindset. On a grey, wet afternoon, spreading a fresh layer of mulch can feel like tucking the garden in. You’re not repairing the problem overnight; you’re slowly rewriting how the soil responds each time the weather turns.
- Best materials for drainage-friendly mulching
- Home-made compost, sieved or roughly crumbled
- Leaf mould from last autumn’s pile, even if it’s not fully finished
- Shredded prunings run through a basic garden shredder
- Part-rotted straw or hay, mixed with a little compost
When mulching isn’t the whole story (but still matters)
If your garden floods for days after every storm, you may be dealing with a high water table, blocked land drains, or site grading that funnels run-off into one area. In those situations, surface mulch still improves soil structure and root health, but you may also need practical measures such as shallow swales, raised beds, or redirecting downpipe water away from planting areas.
Letting your soil learn to breathe again
During the next spell of heavy rain, watch what happens on a mulched patch. Water doesn’t hammer and seal the surface in the same way. It lands softly, filters through the organic blanket, and meets soil that is slowly rebuilding its structure. In that moment, drainage looks less like a technical headache and more like a sign of health.
Most gardeners know the sinking feeling of lifting a plant and finding roots curled, brown, and airless. That quiet guilt can linger. Natural drainage won’t prevent every loss, but it shifts the odds. Over time, roots go deeper and plants cope better with both deluges and dry spells - with fewer emergency rescues from you.
The unexpected part is how this habit changes you as well. Fallen leaves start to look like useful raw material rather than a chore. You stop reaching for the spade at the first sign of trouble. And you get comfortable with a surface that’s a little untidy, in exchange for soil that behaves like a living sponge instead of a stubborn slab.
Perhaps that’s the real, quiet revolution: not merely removing puddles, but accepting that healthy drainage comes from collaboration rather than control. Passers-by may only notice greener growth and fewer muddy patches on the path. You’ll know it was built from those patient layers added season after season.
It begins with one bed, one barrow-load of mulch, and one soggy corner you decide to treat differently. In time, the garden feels less like a sequence of crises and more like a long conversation between water, soil, roots - and your small, regular actions at the surface.
| Key point | Details | Why it matters to readers |
|---|---|---|
| Use surface mulch, not buried amendments | Spread 5–8 cm of compost, leaf mould, or shredded plant material on top of the soil instead of digging it in. Refresh lightly once or twice a year. | Cuts hard labour, protects soil structure, and allows worms and microbes to create natural drainage channels without constant intervention. |
| Match mulch type to your soil | Clay soils respond well to rich compost and leaf mould, while sandy soil benefits from denser mulches that hold moisture, such as composted bark mixed with compost. | The right material speeds drainage improvements and helps avoid problems like surface crusting or water running straight through. |
| Observe drainage after heavy rain | Time how long puddles take to disappear and note which areas stay waterlogged. Adjust mulch depth and materials in those spots. | Replaces guesswork with real feedback and makes progress easier to see over months, so you’re more likely to stick with the habit. |
FAQ
How long does it take for mulching to improve drainage?
Many gardeners spot a difference within one growing season, particularly where soil is only moderately compacted. With heavy clay, meaningful change often takes two to three years of regular mulching as worms and roots gradually rebuild soil structure.Will this trick work if my garden floods after every storm?
It can still help, but if water stands for days you may have a bigger issue such as a high water table or poor site grading. In that case, pair mulching with shallow channels, raised beds, or methods to divert run-off away from your plots.Can I use fresh wood chips as mulch to improve drainage?
Fresh chips are excellent on paths and around established shrubs and trees, but they decompose slowly and can temporarily tie up nitrogen near the surface. If you’re mulching close to hungry plants, blend chips with compost or leaf mould.Do I need to remove old mulch before adding a new layer?
Usually not, provided the old mulch isn’t mouldy or compacted into a water-shedding mat. Rake it lightly to open it up, then top up with a thinner fresh layer to keep the surface breathable.Is mulching enough, or should I still aerate the soil?
Where soil is severely compacted, a single, gentle fork aeration can create the first entry points for air, water and soil life. After that, ongoing surface mulching generally maintains and improves drainage without repeated digging.


Comments
No comments yet. Be the first to comment!
Leave a Comment