A surprising helper is hiding in the garden - something many people throw away without a second thought - yet it can save your vegetables and cut your water use.
When you’re getting beds ready in spring, you think about compost, seeds and the watering can - but hardly anyone considers the small plastic caps from the kitchen. These low-profile bits of plastic are, in fact, ideal for making a vegetable garden more resilient to heat, drought and pests. With one simple tweak, what would be rubbish becomes a practical watering set-up - no high-tech kit and no expensive gadgets required.
Why bottle caps suddenly matter in the vegetable garden
In most kitchens, empty water and juice bottles go straight into recycling. The screw cap comes off and is binned or recycled as well. Out on the plot, though, these tough plastic pieces can be put to excellent use. They cope well with weather, barely warp, and will last for several seasons.
"If you collect caps, you’ve already got the most important component for simple, slow watering at home."
In hot summers, young plants quickly suffer when moisture is scarce. Water sprinkled over the surface often evaporates or runs off before it can soak down properly. A controlled flow delivered right where roots sit helps the soil stay damp for longer - and that’s exactly where small plastic caps earn their keep.
The inverted bottle method: a simple system with a big impact
What you’ll need to have ready
To build your own watering system, a small stash of everyday items is enough. You don’t need anything fancy:
- empty bottles (ideally 1.5 litres; 0.5 litres works well for pots)
- matching caps
- a sturdy needle, thin nail or awl
- a lighter or matches to heat the tip
- a craft knife (cutter) or a sharp knife
In just a few minutes, leftover packaging becomes a mini drip irrigation that works right beside your plants and noticeably reduces water consumption.
The make-or-break detail: getting the hole in the cap right
How well this works depends almost entirely on one small detail: the tiny hole in the cap. It controls how quickly - or slowly - water seeps out of the bottle.
Step by step:
- Briefly heat the needle or nail with a lighter.
- Push the tip through the centre of the cap.
- Let the cap cool for a moment.
- Fill the bottle with water and screw the cap on.
- Test over the sink: you’re aiming for roughly one drip every two to three seconds.
If the flow is too strong, the bottle will empty in no time. If nothing comes out, the hole is too small or blocked. In that case, repeat the process and widen the hole just a fraction. You’ll quickly notice how precisely you can regulate the flow rate.
You’ll also need an opening at the base of the bottle. Use the cutter to slice off the bottom neatly, creating a wide opening. Later, this acts as a filling funnel from the top - so you don’t have to pull the whole set-up out of the soil each time.
How to place the watering bottle correctly in the bed
The best position for tomatoes, peppers and similar crops
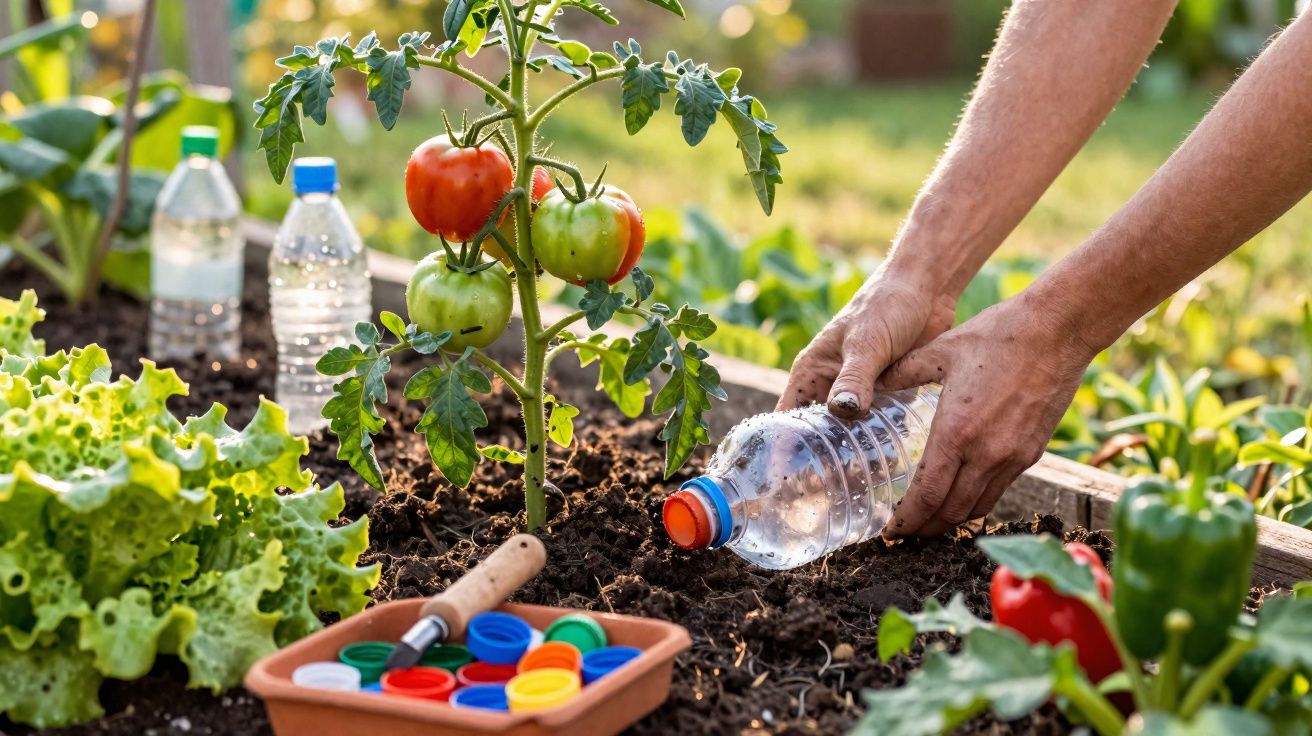
The easiest moment to install it is when you plant out young plants in spring. That way, the bottle can be built into your bed layout from the start.
In a bed or raised bed, do the following:
- mark the planting spot
- dig a hole 10–15 centimetres deep next to the plant
- insert the bottle neck-down so the cap disappears into the soil
- firm the soil all around so it doesn’t wobble
Keep the bottle close enough that roots can grow towards the bottle neck, but not so close that you damage them. A small spade or hand trowel is perfectly sufficient. The key is to work slowly, so you don’t tear young roots.
How often you should top it up
Once the bottle is stable in the ground, day-to-day care becomes surprisingly straightforward. The top opening acts like a built-in funnel, making watering easier. Water goes straight into the bottle with minimal loss, then travels through the hole in the cap into the surrounding soil.
A useful rule of thumb is:
| Season | Top-up guideline |
|---|---|
| Early spring | about once a week |
| Late spring / early summer | every 4–5 days |
| High summer in hot weather | every 2–3 days |
Of course, soil type, location and the crop itself all make a difference. Sandy soils dry out faster than heavy clay. If you’re unsure, simply check the soil regularly with your finger. If it still feels cool and slightly moist 5–10 centimetres down, the system is doing its job.
"Because the water is released slowly, the ground stays evenly moist - without waterlogging or cracked, parched dryness."
Recycling in the bed: more tricks with bottles and caps
Turning small caps into slug traps
Those colourful plastic caps can do more than just help with watering. Used as shallow little dishes, they can become quick, low-effort traps for slugs that love tender lettuce leaves.
Slightly larger caps from milk or juice cartons are particularly handy. Here’s how:
- press the caps into the soil so the rim sits just above the surface
- fill them with leftover beer or a sweet syrup
- place them in the vegetable patch in the evening, especially near lettuces and young plants
The smell draws the slugs in and they end up in the mini traps. That reduces feeding damage without scattering poisonous pellets.
A safer cover for sharp canes and supports
In densely planted beds, stakes are everywhere: bamboo canes, metal rods, trellis supports. Anyone who’s nearly poked an eye while weeding knows how nasty that can be. Simple plastic caps work well as protective end covers.
It’s as straightforward as:
- push a cap onto the end of the cane or rod
- if the support is very smooth, secure it with a bit of tape
- sort by colour to mark rows or varieties
This makes the stakes more visible and far less hazardous. In family gardens with children, or in tight balcony planters, it can significantly reduce the risk of injury.
What changes in the soil when water reaches the roots directly
Stronger plants thanks to steady moisture
After a few weeks of using inverted bottles, changes are easy to spot. Tomatoes, peppers and cucumbers tend to grow more evenly, leaves are less likely to droop quickly, and the soil no longer dries into hard, crusty plates. Roots orient themselves towards the bottle neck and make intensive use of the reliably moist zone.
Another advantage: the leaves stay dry during watering. Many fungal diseases thrive on wet foliage. Because the water is delivered underground, the risk drops noticeably. Tomatoes in particular benefit, showing fewer brown patches or split fruit after heavy rain followed by sunshine.
Less water used, less waste produced
Anyone watching their water meter will quickly see that watering becomes more efficient. Instead of soaking the entire area every day, you can manage with shorter visits to refill the bottles. The drip irrigation happens out of sight, while the surface remains undisturbed.
"With every bottle you reuse, you save money, time and waste - and you ease the burden on local waste services at the same time."
In places where watering bans are common or water prices are rising, that benefit becomes even more appealing. A disposable container turns into a long-lasting part of the garden that can get you through multiple summers.
Practical tips, common pitfalls and smart combinations for bottle-cap drip irrigation
Typical beginner mistakes - and how to avoid them
When starting out with this method, people often run into the same issues:
- Hole too large: the bottle is empty after an hour. Fix: use a new cap and make the hole with a finer tip.
- Hole blocked: in very clay-heavy soils, soil can clog the outlet. Fix: add a small bed of gravel right around the bottle neck.
- Bottle wobbles: bury it deeper or compact the surrounding soil more firmly.
- Too far from the plant: the root zone should be close to the bottle neck; otherwise you’ll mainly be watering weeds.
Especially in the first few days, it’s worth checking. Is it dripping the same way it did in your sink test? Is the soil staying evenly damp without turning soggy? Small tweaks make a big difference.
Which plants benefit most from the method
It works particularly well for crops with high water needs and deeper roots:
- tomatoes, peppers, chilli
- cucumbers and courgettes
- pumpkin, melon
- large herb plants such as basil or rosemary in pots
In containers or balcony boxes, smaller bottles work just as well. Here, 0.5-litre bottles are often enough and are easier to tuck discreetly between plants.
If you like, pair the system with mulch: a thin layer of grass clippings, straw or shredded prunings around the plant helps reduce evaporation even further. That often means a single fill lasts longer, and soil temperature stays more stable.
There’s also a useful learning effect. Over time, many hobby gardeners develop a sharper feel for what their plants need. How quickly does the bottle empty on very hot days? How does your veg respond to longer dry spells? What starts as an improvised DIY fix can become a natural measuring tool for your garden’s water balance.


Comments
No comments yet. Be the first to comment!
Leave a Comment