Don’t throw it away - in 2026, the iconic blue bag from the flat-pack furniture store can become far more than just a carrier for groceries.
That instantly recognisable blue tote has quietly shifted from a simple transport helper into a DIY favourite. The tough material is made for much more than the weekly shop - and if you can manage a bit of sewing, you can save money while ending up with genuinely practical everyday essentials.
Why the blue IKEA bag is a surprisingly high-tech fabric
The well-known carry bag is made entirely from polypropylene - a highly hard-wearing, non-woven plastic. It copes well with water, grime and abrasion, and it can be cleaned with nothing more than a damp cloth. For everyday items that may end up wet, sandy or dirty, it’s an ideal base material.
The carry bag is rated by the manufacturer for loads of up to 25 kilograms - a clear sign of how strong the material is.
Its structure is fairly rigid, holds its shape and doesn’t fray. That makes cutting it out noticeably less stressful than many fabrics you might buy from a haberdashery. Seams still need to be secure, but in most cases you won’t have to finish the raw edges. If you normally worry about fluffy, unraveling edges, this material tends to feel much more forgiving.
There’s another useful bonus: the surface repels water. Toiletries, swimwear, snack boxes or picnic rugs won’t bother it. A quick wipe-down - or a rinse - is often all it takes.
Preparation: turning the carry bag into a sewing project
Before you start on the three main projects, a little prep goes a long way. Ideally, the carry bag should be clean and laid flat so you can cut the material accurately.
- Wash the carry bag in lukewarm water with a little washing-up liquid
- Let it dry completely, ideally hanging up
- Carefully unpick the seams until you have a large, flat sheet
- Mark pattern pieces using a felt-tip pen or ballpoint pen
For a sewing machine, a denim needle in size 90 or 100 works well. A slightly longer straight stitch - around 3 to 4 millimetres - helps avoid punching unnecessary holes through the material. Standard polyester sewing thread is sufficient, as it has a bit of give while remaining strong.
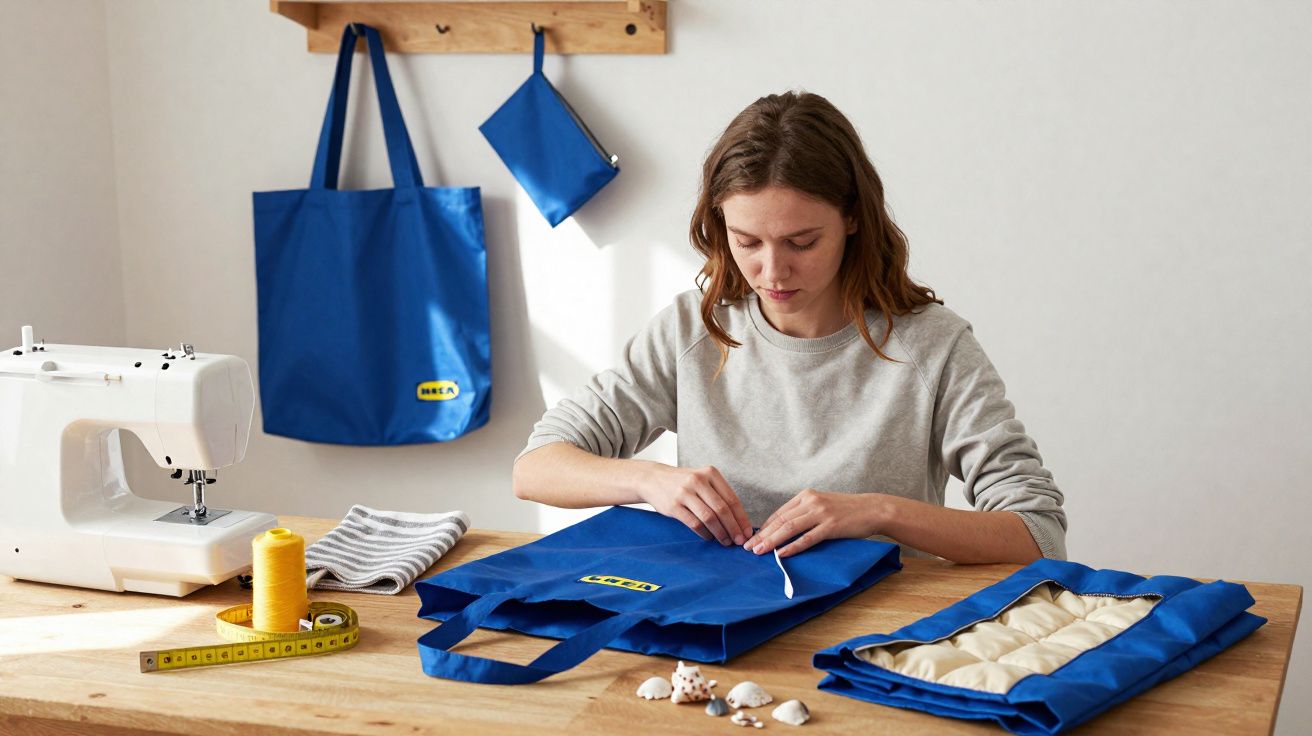
Idea 1: A toiletry bag and wet pouch for the beach
A simple but extremely durable wash bag can be made quickly from a section of the blue panel. Cut a rectangular piece that will form the front and back of the bag.
Fit a zip along the top edge, then close the sides and base with a straight stitch. If you want extra capacity, sew small darts into the corners to create more volume. The water-repellent surface keeps splashes and leaking bottles well under control.
The bag looks more polished if you bind the cut edges with bias tape. If you prefer something bolder, use the trimmed blue handles as edging instead - it creates an industrial look that pairs nicely with a sports bag, rucksack or suitcase.
A handy by-product is a small sleeve for wet swimwear:
- Cut a small rectangle
- Attach a zip along one long side
- Stitch the edges closed and bind the seams with tape
That way, a wet bikini doesn’t end up right next to your phone and book in your beach bag - and everything else stays dry.
Idea 2: An XXL beach bag that shrugs off sand and water
If you spend your time by the lake or the sea, you can turn the carry bag into a seriously large beach tote. Start with the bag itself and, if needed, expand it. You can reinforce the base with a second layer of the same material so towels, drinks and toys don’t sag.
Strengthen the side seams with bold topstitching. It not only improves durability - it also reads like a deliberate design choice. Inside, you can add a large zipped pocket for sunscreen, keys and your wallet. The water-repellent lining protects the contents if a bottle leaks or damp textiles end up inside.
The result is a lightweight, rinse-clean beach bag that you can simply wash under the shower after your holiday and leave to dry.
The handles can be reinforced too by stitching several rows back and forth across the attachment points. If you regularly carry children’s bits, snacks, toys and blankets all at once, you’ll notice the difference immediately. A small amount of extra time at the machine pays off in day-to-day use.
Idea 3: A picnic blanket with a hard shell and a soft core
The third project uses the material as the underside of a picnic blanket. Stitch several panels together into one large rectangle so there’s room for two to four people. On top of this backing, place an old duvet cover or a large sheet to become the soft side.
For more comfort, add a thin layer of padding in between - for example an old fleece blanket or leftovers from a quilt project. Sew all layers together around the edges using a straight stitch or a wide zigzag. The polypropylene side faces down towards the ground and blocks moisture and dirt.
Finish the edge with wide bias binding or strips made from the handles. This not only gives stability but also protects the edges from wear. A stitched-on handle and a fastening strap turn the blanket into a portable bundle that rolls up quickly and takes up very little space in the boot.
Using leftovers wisely: handles, offcuts and small projects
Once you start cutting a carry bag apart, you’ll quickly end up with offcuts on the table. Almost none of it needs to go in the bin. The sturdy handles work well as a key lanyard, as a towel hanger, or as loops in a campervan where you can clip items on with carabiners.
Smaller pieces can become sleeves for an ID card, vaccination record, travel documents or sunglasses. The material also works well as drawer dividers: cut strips, sew them into small boxes, then place them in chests of drawers or a motorhome. The advantage is the wipe-clean surface - crumbs or make-up residue won’t stick around for long.
With simple shapes and straight seams, leftover pieces can turn into a surprising number of small everyday helpers.
Technique tips for relaxed sewing with polypropylene
Because the material doesn’t breathe like cotton, heat can build up under the presser foot. It’s best not to sew long stretches at full speed. Work in shorter runs and pause briefly in between. A Teflon foot - or a piece of tape on the underside of a standard foot - can stop the foot sticking to the surface.
Cut edges can sometimes feel a little scratchy. If that bothers you, bind all outer edges with cotton tape. It makes toiletry bags, totes and sleeves feel nicer in the hand, and it also gives the finish a much cleaner look.
Why upcycling the carry bag fits so well in 2026
Every reused piece saves new material, energy and transport. Instead of ending up in the bin or an incinerator, the carry bag gets a second life as a useful item. Hard-wearing everyday products such as wash bags, beach totes or picnic blankets can be used for years.
That distinctive blue also has high recognition value. Many sewists lean into contrast on purpose: yellow or neon bias binding, black zips, and bold decorative stitching. The results don’t look like a stopgap - they come across as intentional design with a statement.
If you’re still new to sewing, this material can be a reassuring practice surface. Straight shapes, clear seam lines and minimal fraying take the fear out of a first bigger project. More experienced makers can push further: rucksacks, bicycle-basket inserts, laptop sleeves or boot organisation systems are the natural next step.
It gets even more interesting when you combine several carry bags. If you collect different sizes and logos, you can create patchwork effects and build larger panels. That’s how basic transport bags turn into long-lasting, heavy-duty products that stay in use for years - quietly reminding you on every outing that creativity and saving resources work well together.


Comments
No comments yet. Be the first to comment!
Leave a Comment